Omada Provisioning Service
You perform all configuration of Omada Provisioning Service (OPS) in Enterprise Server. Make sure that you have installed the Enterprise Server Integration feature as part of the OPS installation on the server that hosts Enterprise Server.
Installing Provisioning Service package
Before you can configure the Omada Provisioning Service, you must install the Provisioning Service package.
You can do this in Enterprise Server from Setup > Administration > Configuration Management > Installed Packages.
Select the Provisioning Service (OPS) Integration package and click the Import changes in import tool packages (play) icon.
See the installation guide for more information.
The package creates a set of Omada Provisioning Service-specific data object types:
- OPS Connector: an object that describes the configuration of an Omada Provisioning connector, for example the assembly name and the schema for the connector
- OPS Task mapping: an object that describes a mapping configuration. It is used to map incoming data to data that is understood by an Omada Provisioning Service connector.
- OPS Instance: an object that describes the configuration of an Omada Provisioning Service Windows service, for example the relevant hostname and port number.
Connectors
The Connector object describes standard connectors and/or custom connectors. The Connectors view is available under Setup -> Administration -> Connectivity -> Connectors.
The Omada Provisioning Service includes a set of standard connectors. The OPS Connector object contains important information about the unique ID that the connector has, the schema that the connector understands, and the configuration parameters that the connector uses. A connector object has the following properties.
- Name: the name of the connector. The name should be unique.
- Connector ID: the name that the connector assembly code has registered to uniquely identify the connector. This value must be unique.
- Connector data model: the connector data model is a piece of XML that defines the data model the connector supports, including object types, the properties of which the objects consists, and the name and type of the individual properties.
The xml must adhere to the OPSConnectorDataModelML schema. The schema can be found in the C:\Program Files\Omada Identity Suite\Enterprise Server\Website\Schema.
- Connector configuration: Mainly used for hardcoded configuration of the connector.
- Onboarding default: Optional. This field may contain a default configuration which is used when enabling provisioning on a system using this connector. The default configuration contains information on which task mapping object to use for which resource type.
The xml must adhere to the OPSProvisioningConfigurationDefaultML schema. The schema can be found in the *C:\Program Files\Omada Identity Suite\Enterprise Server\Website\Schema folder. This field may contain a default configuration which is used when enabling provisioning on a system using this connector. The default configuration contains information on which task mapping object to use for which resource type.
The xml must adhere to the OPSProvisioningConfigurationDefaultML schema. The schema can be found in the C:\Program Files\Omada Identity Suite\Enterprise Server\Website\Schema folder.
- Onboarding configuration: Optional. This field may contain an XML document which specifies possible configuration options for this connector. The XML is used by the system onboarding page to render possible configuration options.
Omada provided connectors are not using the value of this field.
The xml must adhere to the SystemCategoryConfigurationML schema. The schema can be found in the C:\Program Files\Omada Identity Suite\Enterprise Server\Website\Schema folder.
- IS template: if this field is enabled, the connector is treated as a template for other connectors.
If enabling provisioning and selecting a connector marked as a template, the user will be prompted to specify a name for a new connector which is then based on this template.
- Template: indicates which connector is used as template for this connector. The system is using the Onboarding configuration of the template.
Task mappings
The Task Mappings view is located under Setup > Administration > Connectivity > Task Mappings. A task mappings object has the following properties.
- Name: the name of the mapper. The name should be unique.
- Mapping configuration: the mapping is defined in an XML document in which everything from the operation, object ID, object type and properties are mapped by using a variety of mappers.
Instances
You use the Instances object to configure the Omada Provisioning Service Windows Service itself and to tell Omada Identity Enterprise Server and RoPE where the Omada Provisioning Service is located.
The Instances view is found under Setup > Administration > Connectivity > Instances.
Only one instance of Omada Provisioning Service is supported. You can, however, install and run as many instances as you wish. Nevertheless, the Enterprise Portal and RoPE will always communicate with the instance specified here.
The OPS Instance object has the following properties.
- Name: the name of the instance.
- Server: the fully qualified domain name on the server hosting the Omada Provisioning Service Windows Service.
- Port: the port on which the Omada Provisioning Service WCF services are running. The default port is 8000.
- Allow insecure connections: enable this setting to allow the service to run with no security.
- Use SSL: enable this setting when the OPS service is running using HTTP/SSL.
If you enable the Provisioning Service package, an instance object named Default is created. You must edit the server and port settings before you can continue with other configuration activities.
Customer setting
There is a customer setting related to Omada Provisioning Service in the Enterprise Server database. The customer setting has the key OPSAUTOQUEUE. This setting checks if identities are configured to be included in calculations when OPS send a provisioning claim for them.
By default, the customer setting is set to False.
Provisioning claims web service on-prem
As part of the Enterprise Server Integration feature, a web service is installed. This web service is used by OPS to create provisioning claims for successfully performed jobs.
Manually configure Enterprise Server URL
-
In a text editor, open the Omada Provisioning Service configuration file found at C:\Program Files\Omada Identity Suite\Provisioning Service\Omada.OPS.Service.exe.config in a default installation.
-
Find the client endpoint named OPSWebServiceSoapWindows and change the address attribute to point to the correct URL.
<client>
<endpoint name="OPSWebServiceSoapWindows" address="http://enterpriseserver/webservice/OPSWebService.asmx" binding="basicHttpBinding" bindingConfiguration="OPSWebServiceSoapWindows" contract="OPSWebService.OPSWebServiceSoap"></endpoint>
</client> -
If you use basic authentication, configure the client endpoint named OPSWebServiceSoap, and change the address attribute to point to the correct URL.
<client>
<endpoint name="OPSWebServiceSoap" address="http://enterpriseserver/webservice/OPSWebService.asmx" binding="basicHttpBinding" bindingConfiguration="OPSWebServiceSoap" contract="OPSWebService.OPSWebServiceSoap"></endpoint>
</client>
Set up access
The web service calls are made in context of the service account that is used to run the Windows service named Omada Provisioning Service.
Add this service account as a user in the Enterprise Server.
Use basic authentication
By default, Windows authentication is used to communicate with the OPS Web Service. If you need to use basic authentication instead:
- Open the Omada Provisioning Service configuration file C:\Program Files\Omada Identity Suite\Provisioning Service\Omada.OPS.Service.exe.config in a text editor.
- Find the [addSettings] key named ESUseDefaultCreadentials and change the value to False.
- Find the
[addSettings]key named ESUserName and enter the user name as the value. - Find the [addSettings] key named ESPasswordName and enter the password as the value. You can store the password as encrypted.
Troubleshooting on-prem
Event logging
It is possible to enable logging of Omada Provisioning Service to a file. To do this:
-
Go to C:\Program Files\Omada Identity Suite\Provisioning Service and open the
log4net.configfile for editing. -
Change the content of the log4net.config file to:
<?xml version="1.0" encoding="utf-8" ?> <log4net xmlns="http://csharptest.net/downloads/schema/log4net.xsd"> <appender name="OPSEventLogAppender" type="log4net.Appender.EventLogAppender"> <logName value="Application" /> <applicationName value="Omada Provisioning Service" /> <layout type="log4net.Layout.PatternLayout"> <conversionPattern value="%message [%thread] [%property{NDC}]" /> </layout> </appender> <appender name="OPSRollingFileAppender" type="log4net.Appender.RollingFileAppender"> <file value="Omada.OPS.Service.log" /> <appendToFile value="true" /> <rollingStyle value="Size" /> <maxSizeRollBackups value="5" /> <maximumFileSize value="1000KB" /> <staticLogFileName value="true" /> <layout type="log4net.Layout.PatternLayout"> <conversionPattern value="%date [%thread] %-5level %logger %ndc - %message%newline" /> </layout> </appender> <root> <level value="DEBUG" /> <appender-ref ref="OPSEventLogAppender" /> <appender-ref ref="OPSRollingFileAppender" /> </root> </log4net> -
Save the file.
-
Open the Task Manager and restart the OPS service.
-
Navigate to C:\Program Files\Omada Identity Suite\Provisioning Service. A new file, Omada.OPS.Service.log, will appear in the folder.
Ensure that the user running the OPS service has the "write" permission to the folder C:\Program Files\Omada Identity Suite\Provisioning Service. If this permission has not been added, the Omada.OPS.Service.log file is not created.
Setting up RoPE
You can configure the extension to fail calculations for identities if the connection to the provisioning service fails, and if RoPE should wait to receive conformation that the OPS has received the provisioning task before proceeding with the next calculation.
You can set up the following settings:
- FailHardOnErrors: if you set this setting to True, the RoPE calculation for an identity fails if there is an error while creating an OPS batch. The default setting is False.
<add type="Omada.RoPE.Controller.OISX.Extensions.OPS.ProvisioningServiceExtension, Omada.RoPE.Controller.OISX">

  <settings>

    <add key="FailHardOnErrors" value="true"/>

  </settings>

</add>
OPS extension to RoPE
During the Role and Policy Engine Integration, the provisioning extension is added to the EngineConfiguration.config file. This file is automatically supplied with the line:
<add type="Omada.OPS.Integration.PolicyEngine.ProvisioningServiceExtension, Omada.OPS.Integration.PolicyEngine" />
Remember to verify the content of this file after the installation to ensure that the file contains the correct extension and there are no duplicated entries.
Task mappings
When RoPE calculates new, changed or deleted assignments, a provisioning task is sent to the provisioning service. The task is sent to OPS using a predefined data model, the RoPE model.
As each connector has their own data model, it is necessary to configure how properties in the RoPE model should be mapped to properties in the connector data model.
For this purpose, use task mapping. Mapping can be done using one of the built-in mappers: Constant, SourceField, Expression, or MultiValueExpression. How each of the mappers works is described in the following sections.
The mapping is defined in XML. The following is an example:
xmlns:xsi="http://www.w3.org/2001/XMLSchema-instance">

  <connectorObjectType mappingType="Constant">AdUser</connectorObjectType>

  <mappedObjectType mappingType="Constant">AdUser</mappedObjectType>

  <mappedOperation mappingType="SourceField">Operation</mappedOperation>

  <mappedObjectId mappingType="SourceField">ObjectId</mappedObjectId>

  <fieldMappings>

    <fieldMapping name="employeeId" dataType="stringType" action="remove" mappingType="SourceField">ROPE_AccountName</fieldMapping>

    <fieldMapping name="name" dataType="stringType" action="modify" mappingType="Expression">Operation=="Create" ? ROPE_Identity : null</fieldMapping>

    <fieldMapping name="passwordNeverExpires" dataType="booleanType" action="modify" mappingType="Constant">true</fieldMapping>

  </fieldMappings>

</taskMapping>
The XML must comply with the TaskMappingConfigurationML. The schema file can be found at C:\Program Files\Omada Identity Suite\Enterprise Server 12\website\Schema\ OPSTaskMappingConfigurationML.xsd.
The mapping configuration XML document is comprised by the following XML elements:
- ConnectorObjectType: the name of the target object type that understood by the Connector code.
Example: ADUser for the AD Connector.
For Template Connectors (for example, REST) the ConnectorObjectType is the name of the target object type that is understood by the target system.
Example: now/table/sys_user for a REST connector connecting to ServiceNow.
If not mapped, the value in MappedObjectType is used.
- MappedObjectType: the object name defined in the Data Model for the Connector data object.
Example: SAPUser.
Used when the object name is not the same as the ConnectorObjectType.
Can be used to define several different object types for the same target object type (for example, a Personal and Administrative AD user that both have the target object type ADUser).
- MappedOperation: this mapping can be used to override the operation of the task.
Example: “Operation == "DeleteIfExists" ? "Delete" : Operation” (using the expression mapper type).
For accounts, the default tasks are: create, update, and deleteIfExists.
For assignments, the default tasks are: create, update, and delete.
- MappedObjectId: used to override the unique identifier for the object when the ObjectID is not understood by the target system; or when you want to use different identifiers for different operations.
Example: “string.Format("0@1", ROPE_AccountName, ConnectorConfiguration.GetValue("DomainName"))” (using the expression mapper type)
The ObjectID from RoPE is “[ROPE_AccountName]” for accounts, and “[ROPE_AccountName] – [ROPE_ResourceIdenitifier]” for assignments.
- fieldMappings: a required element. It contains a collection of field mappings that each describes how the OPS Task Mapping must handle the particular property mapping process. At the end of the mapping process, the fieldMapping value is set in the suitable property of the mapped object.
The XML attributes of the fieldMapping XML element are:
- name: a required attribute. The property name supported by the mapped object type.
- datatype: it describes the value type to expect.
- action: an optional attribute. It describes the action (operation) that target connector must take for this property. It can have one of the following values: add, remove, or modify. The default value is “modify”, unless it is for the multivalued property. In such cases, “add” is the default operation.
- multivalued: an optional attribute. It takes a Boolean value. The default value is False. It indicates if the property is a multi-value.
- clearExisting: an optional attribute. You can only use this for multivalued properties. It takes a Boolean value. The default value is False. When it is set to True, the value is added to the particular property, and all existing values are deleted.
- required: an optional attribute. It takes a Boolean value. The default value is False. It determines if the property is required.
- mappingType: required attribute. See the Standard mappers section in the following.
- mapNull: determines if a null value should be provisioned to the target system. If set to True, and a string value is empty in Enterprise Server, the mapped value will be null in the target system. The default value is False.
The ROPE model
The Account object has the following standard properties:
| Name | Type | Description |
|---|---|---|
| ROPE_Key | stringType | The UId of the calculated assignment |
| ROPE_Identity | stringType | The display name of the identity |
| ROPE_AccountName | stringType | The account name |
| ROPE_DistinguisedName | stringType | The distinguished name of the account. The value is only available for calculated assignments with an Actual reason. |
| ROPE_AccountCBK | stringType | The Omada Identity Data Warehouse’s composed business key for the account. |
| ROPE_AccountType | stringType | The account type name. |
| ROPE_AccountTypeId | stringType | The UId of the account type. |
| ROPE_Resource | stringType | The display name of the resource. |
| ROPE_ResourceType | stringType | The name of the resource type of the resource. |
| ROPE_SystemID | stringType | The UId of the system object as a string. |
| ROPE_SystemKey | stringType | The SYSTEMID of the system. |
| ROPE_SystemCBK | stringType | The Omada Identity Data Warehouse’s composed business key for the system. |
| ROPE_Disabled | booleanType | Disable or enable the account. |
| ROPE_ActualAccountName | stringType | The actual account name in the target system. This value can be used to lookup the account in the target system in case of account renaming. |
The Assignment object has the following standard properties:
| Name | Type | Description |
|---|---|---|
| ROPE_Key | stringType | The UId of the calculated assignment. |
| ROPE_System | stringType | The name of the system to which the resource belongs. |
| ROPE_SystemID | stringType | The UId of the system object as a string. |
| ROPE_SystemKey | stringType | The system’s SYSTEMID. |
| ROPE_SystemCBK | stringType | The Omada Identity Data Warehouse’s composed business key for the system. |
| ROPE_AccountCBK | stringType | The Omada Identity Data Warehouse’s composed business key for the account. |
| ROPE_AccountName | stringType | The account name. |
| ROPE_DistinguisedName | stringType | The distinguished name of the account. The value is only available for calculated assignments with an Actual reason. |
| ROPE_ResourceKey | stringType | The ROLEID of the resource. |
| ROPE_ResourceCBK | stringType | The Omada Identity Data Warehouse’s composed business key for the resource. |
| ROPE_ResourceType | stringType | The name of the resource type of the resource. |
| ROPE_ValidFrom | datetimeType | The date/time from when the assignment should start. |
| ROPE_ValidTo | datetimeType | The date/time from when the assignment should end. |
| ROPE_Disabled | booleanType | Shows if the assignment is disabled. |
| ROPE_Accounts | stringType | Multi-value property containing the account name. Usable for systems with the member attribute on the resource. |
| ROPE_Resources | stringType | Multi-value property containing the ROLEID. Usable for systems with the roles attribute on the user. |
Using provisioning relevant attributes
In addition to the standard properties listed above, provisioning relevant attributes from the resource type are also added to the provisioning task.
If the resource type points to a provisioning relevant attribute set with, for example, an attribute named FIRSTNAME, it is added to the account or assignment object with the name ROPE_ATTR_FIRSTNAME. Note the ATTR prefixing and the upper casing of the attribute name.
RoPE calculates provisioning relevant attributes either from properties set on the resource type or from an extension. For more information, see the section on Assignment attributes in the Omada Identity - Role and Policy Engine Guide.
The ‘Constant’ mapper
If you set the value of the mappingType to Constant, the value of the associated XML element is expected to be a constant one.
The ‘SourceField’ mapper
When the value of the mappingType is SourceField, the value of the associated XML element is expected to be the name of a field in the source object type. The value of that field is copied to the target field. This is useful for simple field renaming.
The ‘Expression’ mapper
When the value of the mappingType is Expression, the value of the associated XML element is expected to be an expression, which is evaluated to generate the output value for the target field.
Expressions are written in a C# subset and are evaluated using DynamicExpresso. For more information about this, see Dynamic Expresso.
For example, in the task mapping XML document below, the expression mapper has been used for the target field name.
In this example, if the Operation property value of the incoming object from the RoPE extension is Create, the value of the target property name becomes the value of the incoming object property Create. Otherwise null is set as the value.
<fieldMapping name="name" dataType="stringType" action="modify" mappingType="Expression">Operation=="Create" ? ROPE_Identity :null</fieldMapping>
It is also common to use the C# method string.Format() in the Expression mapper.
In this example, the value of the target property userPrincipalName is the value of the property ROPE_AccountName from the source object, followed by the @megamart.com.
<fieldMapping name="userPrincipalName" dataType="stringType" action="modify" mappingType="Expression">string.Format("{0}@megamart.com", ROPE_AccountName)</fieldMapping>
The ‘MultiValueExpression’ mapper
The MultiValueExpression mapper builds on top of the Expression mapper and has all of the same capabilities.
On top of these capabilities is a set of available multi-value operations and variables.
If you have a multi-value property named, for example members, you can perform expressions for each value that it contains using the operators “:” and “Value”.
In this example, all values in the members property are set to value: @megamart.com.
<fieldMapping name="members" multiValued="true" dataType="stringType" action="modify" mappingType="MultiValueExpression">members:string.Format("{0}@megamart.com", Value)</fieldMapping>
The string splitter mapper
The string splitter mapper is based on the MultiValueExpression mapper sharing the same syntax.
PROPERTY:Value It allows to convert a delimited string into multivalue with each value being included as a part of an expression.
By default the comma is used as a delimiter with the possibility to set different delimiter. It is specified in the mappings.
PROPERTY,delimiter=delimiter:Value Examples
For a comma delimited string containing email addresses mail1@xyz.corp,mail2@xyz.corp, when you use the PROPERTY:Value expression, as a result you receive the mail1@xyz.corp and mail2@xyz.corp values.
For a comma delimited string containing mail1,mail2, when you use the PROPERTY:Value+"@xyz.com" expression, as a result you receive the mail1@xyz.corp and mail2@xyz.corp values.
For a string with multiple values on separate lines:
Example: mail1
mail2
When you use the PROPERTY,delimiter=\r\n:Value+"@xyz.corp" expression, as a result you receive the mail1@xyz.corp and mail2@xyz.corp values.
Expression operators and variables
The following operators and variables are available when using the Expression mapper:
| Operator/variable | Usage |
|---|---|
| ObjectType | Contains the value of the connector object type. |
| ObjectId | Contains the value of the task object ID. |
| Operation | The task operation. The possible values are Create, Update, Delete, CreateOrUpdate, and DeleteIfExists. |
Extensions
The expression mappers have a set of built-in functions, which are meant to ease the job of writing task mappings.
- NameValuePairExtensions. GetAttributeValue: use this function to get a value from a name property containing name value pairs.
Example: If the value for ATTRIBUTES is SIZE=500, you can use the extension to get the value 500.
NameValuePairExtensions.GetAttributeValue
(ATTRIBUTES, “SIZE”)
- Extensions.ArrayContains (Array array, object searchValue): use this function to check if a multi-value property contains a specific value.
- Extensions.ArrayJoin: use the function for multi-value properties to join all values into one string.
The function has the following parameters:
string ArrayJoin(Array array, string separator)
The array is the multivalue property, and separator is the string to use as a separator between the strings.
- Extensions.GetTokenValue (string value, char delimiter, int tokenNumber, string defaultValue): use this function to extract a portion of a string. The function splits the string by the delimiter and then fetches the token value indicated by its placement.
Example: An account name is provided like this domain\accountname, but you are only interested in the accountname. In this case, use the function like this:
Extensions.GetTokenValue(PROPERTY, ‘\’, 2, “”)
- Extensions.GetSidFromCBK (string composedBusinessKey): this function creates an Active Directory object-sid from a Data Warehouse-composed businesskey.
Using connector configuration values in task mappings
In some cases, you may want to use system-defined variables in your task mappings. You can do this by specifying these variables as a connector configuration parameter. You can specify the configuration parameters during the system onboarding process when you enable provisioning.
You can find the values of these settings in the task mappings using the Expression mapper.
To retrieve the value, use the function
ConnectorConfiguration.GetValue("connector setting name")
Under connector setting name, you should just enter the name of the connector setting.
Resource Lifecycle Management
OPS provides a simple way of creating, updating and removing resources in target systems. Add a mapping in provisioning configuration for the relevant system on the resource data objects in Enterprise Server.
Logical key
In System onboarding, the logical key or ODWLOGICKEY is a configurable key that can be used to match resource objects.
This logical key works across components and is therefore relevant for OPS, ODW, and ES.
Creating resources in Active Directory is the primary system where Resource Lifecycle Management (RLM) is used. In RLM, a resource is first created in ES and then in the target system through the OPS or MIM.
Furthermore, when the resource is imported and subsequently exported, the ODWLOGICKEY helps to ensure that the resources are linked to each other as they represent the same object in the target system.
Import configuration
The fields used as the logical key must be configured for each system where you wish to create new resources
- For Active Directory, the logical key is configured in System definition -> Advanced settings.

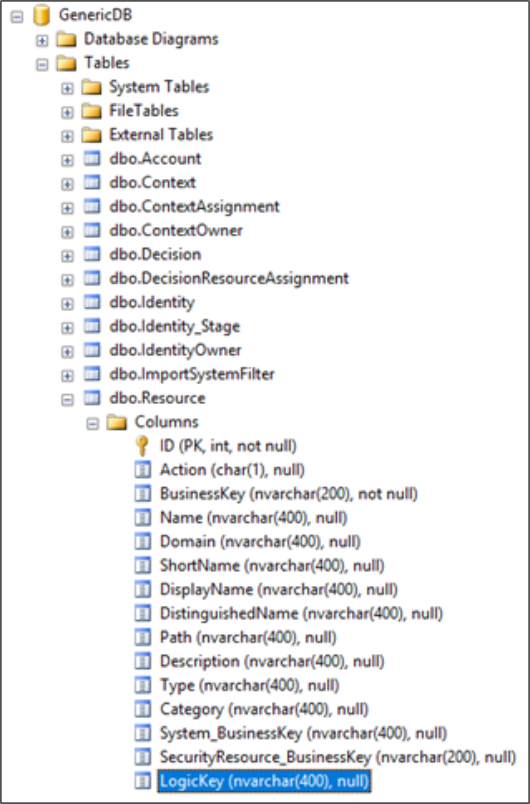
- For generic database systems, the LogicKey column must be added in the Resource table.
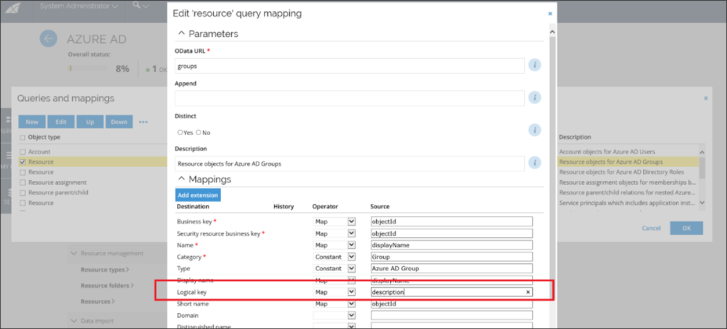
- For the systems supporting Queries and mappings, the mapping must be made from the target system to the Logical Key destination field.
Provisioning configuration
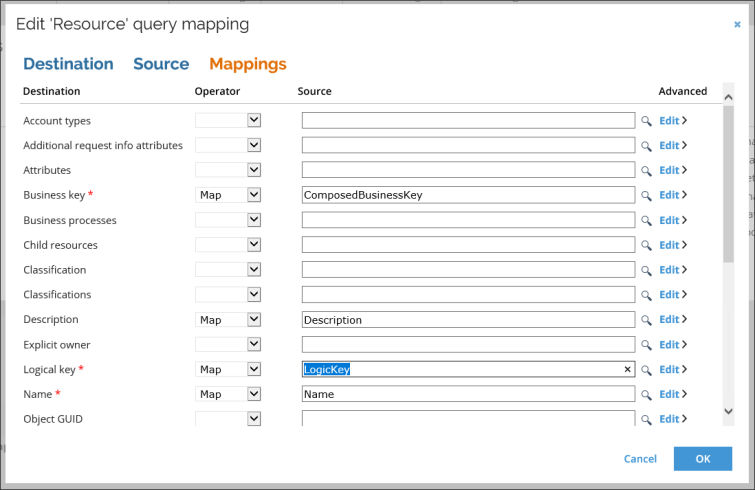
When setting up your task make sure that a mapping between RLM_ODWLOGICKEY and the field in the target system chosen when configuring the import is configured.
Warehouse to portal configuration
To ensure that new resources created in the Enterprise server are joined to their actual representation, after provisioning and import to the warehouse, the LogicalKey is mapped out-of-the-box during Omada Identity installation.
The RLM_Resource object
When you enable task mapping for resources, a new object is created in the OPS Object Model, which you can use in the selected task mapping.
The object type and properties are prefixed with RLM. The available properties equal the properties which you have added to the resource data object type.
For reference properties, the properties of the referred data object type are also listed. If the property does not refer to a data object type, only the key property and display name are available.
Any referred data object type properties are only available one level down. If you change the resource data object type or data object types referred to by the Resource data object type, you must push the configuration again.
As examples, see a list of some of the available properties below. For brevity, not all properties that are available in the standard application are listed.
| Name | Type | Description |
|---|---|---|
| RLM_DisplayName | stringType | The resource’s display name. |
| RLM_NAME | stringType | The name of the resource |
| RLM_ODWLOGICKEY | stringType | The logical key value as defined when creating the resource in ES. |
| RLM_DESCRIPTION | stringType | The description of the resource |
| RLM_ROLEID | stringType | The resource’s ID. |
| RLM_RESOURCESTATUS | stringType | The status of the resource. The English value. |
| RLM_RESCLASSIFICATION | stringType | Multi-value string property containing the selected classification values. |
| RLM_ROLECATEGORY | stringType | The resource category as a string. |
| RLM_ROLETYPEREF_Key | stringType | Contains the value of the key property on resource type objects. By default, this is the NAME property. |
| RLM_ROLETYPEREF_DisplayName | stringType | The display name of the resource type. |
| RLM_SYSTEMREF_Key | stringType | Contains the value of the key property on System objects. By default, this is the SYSTEMID property. |
| RLM_SYSTEMREF_DisplayName | stringType | The system’s display name. |
| RLM_SYSTEMREF_NAME | stringType | The name of the system. |
| RLM_SYSTEMREF_DESCRIPTION | stringType | The description of the system. |
| RLM_SYSTEMREF_SYSTEMID | stringType | The system’s ID. |
| RLM_SYSTEMREF_ODWBUSIKEY | stringType | The Omada Identity Data Warehouse’s composed business key for the system. |
| RLM_OWNERREF_Key | stringType | The multi-value string property that contains the value of the key property of the selected owners. Owners can both be users and user groups. |
| RLM_OWNERREF_DisplayName | stringType | The multi-value string property that contains the display name of the selected owners. |
You can get a list of all properties in the implementation by querying the OPS database for properties with a name similar to RLM.
FROM [ProvisioningService].[dbo].[PropertyDefinitions] WHERE Name like 'RLM%'
Multi-value references
For multi-values reference properties, all properties of the referenced data object type are available as multi-value properties. For example, the first name of explicit owners is available as a multi-value property.
The values in the multi-value properties are prefixed with the key value of the referenced object. The key will only be used if a key property is defined on the Data object type of the referenced object.
If you, for example, refer an explicit owner with the identity ID ‘AAAA’ and the first name ‘Anna’, the values are:
- RLM_EXPLICITOWNER_Key: value AAA.
- RLM_EXPLICITOWNER_FIRSTNAME: value AAAA=Anna
RLM_EXPLICITOWNER_FIRSTNAME:NameValuePairExtensions.GetAttributeValue(Value, "")
The ATTRIBVALUES property
The ATTRIBVALUES property is handled slightly differently compared to other multi-value properties. The property contains resource-specific attribute values.
In the created provisioning task, the values are available as name-value pairs. The name is the definition value of the attribute, and the value is the entered value for the attribute.
Examples:
- RLM_ATTRIBVALUES: value ISSUEWARNINGQUOTA=320
- RLM_ATTRIBVALUES: value PROHIBITSENDQUOTA=360
- RLM_ATTRIBVALUES: value PROHIBITSENDRECEIVEQUOTA=400
- RLM_ATTRIBVALUES: value RDAPROPROTY=4000
Note: Use the extension NameValuePairExtensions.GetAttributeValue in the Expression mapper to get the values.
The SubmitProvisioningJob code method
Use the SubmitProvisioningJob code method to create a provisioning job when a resource has been created, updated or modified.
The code method file is located in the Omada.OE.Solution.OIM.Assembly.dll code assembly. The class name is Omada.OE.Solution.OIM.Assembly.OPS.ResourceLifeCycleManagement.
The code method looks as follows:
public void SubmitProvisioningJob(CodeMethodInvokeContext context, string operationEnum, int priority
The code method expects the action object to be of data object type RESOURCE. In addition to the action object, the parameter operationEnum must be filled. This parameter must have one of the following values: create, update, delete, createOrUpdate, or deleteIfExists.
The parameter’s priority must be filled with the desired priority of the provisioning job.
Number 1 is the highest priority. The higher the priority, the faster OPS performs the job.
Connector data model on-prem
A provisioning connector has a data model, which is used to describe the objects it can provision and update in the target system. The data model is defined as XML. An example of the XML could look like this:
XML example
<connectorDataModel xmlns="http://schemas.omada.net/ops/2015/ConnectorDataModelML" xmlns:xsi="http://www.w3.org/2001/XMLSchema-instance">
  <properties>
    <property name=”Username” datatype=”stringType” required=”false” multivalued=”false” / >
    <property name=”UserDispayName” / >
    <property name=”Manager” datatype=”referenceType” / >
  </properties>
  <objects>
    <object name=”User”>
      <objectProperties>
        <objectProperty isKey=”true”>Username</objectProperty>
        <objectProperty>UserDisplayName</objectProperty>
        <objectProperty referenceObject=”User” referenceKeyProperty=”UserId” referenceLookupProperty=”Username”>Manager</objectProperty>
      </objectProperties>
    </object>
  </objects>
</connectorDataModel>
The XML has two sections:
- A list of properties in the properties element.
- A list of objects in the objects element within which the name of the object and the properties it constitutes are defined.
The value you use as the name attribute on the property element should also be used in the objectProperty element in the list of objectsProperties in the object element.
The XML must follow the XML schema found in http://schemas.omada.net/ops/2015/ConnectorDataModelML.
The schema file is installed as part of the Enterprise Server Integration feature, and it is placed at C:\Program Files\Omada Identity Suite\Enterprise Server 12\website\Schema\OPSConnectorDataModel.xsd.
Name spaces
To avoid potential name clashes in the connector data model, you can specify a namespace in which to place the properties.
This is only relevant for properties that are placed in the namespace, not the object type names.
The namespace is specified as an attribute named modelNamespace in the dataModel root element, for example:
<connectorDataModel xmlns="http://schemas.omada.net/ops/2015/ConnectorDataModelML" xmlns:xsi="http://www.w3.org/2001/XMLSchema-instance" modelNamespace="somenamespace">
The property element
Properties are described using the property element. This element has the following attributes:
| Attribute | Description |
|---|---|
| datatype | Describes the type of value to expect. You can use one of the following values: * stringType * datetimeType * booleanType * referenceType * intType * secureStringType. * Default value: If no attribute is specified, stringType is used. |
| required | Describes whether the property is required. The value can be True or False. If you do not specify this attribute, the value is False. |
| multivalued | Describes whether the property can contain multiple values. The value can be True or False. If you do not specify this attribute, the value is False. |
| displayName | You can define a display name for the property, which will be displayed in the task mappings in the UI instead of the name. This allows you to use a user-friendly name in place of complex property names. |
Use the object element to describe connector objects. This element only has the attribute name which is the name of the object.
The object properties are defined in a list of objectProperty elements in which the text in the element points to a property via the name attribute.
The element has the following optional attributes:
| Attribute | Description |
|---|---|
| isKey | A Boolean attribute to use to define the key properties. You can specify multiple key properties. |
| referenceObject | A string attribute to use to indicate to which object type a referenceType property refers. You do not have to define the reference object in the connector model itself. It is also not validated. |
| referenceKeyProperty | A string property to indicate the key property on the referenced object. You do not have to define the reference object in the connector model itself. It is not validated. |
| referenceLookupProperty | A string property to indicate the property in the referenced object to make a lookup against to find the reference object from the task property value. You do not have to define the reference object in the connector model itself. It is not validated. |
Object type details
Some connectors need more information about the object in order to locate, create or update an object.
In such cases, you can specify a list of objectDetails for each object. In the following example, the object type User specifies that the schema" is dbo:
  <objects>
    <object name=”User”>
      <objectDetails>
        <objectDetail name=”schema”value=”dbo”/>
      </objectDetails>
      <objectProperties/>
    </object>
  </objects>
</connectorDataModel>
The individual connector defined the object details that you can specify.
In addition, you can supply the objectDetails with the largeDataField where you can pass large quantities of data, as the value of this element can have the maximum length of int32 (2147483647 characters).
The configuration looks as follows:
 <objects>
   <object name="User">
     <objectDetails>
       <objectDetail name="some_name"value="some_value">
             <largeDataField>
                 <!--CDATA some very big value-->
             </largeDataField>
     </objectDetail>
     </objectDetails>
             <objectProperties>
       <objectProperty>some_value</objectProperty>
     </objectProperties>
   </object>
 </objects>