Preparing for executing imports in Omada Identity
Import of data from target systems can be started from the Omada Identity Portal. There are two ways this can be done, through a WMI call to the SSIS Server (default), or by creating and starting SQL Agent jobs. Regardless of the chosen alternative, you must complete a number of security operations on the SSIS Server.

General configuration
Configure the Omada Identity Portal
For the configuration to work, you must create an application pool identity as a user in Enterprise Server via the Omada Identity Portal:
- Open the Omada Identity Portal, go to Setup -> Administration -> Users and Groups and add a new user.
- Add
srvc_oisas the username and make that the user is a member of the Data Administrators group, then specify any other relevant properties.
Data Warehouse configuration files
The configuration file Omada ODW WebService.dtsConfig in the Omada Identity Data Warehouse installation is placed in C:\Program Files\Omada Identity Suite\Datawarehouse\Common in a default installation.
When you start the import from Enterprise Server, note the important parameter User::UseDefaultCredentials in the Omada ODW WebService.dtsConfig file.
By default, this setting is set to True, and the import is completed using the application pool identity for the Enterprise Server website.
Import as SQL Agent Job
You can start an import by using SQL Agent Jobs. When you start the import from the Omada Identity Portal, a new SQL Agent Job is created and started.
There are a number of customer settings available to enable and control the feature.
Go to Setup -> Administration -> More... -> Customer Settings, then locate the settings for importing via an SQL agent job under the header Start import settings.

| Customer setting | Description |
|---|---|
| SQL Agent job proxy | To start the SQL Agent job, provide a credential proxy for the import. This proxy should be for the application pool identity of Omada Identity Enterprise Server. |
| SQL Agent job server instance | Type the SQL instance for which the SQL Job should be created and invoked. |
| SSIS Package server instance | Type the SQL Server instance in which the ODW SSIS packages should be stored. |
| Start import as SQL Agent job | Set this customer setting to True to start the import using a SQL Agent Job instead of WMI. |
If a customer uses the SQL Agent for imports and only allows Windows authentication to SQL Server, then the same service account must be used to run the IIS web site and the Timer service.
Access to the MSDB database
In order to create and start the SQL Agent job will a connection to the MSDB database on the SQL Agent job server instance be made.
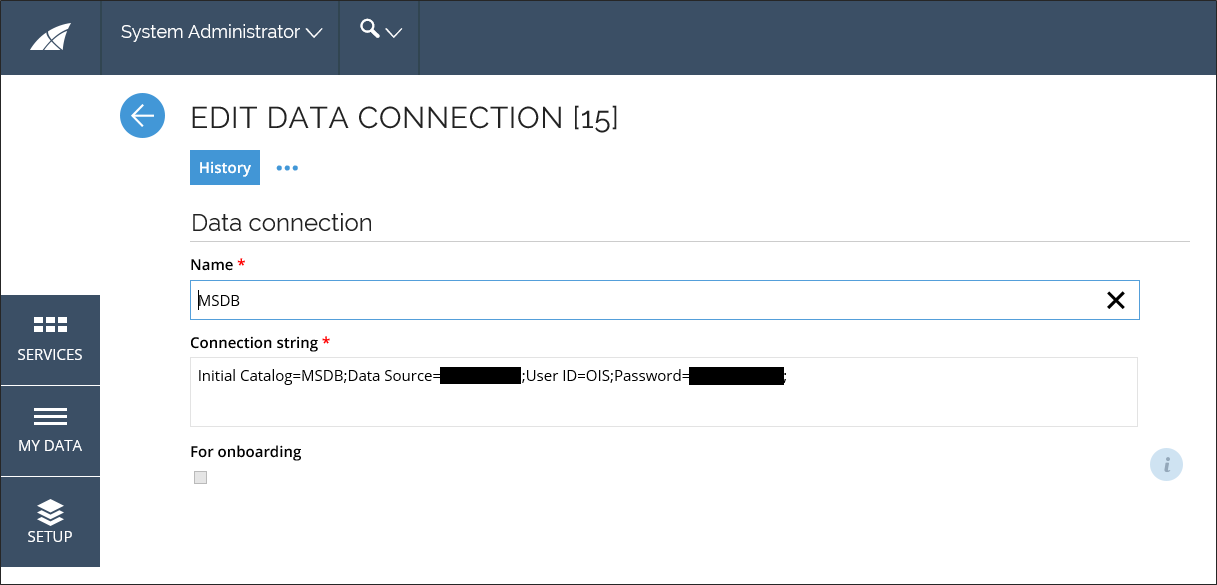
Connection is made in context of the application pool identity of the website. To specify another user, create a new data base connection under Setup -> Administration -> Connectivity -> Data connections.
The name of the data connection must be MSDB.
The application pool identity or specified user must have the following role memberships for the MSDB database
db_datareaderdb_ssisadminSQLAgentOperatorRole
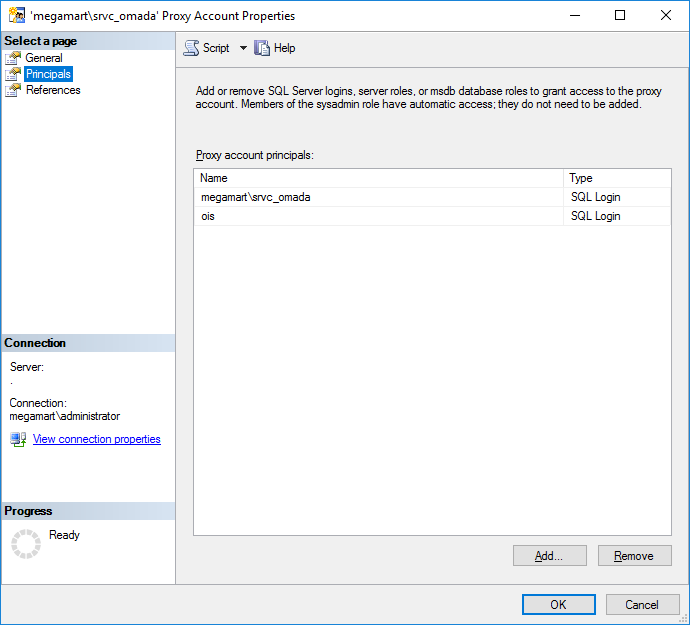
If the user isn't the same as the principal used for the proxy, must the user be granted access to the specified proxy:
Import using WMI calls
By default, imports are started by making a WMI call to the SSIS server. The WMI call starts a process on the SSIS server and runs the DTEXEC.exe.
When you start an Omada Identity Data Warehouse import from Enterprise Server, you do this in the context of the application pool identity for the Enterprise Server website.
When you start the import on the SSIS server, Omada Identity Data Warehouse makes a web service call to Enterprise Server where you are asked what the Omada Identity Data Warehouse needs to do. Here, you must specify the data object UId of the required Import profile.
A set of customer settings are available to use to control the start of the import.

To start the import as another user than the application pool identity, you must specify this user in the customer settings Execution user and Execution user password. You can encrypt this password.
In some occasions, the DTEXEC.exe file does not exist for the specified Execution user. The import fails with the error message Path not found. In such cases, change the path in these settings.
In the customer setting Server name, specify the name of the server where SSIS is running.
In the customer setting Use Kerberos, specify if you are using Kerberos authentication. This is usually the case, but the setting is set to False by default.
When you use Kerberos, you must make sure that service principal names are made for the SQL server in addition to the application pool identity.
As an example, let us say that we have the following configuration in place:
- The domain is kerb.local.
- The Omada Identity Portal has a DNS name, which is Omada Identity. You must create a DNS CName.
- Application pool identity is kerb\srvc_ois.
We have the following servers:
- APPS: has the Omada Identity Portal (Enterprise Server), RoPE and OPS running.
- SQL: has a SQL server running. All databases are installed on this server.
- SSIS: is our integration server.
Configuring Kerberos
In most cases, Kerberos authentication is enabled on the system that you are using, and in most cases, the software is spread across multiple servers.
This means that you may face a double-hop problem when you start the Omada Identity Data Warehouse import from Omada Identity Enterpriser Server. For more information about double-hop problems, see Microsoft MSDSN.
The following happens, when you start an import from Omada Identity Enterprise Server:
- APPS makes a WMI call to SSIS
- SSIS makes a web service call back to APPS
- APPS now makes a call to SQL and returns the information to SSIS
- SSIS makes calls to SQL to store the imported data
To perform the import correctly, you need the following Service Principal Names (SPNs).
- setspn --s http/apps kerb\srvc_ois
- setspn --s http/apps.kerb.local kerb\srvc_ois
After setting the SPNs, open Active directory groups and user, and enable delegation for the application pool identity:
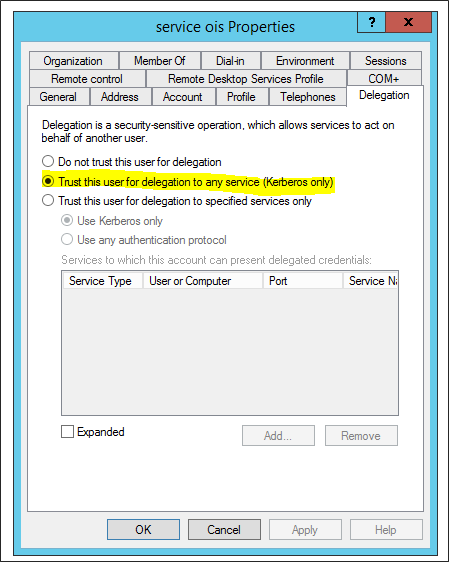
You must also allow the APPS, SSIS and SQL computer to perform delegation. You also do this from Active directory groups and user.
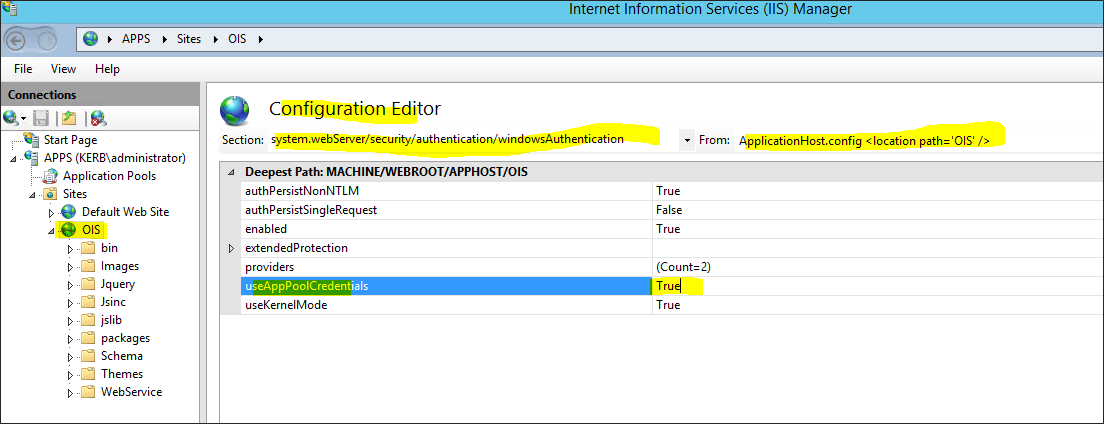
Finally, you must make sure that the website uses the application pool credentials.
-
Open IIS Manager
-
Browse to your Omada Identity website, then select Configuration Editor under Management
-
Under Section, select system.webServer/security/authentication/windowsAuthentication
-
Under From, select applicationHost.config and set the useAppPoolCredentials setting to True.
-
Make an IISRESET to make sure that your changes have taken effect.
Use the same procedure enable delegation for the SSIS computer object.
Database access for the importing user
The user that runs the import requires the following database access to run an import.
- db_ssisadmin to MSDB on server SQL
- db_datareader to Omada Identity on server SQL
- db_datareader to OISAudit on server SQL
- db_datareader to RoPE on server SQL
- db_owner to Omada Identity Data Warehouse on server SQL
- db_owner to Omada Identity Data Warehouse Master on server SQL
- db_owner to Omada Identity Data Warehouse Staging on server SQL
Setting up WMI
You can perform imports from the Omada Identity Portal through Windows Management Instrumentation (WMI) calls. To allow this, you must set up a number of security-related settings. These settings are explained in the following sections.
For more information on this subject, see the topic Setting up a Remote WMI connection from Microsoft MSDN.
Assign access to Windows Registry
When you start the remote process, the application pool identity must read and write from the Windows Registry. You can allow this by modifying the local security policy on the SSIS server.
- Open Local Security Policy (gpedit.msc) editor.
- Browse to Computer Configuration\Windows Settings\Security Settings\ Local Policies\User Rights Assignments, then locate and open Back up files and directories.
- Add kerb\srvc_ois and click OK.
- Locate and open Restore files and directories, then add kerb\srvc_ois, and click OK.
Set up COM security
To allow the application pool identity to make remote WMI calls on the SISS server, you must do the following in COM security on the SSIS server:
-
Run dcomcnfg from the command line, then browse to Component Services\Computers.
-
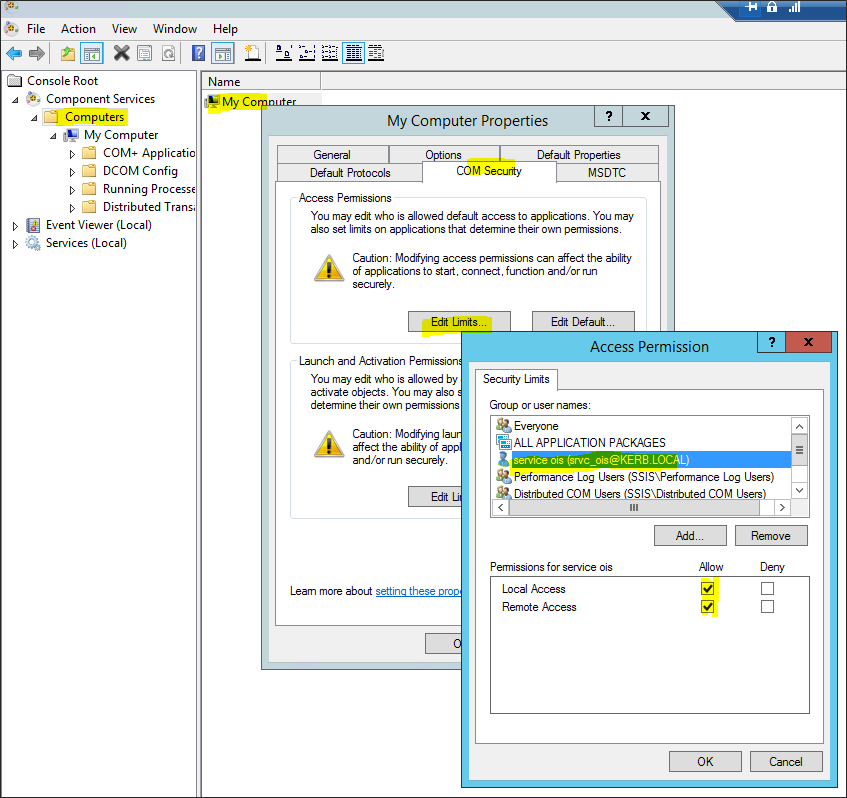
Right-click My Computer and select Properties, then select the COM Security tab.
-
For Access Permissions select Edit Limits....
-
Add kerb\srvc_ois, allow Local Access and Remote Access, then click OK.
-
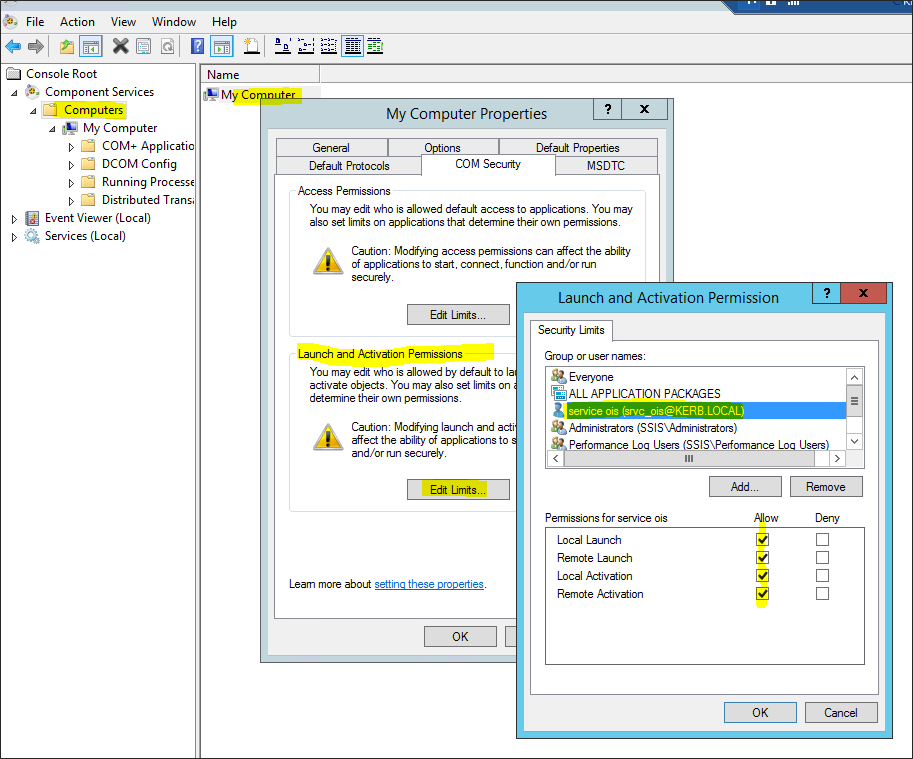
For Launch and Activation Permissions, select Edit Limits....
-
Add kerb\srvc_ois and allow Local Launch, Remote Launch, Local Activation, and Remote Activation.
Set up WMI control
To allow the application pool identity to make remote WMI calls on the SISS server, it needs access to the WMI CIMV2 namespace.
-
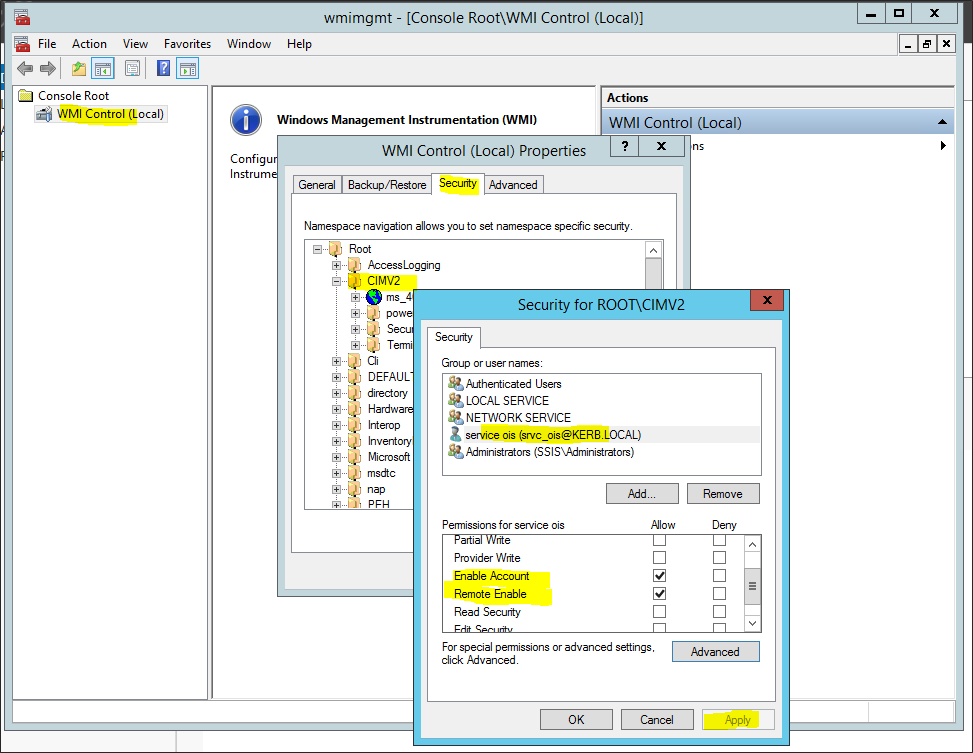
Start wmimgmt.msc from a command line.
-
Go to WMI Control (local), then right-click, and select Properties.
-
Select the Security tab, then go to Root\CIMV2
-
Select Security, then add kerb\srvc_ois, select Enable Account and Remote Enable. Click Apply.
-
In the same window select Advanced, then select the kerb\srvc_ois entry and click the Edit button.
-
Under Applies to select This namespace and subnamespaces, then click OK in all windows until you are back to the main window.

Windows Management Instrumentation Windows service
Set up DCOM security for WMI
To allow the application pool identity to make remote WMI calls on the SISS server, following must be done in DCOM security on the SSIS server.
-
Run dcomcnfg from the command line
-
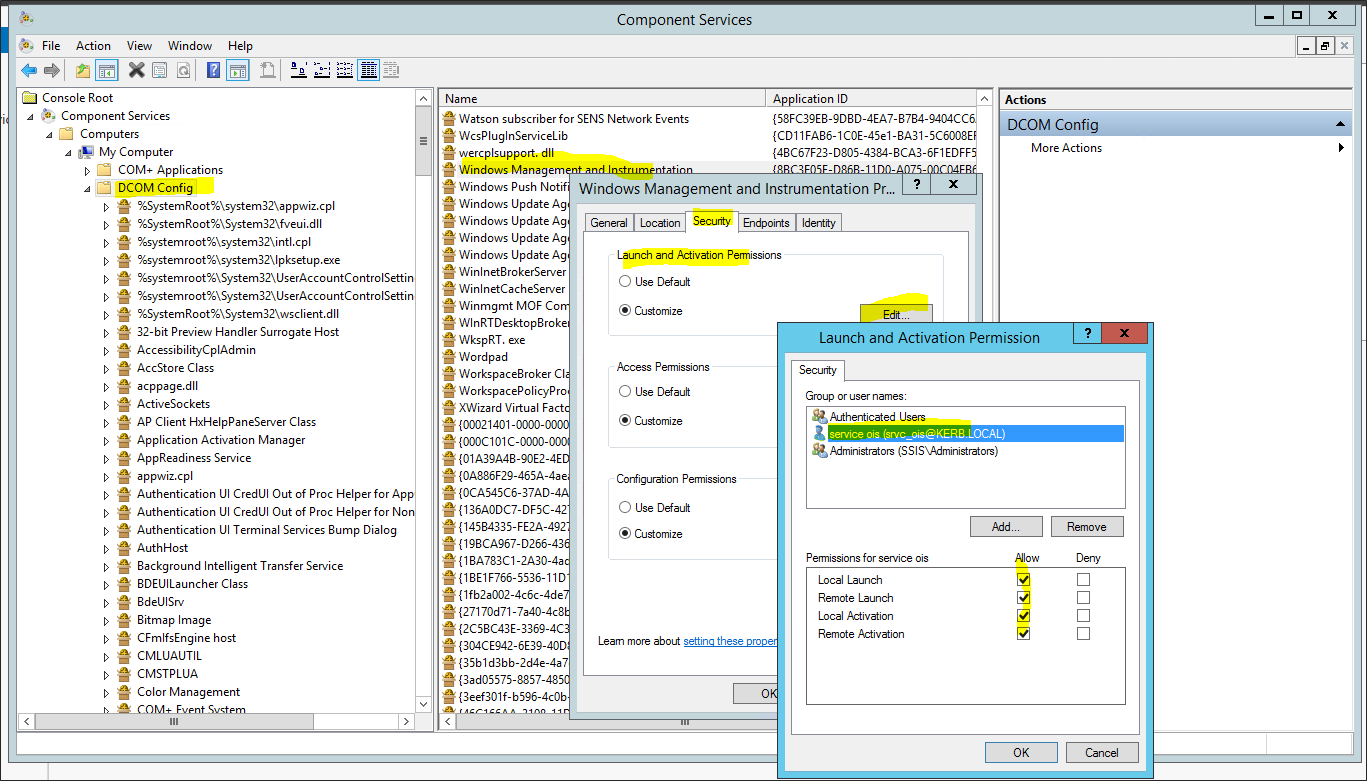
Browse to Component Services\Computers\My Computer\DCOM config.
-
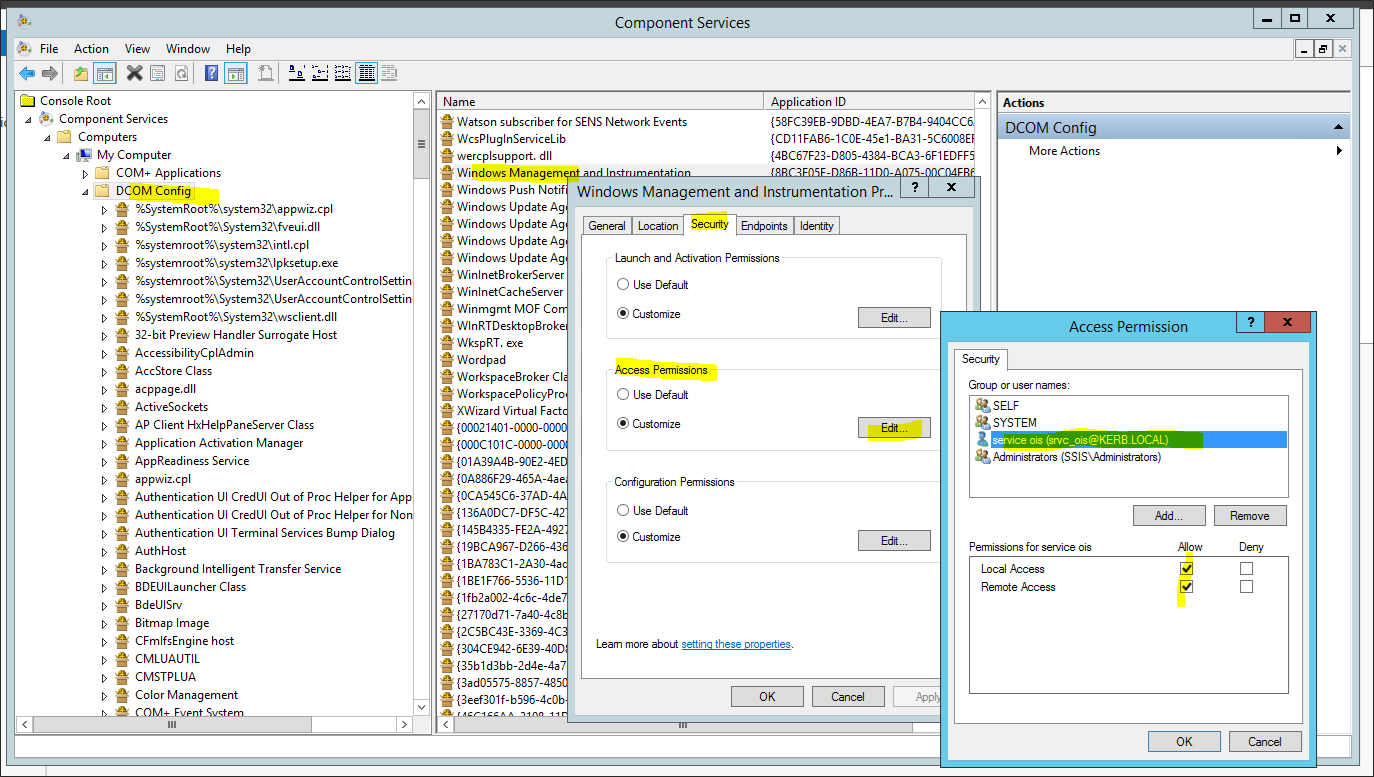
Find Windows Management and Instrumentation, right-click and select Properties.
-
Select the Security tab. Under Launch and Activation Permissions, select Edit.
-
Add kerb\srvc_ois then allow everything:
-
Click OK to save the permission.
-
Under Access permission, select Edit. Add kerb\srvc_ois and allow everything. Click OK to save the permission.
-
Restart the Windows Management Instrumentation Windows service.
Set up DCOM security for Integration services
To allow the application pool identity to start the import on the SISS server, following must be done in DCOM security on the SSIS server.
-
Run dcomcnfg from the command line.
-
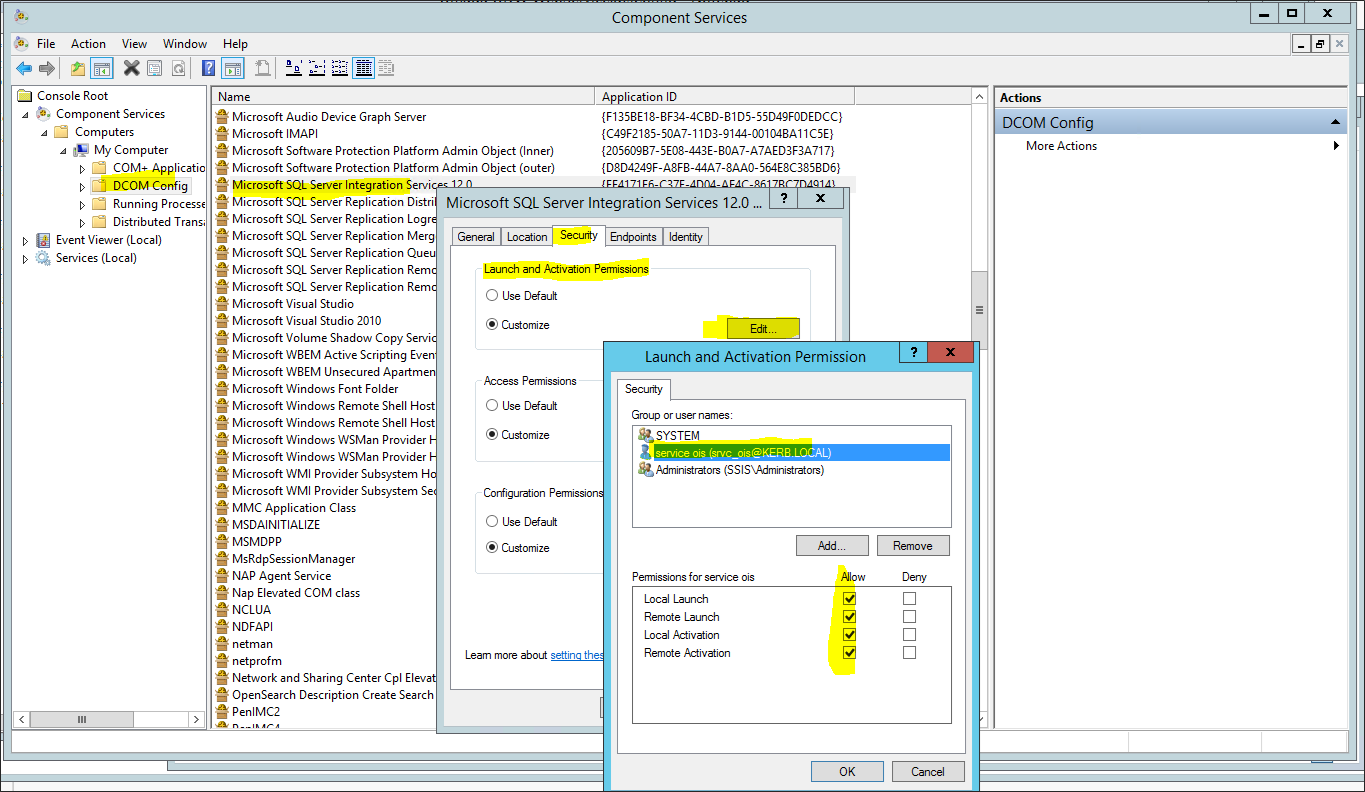
Go to Component Services\Computers\My Computer\DCOM config, then locate Microsoft SQL Server Integration Services. Right-click and select Properties.
-
Select the Security tab. Under Launch and Activation Permissions, select Edit.
-
Add kerb\srvc_ois and select Allow for all permissions. Click OK to save the permissions.
-
Under Access permission select Edit. Add kerb\srvc_ois and allow everything. Click OK to save the permission.
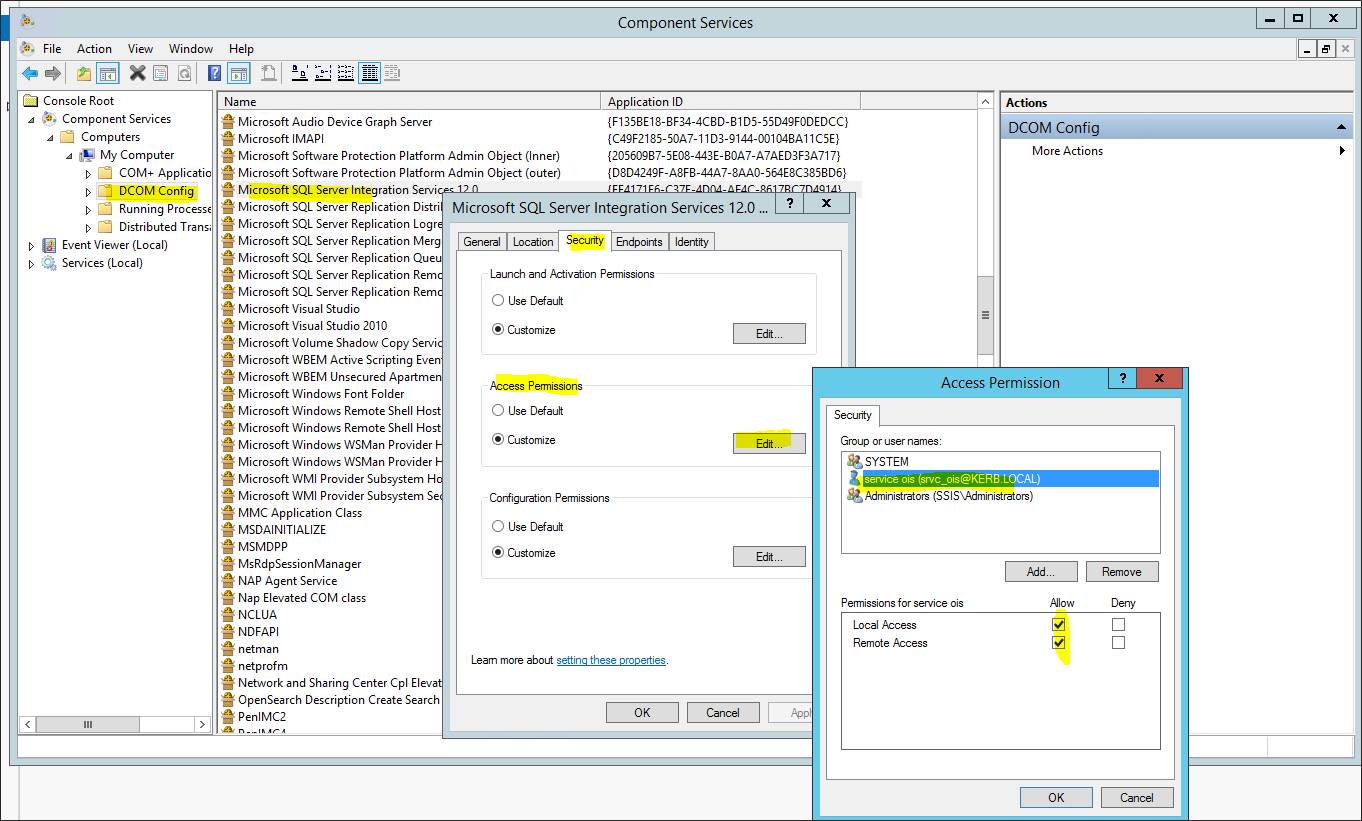
-
Restart the SQL Server Integration Services Windows service.
Additional configuration
The following areas are parts of the basic configuration that have been covered earlier in this document, but they are repeated here.
Microsoft SQL server SPNs
SPNs are required for SQL Server. In the following, let us assume that we run the SQL Windows services using a service account named kerb\srvc_sql
For this, we need the following SPNs:
- setspn --s MSSQLSvc/sql.kerb.local kerb\srvc_sql
- setspn --s MSSQLSvc/sql.kerb.local:1433 kerb\srvc_sql
If SQL Server Analysis Services are being used, you also need the following two SPNs:
- setspn -s MSOLAPSvc.3/sql.kerb.local kerb\srvc_sql
- setspn -s MSOLAPSvc.3/sql kerb\srvc_sql
Consult this guide if SQL Server Analysis Services is a named instance, or it does not run as a domain account.
After making the SPNs, open Active directory groups and user, and enable delegation for the service account.
The SPNs above are usually created automatically during the installation of the SQL Server.
To check if the SPNs are already created, run the following command:
setspn –l kerb\srvc_local
Alternatively, use the Microsoft® Kerberos Configuration Manager for SQL Server tool.
Use the following SQL to check the authentication scheme for the current connections:
SELECT
   dec.session_id,
   dec.client_net_address,
   dec.auth_scheme
FROM sys.dm_exec_connections AS dec
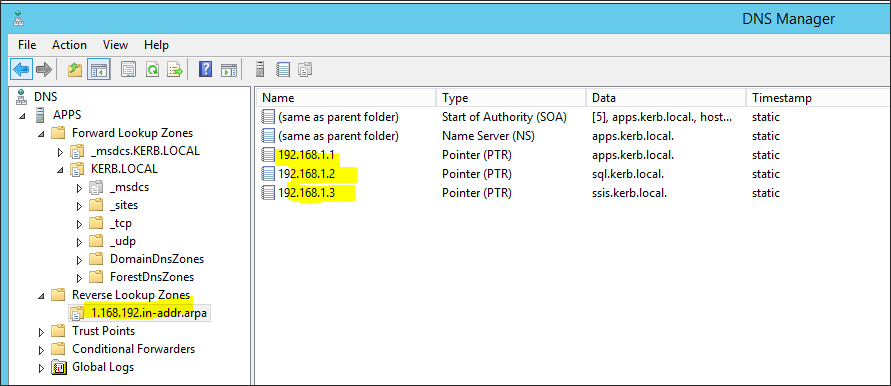
Configure DNS
-
Make sure that you have the following Forward Lookup Zone.
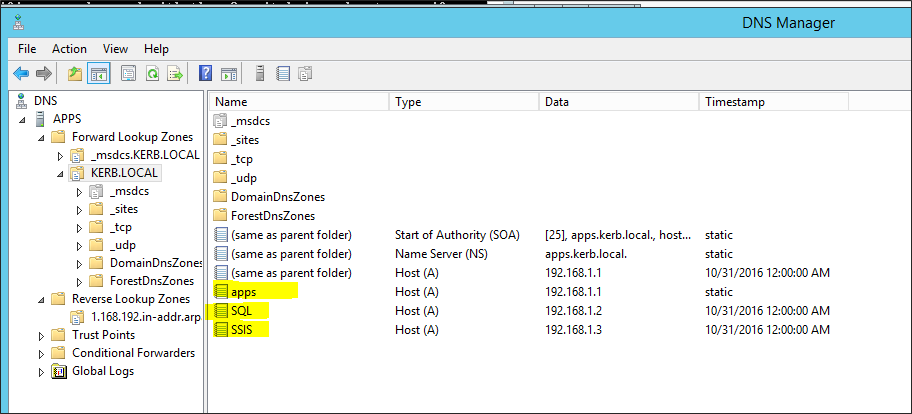
-
Make sure that you have the following Reverse Lookup Zones. If you do not have some or all of the reverse lookup zones, create the missing zones yourself.
Configure SSIS server
If the SSIS server is running on a standalone server with no SQL server, make sure that you have specified the location of the SQL server in the MsDtsSrv.ini.xml file.
-
If you are using SQL 2016, on the SSIS server, go to C:\Program Files\Microsoft SQL Server\120\DTS\Binn.
-
Open the file MsDtsSrvr.ini.xml.
-
Set
<ServerName\>to the sql.kerb.local.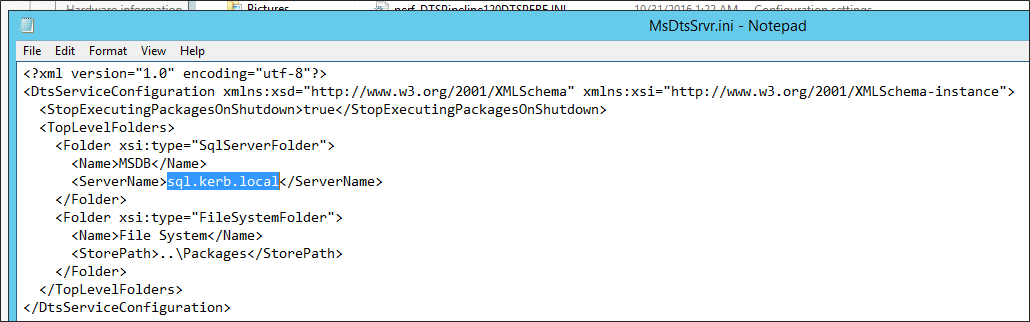
-
Restart the SSIS Windows service.
Troubleshooting
The following section shows a list of some of the errors that you are most likely to come across when you set up Kerberos.
-
I am prompted for user name and password by the Omada Identity Portal
This is a typical Kerberos issue. Read the section on Kerberos configuration carefully.
- Make sure you created the SPNs for SQL server in addition to the Omada Identity Portal
- Make sure you have only enabled Windows Authentication.
- Make sure that useAppPoolCredentials is enabled for the site.
- Make sure that site is added to Intranet zone.
-
The RPC server is unavailable. (Exception from HRESULT: 0x800706BA)
- Make sure that you change the ODWSSIS data connection to point to the SSIS server.
-
Access is denied. (Exception from HRESULT: 0x80070005 (E_ACCESSDENIED))
- Make sure you enabled use of Kerberos under Customer Settings.
- Make sure you configure COM Security.
-
Access denied
- Make sure that you configured WMI Control.
-
A security package specific error occurred. (Exception from HRESULT: 0x80070721)
- Make sure Kerberos is properly configured. Especially that delegation is enabled for all involved computers.
- Make sure you configured DCOM Security for WMI.
-
Unknown failure (8)
This is usually because the user cannot read from the registry.
-
Failed to retrieve data for this request. Microsoft.SqlServer.Management.Sdk.Sfc)
This error usually happens when you have a standalone SSIS server. See the section on SSIS server configuration.
-
Intermittent error 800703fa: Illegal Operation attempted on a registry key
A description of how to solve this issue is available on Microsoft MSDN.
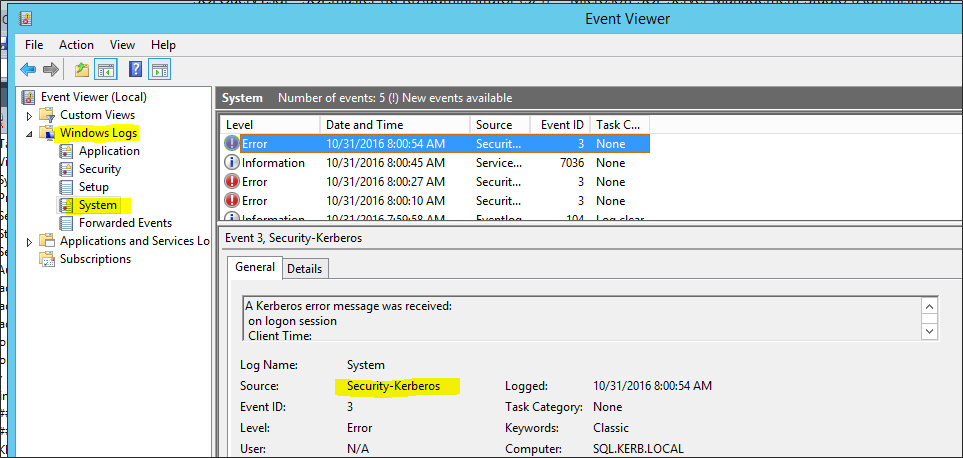
Enable logging for Kerberos
If you are struggling with Kerberos issues, you should enable Kerberos logging.
-
Open Registry Editor and go to HKEY_LOCAL_MACHINE\SYSTEM\CurrentControlSet\Control\Lsa\Kerberos\Parameters.
-
Add a new DWORD value with name LogLevel and give it the value 1.

-
If there are any Kerberos-related issues, this is now logged to the System Windows log.
-
To ensure steady system performance, remember to disable this setting again.