Evaluating identity violations
If the organization has set up compensating controls, the Evaluate identity violations process will provide managers to review and mitigate these violations. The manager of an identity which has triggered a violation of any constraint will be able to review, and then decide to allow the violations.
You should not delete any compensating control that is being used in the violation process, otherwise, it would lock the process.
When the Omada Identity Role and Policy Engine (RoPE) detects a violation of a constraint in the calculation of an identity, RoPE automatically launches the Evaluate identity violations process for the manager to complete.
There are two activities in this process:
- A task is assigned to the identity manager. This task is shown on the front page of Omada Identity when the manager opens the Omada Identity Portal.
- A security officer must review the manager's decisions and either approve or reject the evaluation and the selected compensating control.
If an open evaluation task cannot be approved, the person assigned to the task should check if there were any additional changes to the constraints for the relevant resources. As a result of the changes to constraints, there might be the case that there are no violations anymore. The task needs to be terminated.
The goal of this two-step evaluation process is to make sure that no users are given access permissions that they should not receive.
Manager’s evaluation of violations
In this process, the identity manager evaluates the assigned resources or business processes and can either block or allow an assignment. By default, the first step of the process is automatically assigned to the identity's manager.
If the assignee of the first step is changed from a manager to another user/user group which is not present in the system, the task will be automatically assigned to the identity's default manager.
You can set an expiration date on the evaluation in the Expiration date of the evaluation field. After the expiration date, you must review the violation again. If you do not set a date, a default expiry date of 180 days after the current date is used.
The reason must be given only if a violation is allowed that was not allowed before.
Evaluate identity violations
-
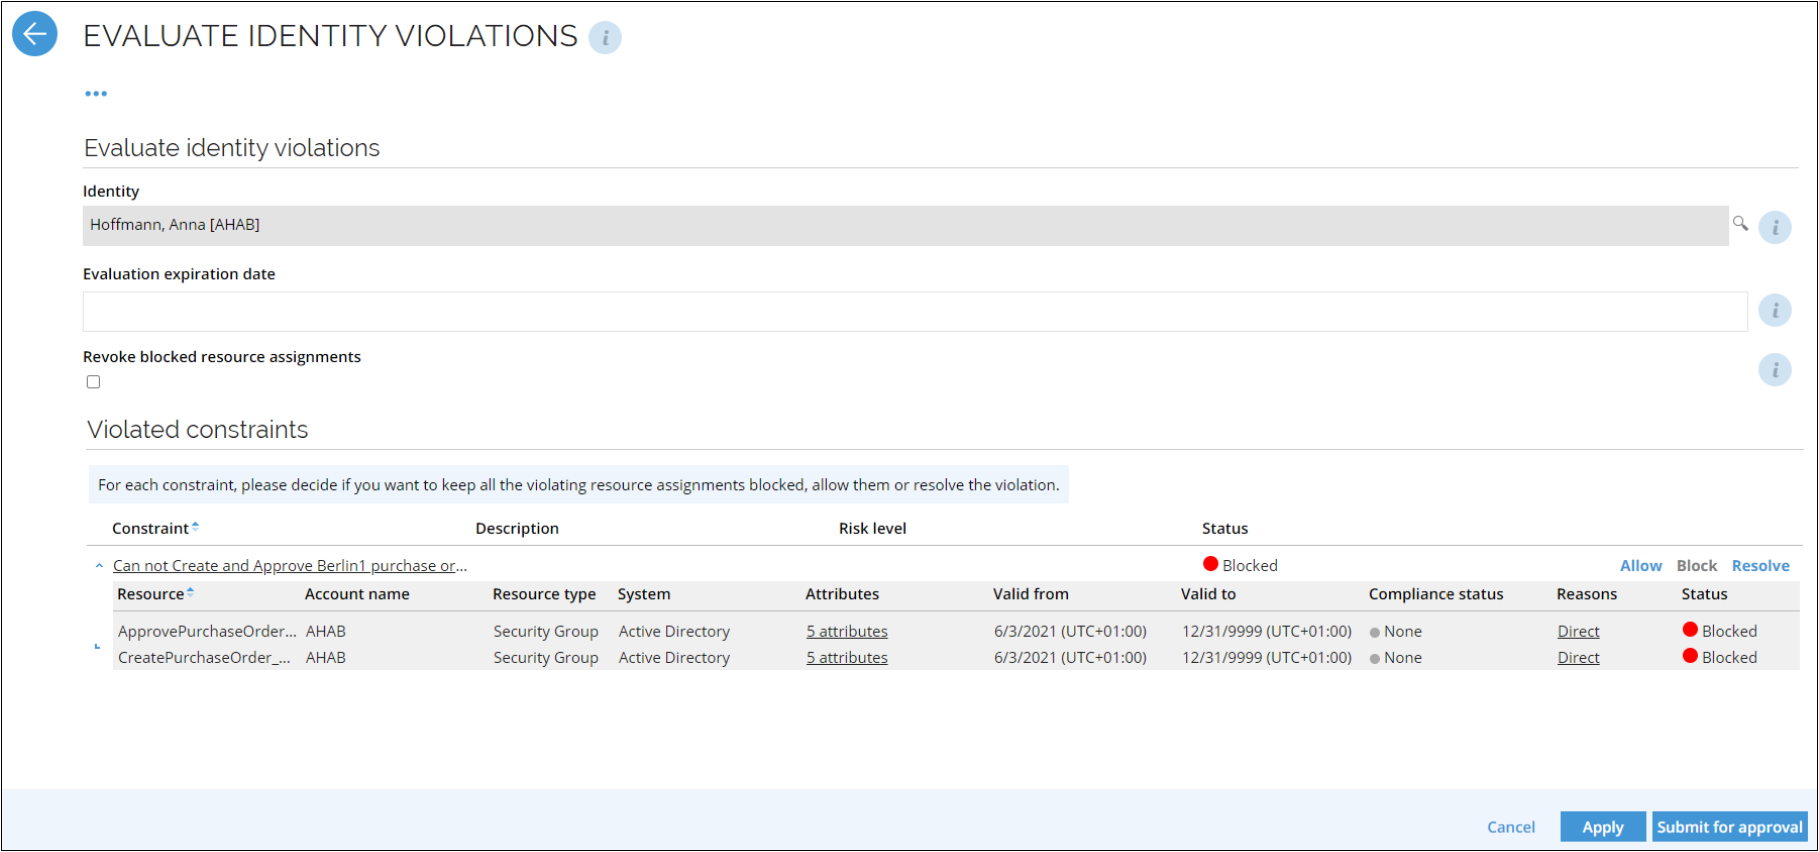
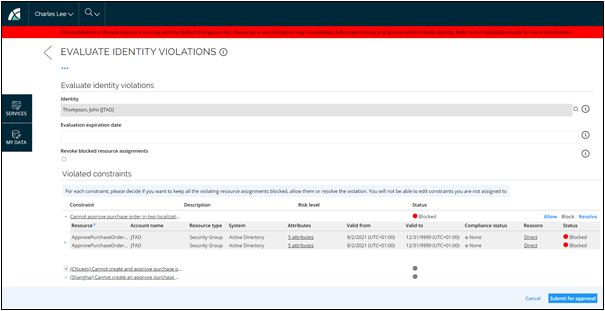
From the main page in Omada Identity, click the Evaluate Identity Violations task. On the Evaluate Identity Violations page, you must choose an action for each resource listed in the overview. By default, all resources are blocked. If you submit blocked resources without making any changes, the resources remain blocked.
-
Click Allow to allow the violation. If you do it, you must provide a compensating control to be able to allow the violation.
- Keep all violations, including potential risks that the violations pose to the organization. Keep all assignments.
-
You can also click Resolve. This action allows you to select individual assignments to be blocked or allowed.
- Opens a dialog that allows you to select individual assignments to block or allow.
-
If you have already allowed a violation, you can click Block to block the approved access.
- Block all resources that are in the constraint. By default, all assignments are blocked if there are no decisions made.
-
When you have decided for each violation, click Submit for approval to proceed to the review process.
 info
infoThere are two ways to allow violating resource assignments. You can allow all violations through a mass edit (the Allow button at a constraint level) or allow individual assignments through the Resolve dialog. After the mass edit is applied, if the Allow button is clicked again, the opened dialog box will be empty. This means that it is not possible just to modify the given reason. The reason field needs to be filled every time the user wants to make changes to the Allow decision for all resource assignments. A workaround is to make changes through the Resolve dialog, where the reason can be directly modified for each individual resource assignment.
Evaluate identity violation sectionIdentity is the name of the identity that has caused the violation. The field is read-only. Revoke blocked resource assignments - If selected, all resource assignments with the Blocked status will be permanently removed from the identity. It will not be possible to re-evaluate and restore these resource assignments in the future. Evaluation expiration - set an expiration date for the approved violation.
When adding a new step to the Evaluate identity violations process template, the fields Evaluation expiration date and Revoke blocked resource assignments will not be hidden and will be available to edit. Customer decides to change this, if they do not wish the reviewers to be able to see or edit these properties. This can be done by the Process designer.
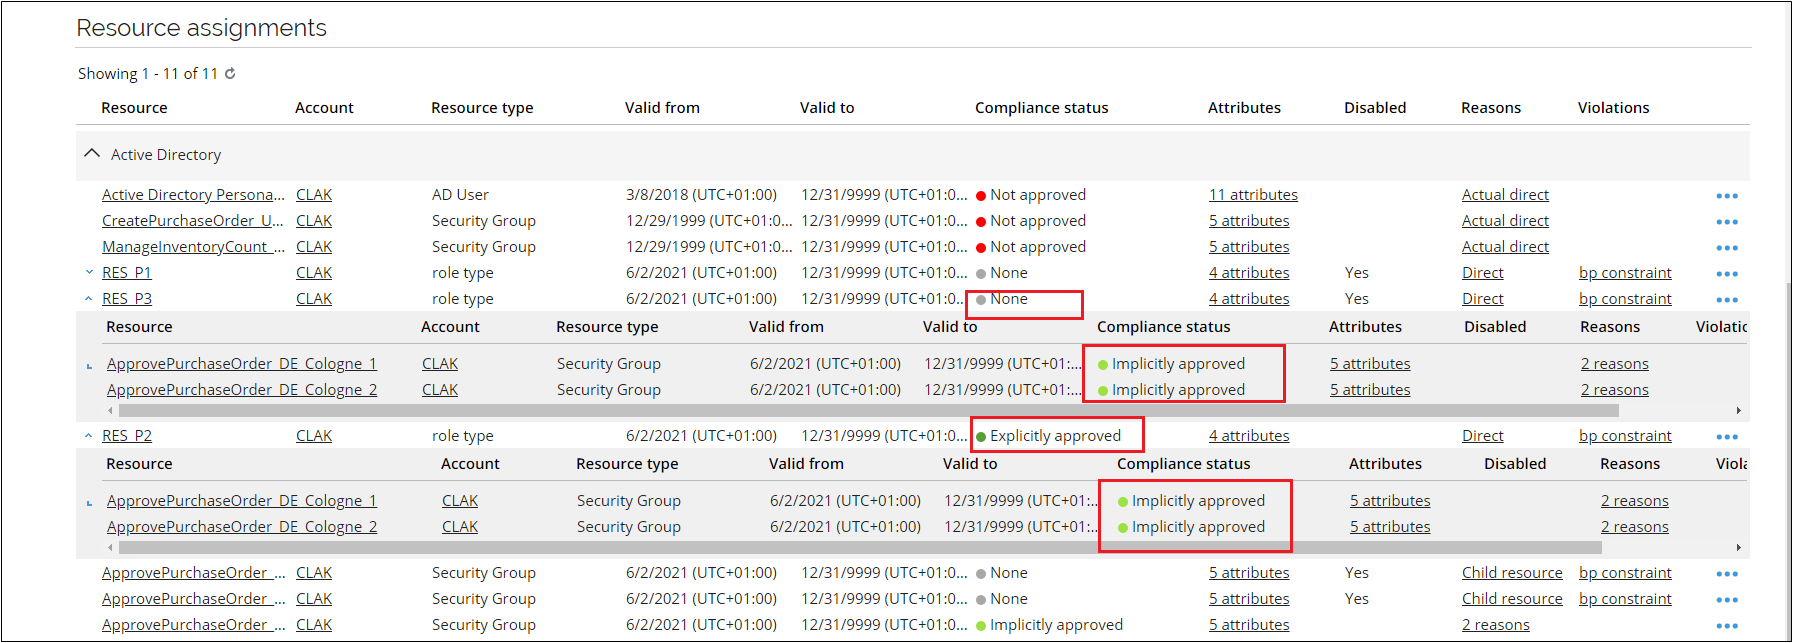
Violated constraints sectionConstraint - The name of a constraint causing the violation. Click the name of a constraint to the details:
- Resource - A resource assigned to the identity causing the violation.
- Account name - The short name of the account the violations refer to.
- Resource type - The name of the resource the identity belongs to.
- System - The name of the system the resource belongs to.
- Attributes - Attributes belonging to the assignment.
- Valid from/to - The period of the assignment.
- Compliance status - The status calculated by RoPE.
- Reasons - The reason indicating why the assignment was made.
- Status - Displays the current approval status of the assignment for the resource. Description - The detailed description of a constraint. Risk Level - The risk level of the constraint is defined on the constraint object. Status - Displays the overall approval status of the decision for the violated constraint. If all assignments are blocked, the status is Blocked. If all are allowed the status is Allowed. If some are blocked and some are allowed, the status is Resolved.
About using compensating controls with evaluating violations
You must create and configure compensating controls before you evaluate violations. You cannot configure a new compensating control while you evaluate a violation of a restraint.
When you evaluate SoD violations as a manager, you must select a compensating control to use when you click Allow to approve a violation of the constraints and policies set up in your system.
When you click the Allow button, you must select the compensating control, explain the consequences, and state the reason for your allowing the violation.
Add compensating control to violation
Follow these steps to add compensating control to violation:
-
In the Allow violation window, click the look-up icon to open the Select Compensating control pop-up. Choose the relevant compensating control. This field is mandatory by default, but that can be changed in a configuration object. If there is only one compensating control, the field gets filled automatically.
-
The Compensating control field displays the name of a compensating control selected when the violation was allowed.
-
In the Justification field, type a comment that explains the reason for the violations of the established organizational policy.
noteThe Compensating control and Justification columns are not included in the SoD configuration object by default.
-
Click OK to close the dialog box and save the action.
-
In the Status column on the Evaluate identity violations page, the status for the individual resource should now have changed the color from red to green.
-
Repeat the process for all relevant resources, then click Submit for approval when you are done.
Resolve violations
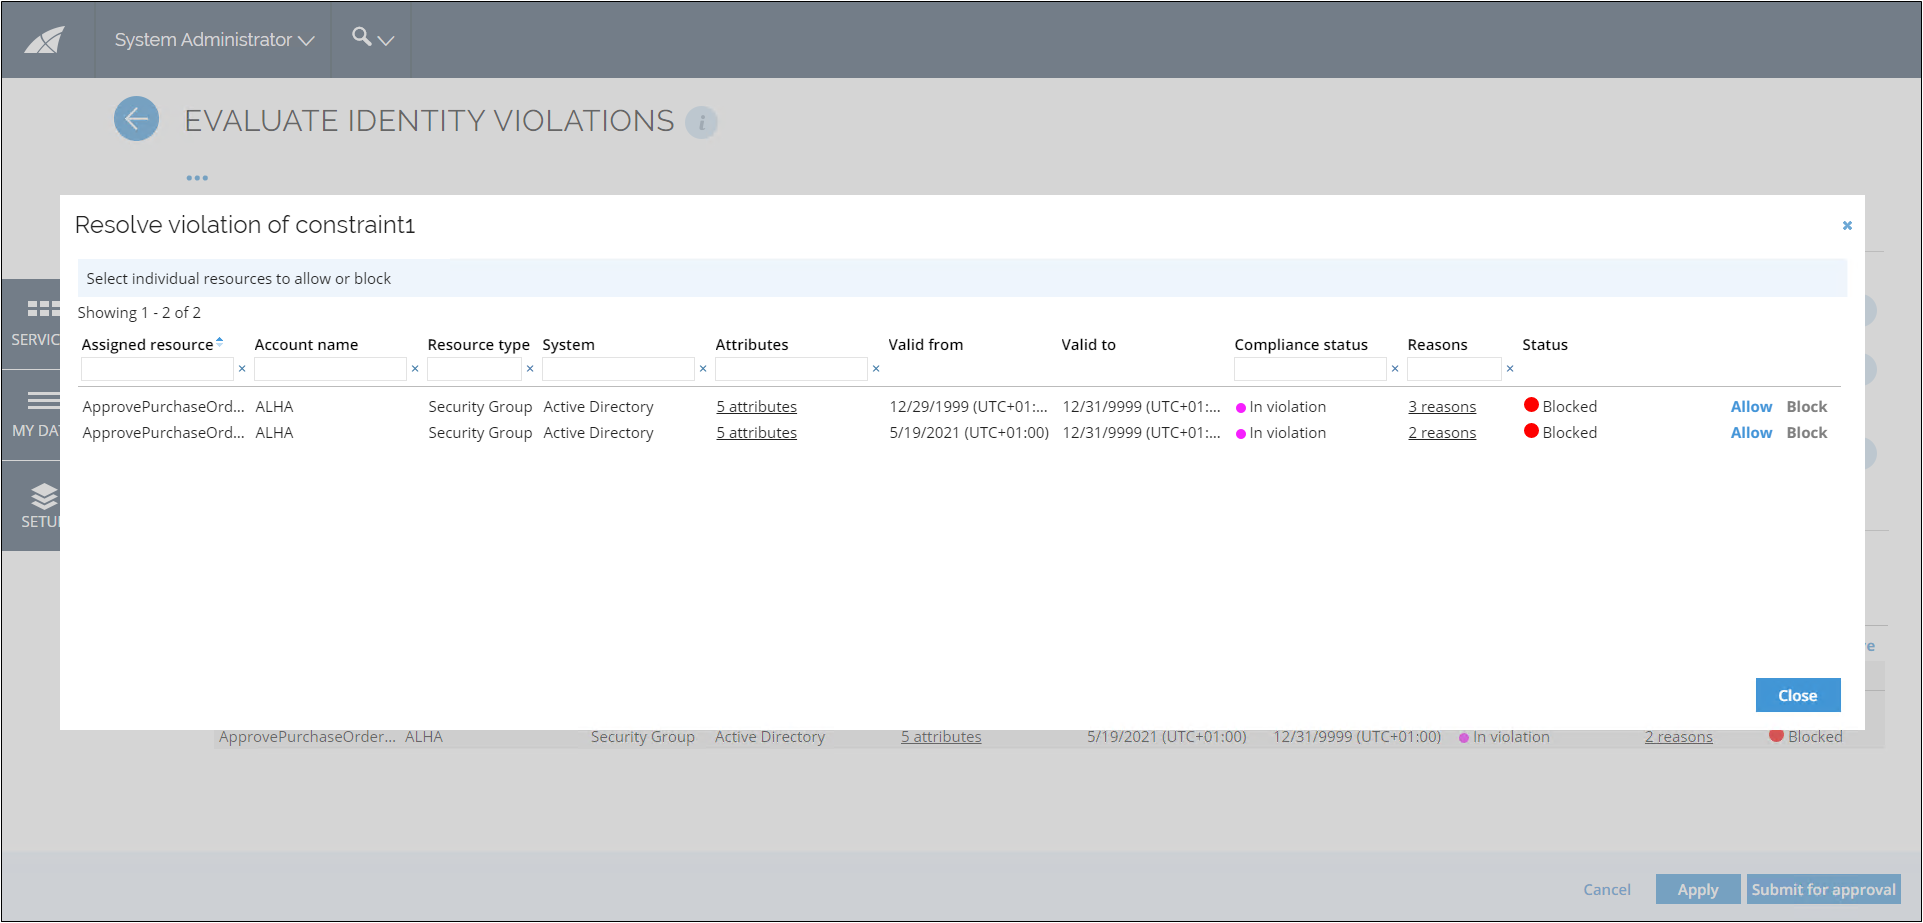
The Resolve action allows you to resolve the violations of business processes, roles, or resources. All affected resources are taken into the process when the constraint is defined on the business process level. In the dialog, you can see the details of each assignment.
Resolve violation
Follow these steps to resolve a violation:
-
In the overview of the Evaluate Identity Violations window, click Resolve. A Resolve violation of [constraint title] dialog opens.
-
In the opened dialog, a list of violations is displayed. If the constraint is defined in a business process or a resource level, only the actual violating resources will have the Allow and Block buttons.
noteIf you decide to change the selected resources, click the Allow or Block buttons next to it and choose another one. If a resource is included in another constraint that was already decided on, this is also taken into account in order to block the Allow action. Child resources have action buttons if they are the violating resource.
-
Click Submit for approval when you finish.
Reset violations
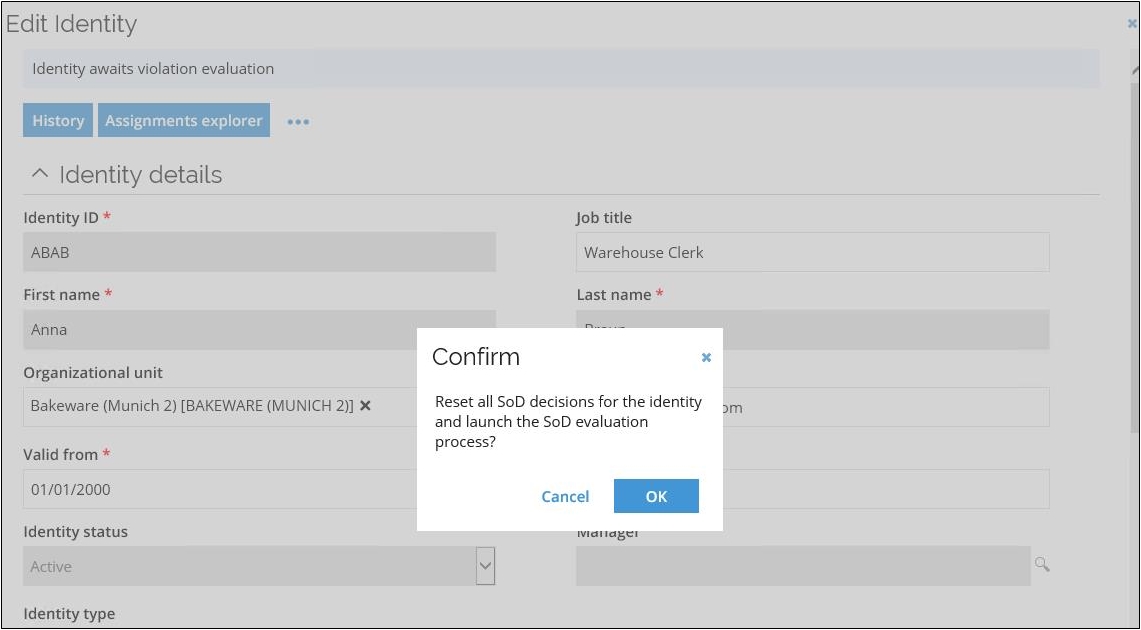
If you want to reset all existing SoD violation decisions made for an identity in order to re-evaluate all violations, the Reset SoD violations action is available from the context menu of the identity form. The reset violations action triggers RoPE to relaunch the SoD evaluation process for the identity, resets all decisions, and sets the state of all decisions to Block.
The reset violations action is available for operation admins, system admins, and service desk agents.
Reset violation
Follow these steps to reset a violation:
-
Open the identity you want to reset the violations for.
-
Click the context menu and select the Reset SoD violations option.
-
A confirmation pop-up displays. Click OK. The identity is queued for recalculation. After it is recalculated, the process will be relaunched with a task to a manager.
Reset violation decisions for multiple identities
It is possible to reset violation decisions using mass update by setting the property IDENT_RELAUNCHSOD to True. However, this does not trigger a RoPE calculation by default. You can do that by updating the engineConfiguration.config file in RoPE. The property must be added to the list of properties that cause a recalculation in the configuration of the CalculationAffectingEventsResolverextension, for example:
<add key="DOT#Identity" value="IDENTITYID,FIRSTNAME,LASTNAME,VALIDFROM,VALIDTO,IDENTITYSTATUS,OUREF,EXPLICITOWNER,ODWBUSIKEY,CLT_TAGS,IDENT_RELAUNCHSOD"/>
Security officer's approval of violations
By default, the second step in the process is assigned to a security officers' group. It can also be assigned manually to another user or group of users that must approve or reject the evaluator's decision and provide a comment/reason for rejection.
If the assignee of the second step is changed from a security officer to another user/user group which is not present in the system, the task will be automatically assigned to the system administrator.
Regardless of the evaluator's initial decision, the approver must review it. This is a security measure to assure that there are no violations to the established organizational policy unless at least two parties have agreed that the Allow or Resolve action is something the organization can accept.
After the first step of evaluation is done, the reviewer receives an email. It reflects the default behavior, meaning, the manager is a default evaluator. You can customize the process and the email template contents.
Approve evaluations (security officer)
Follow these steps to approve evaluations as a security officer:
-
From the main page in Omada Identity, click the Review evaluation of violations task. A new page opens. On this page, you can see the decisions that the identity manager has made in the process.
-
If you agree with all the manager's decisions, click Approve. If you disagree with the manager's choices, click Reject. If you reject the manager's decisions, you will send the task back to the manager, who must either revise their decisions for the actions or provide better compensating control.
infoWhen a parent resource is in violation, then child resource status will appear as not approved until the violation is resolved.
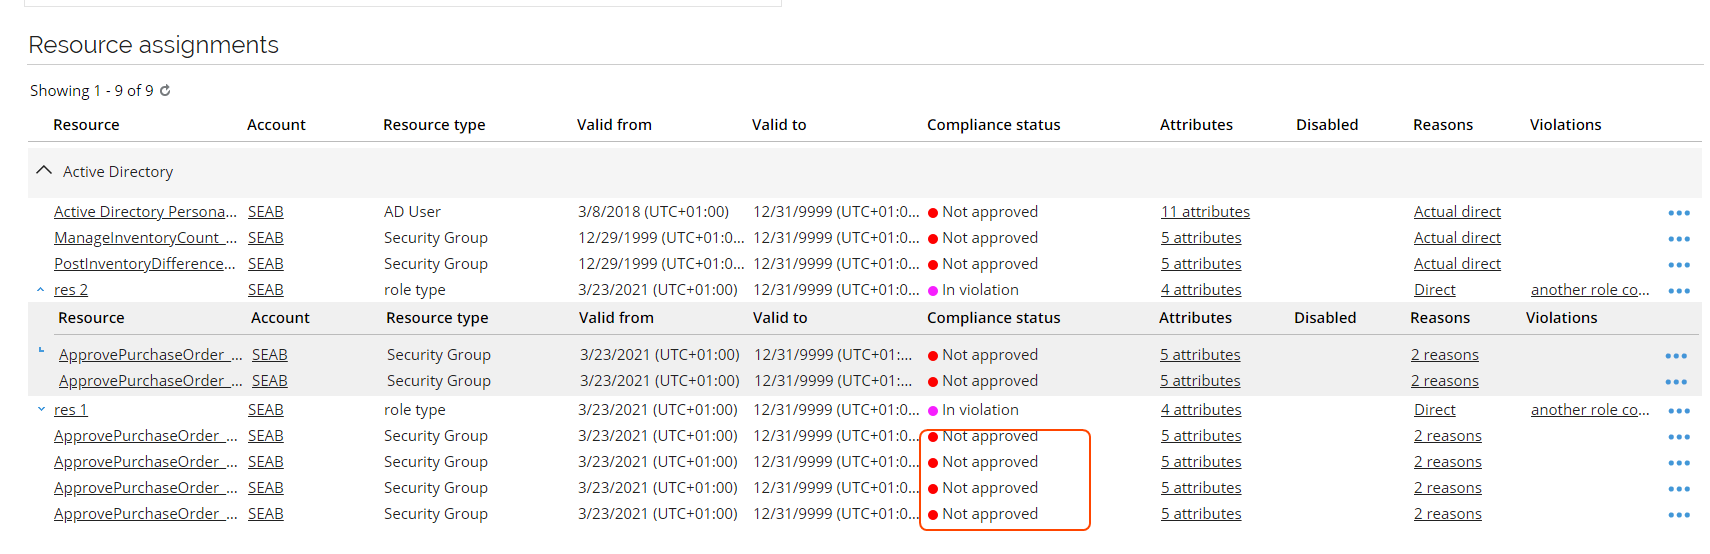
It may occur that the violating resources may be two parent resources that share the same child resources. It is possible that the evaluator can block one parent resource, and allow the other. When such an evaluation is approved, the resource assignment for the blocked parent resource will be disabled. Assignments for child resources that the blocked parent resource shares with the allowed parent resource, will be kept as the Allow decision takes priority.
Constraint owners in Evaluate Identity Violations process
It is possible to set the Constraint owner as an assignee for one or both two default steps of the Evaluate identity violations process.
Assignee of the first activity in the process is set to Constraint owner
Evaluate identity violations activity
If an identity violates multiple constraints that have different owners, all owners will get an Evaluate identity violations task. The task will include a list of all constraints violated by the identity, but each owner will be able to make decisions regarding only the constraints that they own. The constraints that the evaluator cannot make decisions on are by default collapsed and the Allow, Block and Resolve buttons are hidden next to these constraints. It is possible to expand the constraints to see the details of the violating resource assignments. During the first run of the process, the evaluator will not see the decisions made regarding violations of the constraints that they do not own. A grey icon will be displayed in the Status field for these constraints. If the evaluation process was previously completed and has been relaunched due to e.g. expiration date for the decision being reached, the assignee will be able to see the status that all the constraints and resources had after the previous evaluation.
The Review evaluation of violations activity is not launched until all the violations are evaluated by the respective owners of the constraints.
If a constraint has multiple owners, then the first one making a decision is the one whose decision is sent to the review stage.
Fallback rule
We recommend that all the constraints in the system have assigned Constraint owners. If an identity is violating several constraints, some of which lack assigned owners, then a manager of an identity will also receive the Evaluate identity violations task. The manager will be able to decide on all the constraints that identity violates. The owners of the constraints which had assigned owners will also receive the Evaluate identity violations task.
Review evaluation of violations activity
The reviewer will be able to see all the violated constraints and all the decisions made by the assignees of the first activity. Similar to the default configuration, the reviewer can either approve or reject the evaluation.
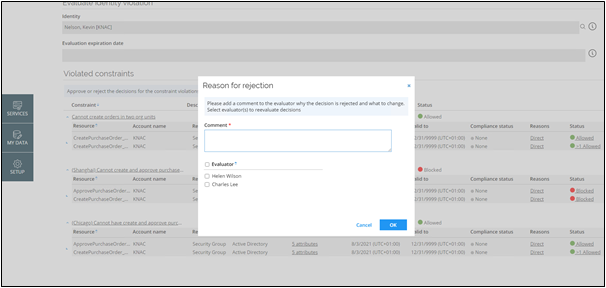
Rejecting evaluation
Upon rejecting the evaluation, the reviewer will be presented with a dialog where they can give a reason for the rejection and select specific evaluators whose decision was not approved. The selected evaluators will receive Evaluate identity violation task again. After all the evaluators who had their task returned to them submit their decision, the task will again be sent to the reviewer.
Approving evaluation
It is recommended that if two or more constraints contain some of the same resources, these constraints have the same owners. If the owners of these constraints are different, some of the resource assignments within the constraints may receive several (possibly conflicting) evaluations.
If a resource was evaluated by more than one evaluator, the system will indicate it with a >1 symbol in the Status column.

Clicking on the Status column will open a dialog containing individual evaluations.
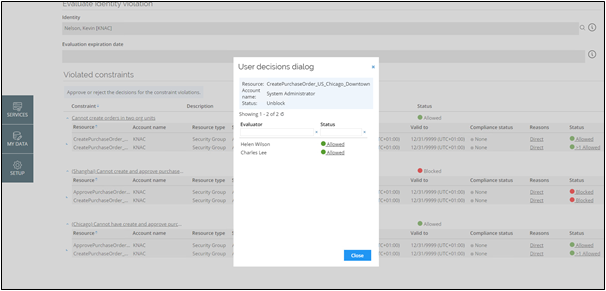
If at least one of the evaluators decided to block the resource, the reviewer will see status Blocked. Otherwise, the resource will be allowed. If all evaluators allow the violation of the resource, the reviewer will have to select the winning Compensating control and Justification while approving. That Compensating control and Justification will be the ones shown in the Audit trail report or during future re-evaluations.
If a certain resource was evaluated by several evaluators (e.g., due to it being in multiple constraints), all the decisions will be shown in the Audit trail report.
Assignee of the second activity in the process is set to Constraint owner
If an assignee of the second activity in the Review evaluation of violations process is set to Constraint owner, all constraint owners assigned to the constraints that the identity is violating will receive the Review evaluation of violations task. When the first owner has approved, the process is completed. Upon rejection, the process will return to the first activity.
Process customization
When the Constraint owner is set as an assignee in the Evaluate identity violations process, it will not be possible to remove or add steps to the process.
If the Evaluate identity violations task is reassigned to another person, they will be able to make all decisions.