Changesets
Create changesets
In a new installation, there are no existing changesets. To create them, follow these steps:
- Create changesets by clicking the shortcut menu in the upper right corner on the top menu bar and selecting Choose Changeset. The Choose Active Changeset window opens.
- Enter a name for your new changeset and click OK.
Omada recommends that you define a naming convention for changesets, for example:
<initials>_<xxxyyy>_<short description>_<number>
where:
xxx is a short name for the change, which refers to a document or other documentation, for example:
- BPP for Business Process Procedure
- BUG for Bug reports
- ISE for Issue
yyy is a sequential number appended to xxx. The number is the sequential number based on the number of changesets you may need to create for the same scenario.
Select active change-set
Before you start creating changes in the system, you must select which changeset should be the active changeset. The active changeset is where all the configuration changes you perform are stored. To do so, follow these steps:
- To select the changeset you want to use, click the shortcut menu in the top menu bar, and select Choose Changeset.
- The Choose Active Changeset dialog box opens and presents you with the list of changesets that were created in the system.
- From the drop-down list of changesets, select the changeset on which you want to store your changes. On the Configuration Changes view, a message appears indicating the changeset that was selected as the active changeset. The message is indicated in yellow at the top of the list.
Because changesets are just a logical way of grouping changes, the active changeset is only stored for a particular browser. The changeset will still be active even when you open a new browser window. When you close the browser and open it again, the active changeset will be set to None.
If you do not want the changeset to stay active when opening a new browser window, open the new window in the private/incognito browsing mode.
Working with changesets
After you have selected the active changeset, you can make changes to the configuration. When you have many changes, you can:
-
Search for configuration changes
- All changesets
- Changes allocated to a specific changeset
- Changes in changesets belonging to a specific user
- Changes performed within a specific period of time
- Combinations of any of the above-mentioned criteria
infoWhen you search for and locate the configuration changes/changesets that you want to display, you can move the configuration changes between different changesets. When you click on unassigned changes, the Select Changeset dialog box opens.
You should then select the relevant changeset for the changes and click OK.
You can only make changes to open changesets.
-
Merge changesets
-
Download changesets
-
When your configuration changes are complete, select the changeset that you want to download in the criteria screen and click Next. Only the included changes are shown.
-
Click Download to export the displayed configuration changes to an XML file.
-
After you click Download, select Save As in the confirmation box and browse to the Transport Directory that you set up previously.
infoThe system suggests a default file name. This file name consists of the date and the current time. Omada recommends that you change the filename to be the same as the name of the changeset.
The XML file contains all the changes that you selected. So, it is important to consider your search criteria and selections so that you only download the relevant information.
-
-
Close changesets
- When you have successfully exported and imported a changeset, Omada recommends that you change the status of the changeset to Closed so that you can no longer use the changeset.
- While you view the list of changesets on the Configuration Changes page, click the Changesets link to open a dialog box.
- Select the Closed checkbox and click OK to close the changeset.
- When you have successfully exported and imported a changeset, Omada recommends that you change the status of the changeset to Closed so that you can no longer use the changeset.
-
Lock changesets, so that you cannot change them further
When you have made changes to the configuration, you can then go to Setup > Administration > Configuration Management... > Configuration Changes.
From here, you can enter the relevant search criteria and click Next to search through the existing changesets.
Importing changesets
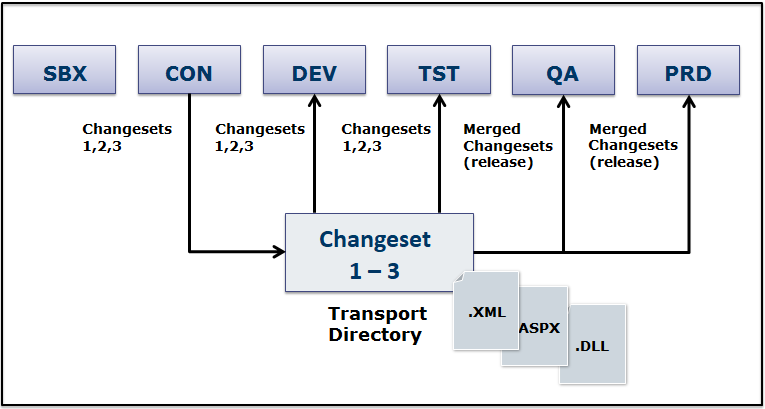
The standard import is typically used by smaller project groups working independently of each other or when performing specific tests. The merge method is valuable for coordinating imports before you install any major updates of the system for a more controlled transport.
The following diagram illustrates the transport flow between the changesets and the various systems:
Omada Identity supports the use of changesets to alter system configuration to fit your organization's needs. The changesets must be in the XML file format.
You can import custom changesets, for example made as part of an implementation project, through the Import Changeset page.
To import changesets manually, follow these steps:
-
Go to Setup > Configuration Management... > Import changeset.
-
In the File Upload window that opens, click Browse to locate the required changeset file. Remember that the changeset file must be an XML file.
-
If you need to add a second changeset, click the Click here to upload changeset file in the blue notification bar on the Configuration Changeset Import page. Open the File Upload window. Follow the same procedure as in step 2.
-
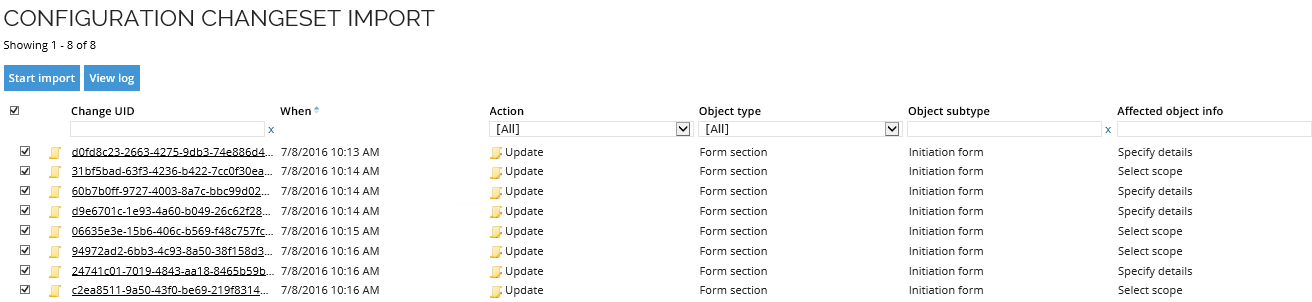
By default, all changesets included in the XML file are selected. If there are any changes that you do not want to include, clear the checkbox for the relevant changeset.
-
When you are ready, click the Start import button in the top left corner to begin the importing process.
-
In the confirmation dialog box, select the Run-in testmode checkbox to run the import in test mode. Use the Run in testmode functionality to determine if there are any import conflicts. During the test mode import, the progress of the import is shown. The duration of the import process depends on how many changes are included in the changeset.
-
If you do not want to test the import, clear the Run in testmode checkbox in the Confirmation dialog box to skip running in test mode. When the import is finished, you see a summary of the imports.
When a changeset is imported in test mode, all actions within the changeset are executed as they would be during a standard import. This includes the evaluation and triggering of event definitions, such as those configured to run on resource creation.
The only functional difference between a test execution and a standard import is that, once processing is complete, the transaction is rolled back instead of being committed.
As a result:
-
Event definitions are triggered during a test run if their conditions are met (for example, on resource creation).
-
Any actions initiated by these event definitions (such as executing code methods) are also performed.
-
No changes are persisted, as the entire transaction is rolled back at the end of the execution.
This behavior is expected and consistent with the system’s design for processing changesets in test mode.