Data preview
The Data preview feature is designed to assist system owners in preparing queries and mappings against target systems. The goal is to preview the data in the portal without having to run imports. In addition, the Data Preview Service allows the system owners to generate Logs as part of the preview and access them directly from the portal.
The Data preview feature is supported only by .NET-based query collectors, for example, REST collector, Microsoft Active Directory collector, or OData collector.
Please note that the first version of the Data Preview Service is in English only. Users who have selected a different language setting will still see English labels and captions in the preview UI.
The preview of data is available from the Queries and Mappings task in the system configuration.
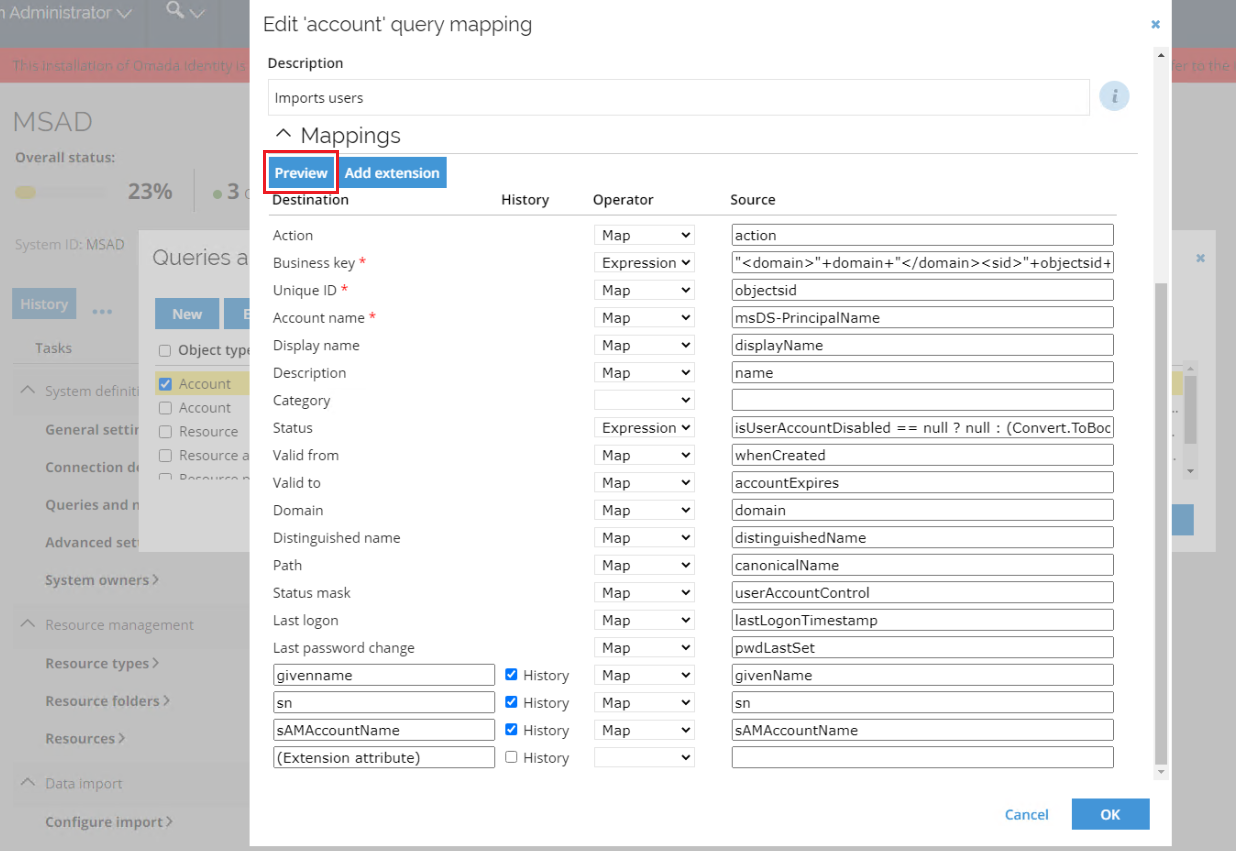
To perform the data preview:
- Go to Queries and Mappings task in your desired system.
- Select one query to be previewed.
- Press the Preview button.
- The data preview will be displayed in a new Preview query window.
Because the preview displays a separate column for each mapping, the preview screen may present many columns with information. In order to ease the reading for a given row of data, the data in the first column is always presented as a link.
Using Lookup operator in the Mappings options displays only preview of the input for the Lookup, and not the end result. The actual lookup, for example business key or compsed key, is visible only during data import itself.
Clicking the link opens the Row details window that presents all mappings for a given row.
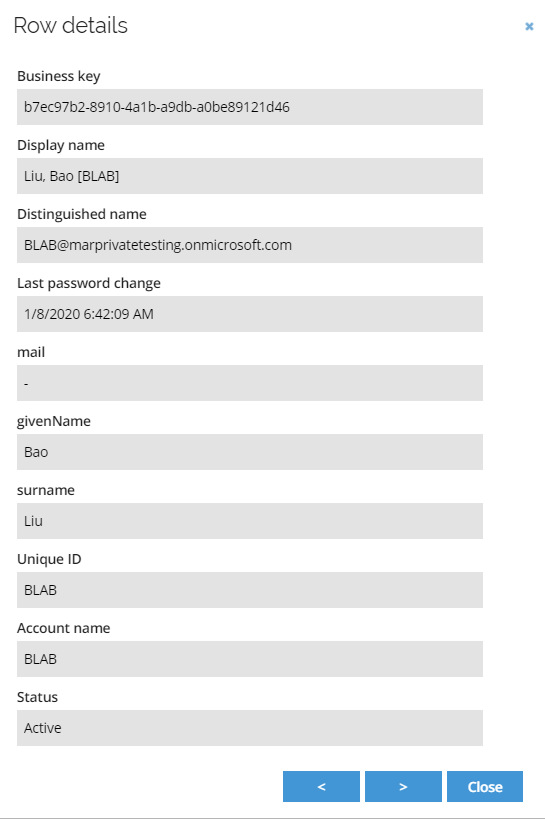
In the bottom right-hand corner of the window, there is the Close button and two arrow buttons, < and >, which allow you to navigate to and view the previous or the next row of data. Please note that you can navigate only between the rows on the same page.
In addition, the Preview button is also available in the Edit query mapping dialog box.
If, for any reason, you need to cancel the process of generating the preview, you can do so by clicking the Cancel button on the Loading screen.
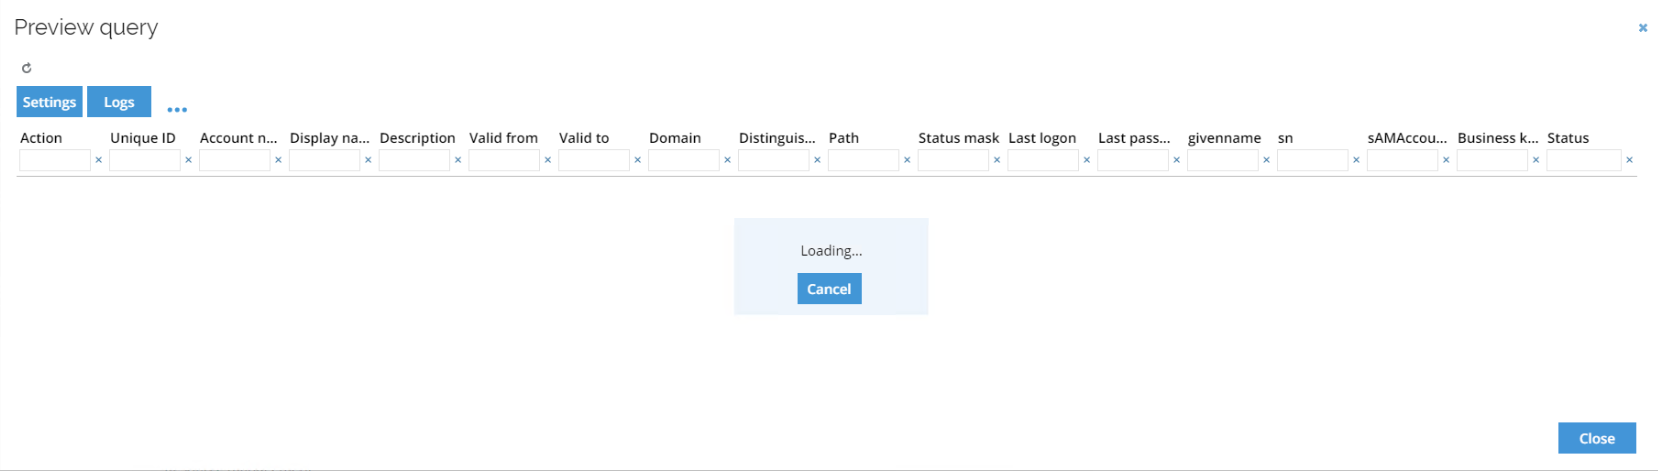
Such a canceled preview will display only as much data as was downloaded from the target system.
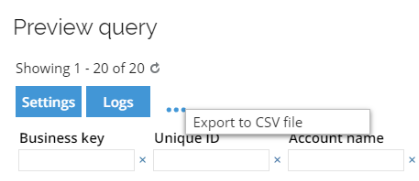
By clicking the ellipsis menu, you can open the Export to CSV file option. This option allows you to download the preview in a CSV format file.
Preview settings
The data previews can be configured to better suit your needs. The Settings button, available in the Preview query window, allows you to display the settings of the preview.
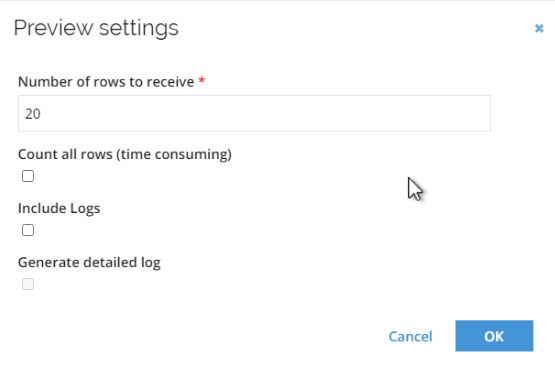
There are the following Preview settings:
| Setting | Description |
|---|---|
| Number of rows to receive | This setting defines the maximum number of rows to be returned by the collector and displayed in the preview. The Data Preview Service will continue to query the target system for pages of data until the configured number of rows or all rows are loaded (whatever happens first). This setting is limited to 1000 rows. |
| Count all rows (time consuming) | This setting allows you to instruct the Data Preview Service to fetch all pages and count the total number of rows. The total number of rows will be displayed as a text "Showing [x] - [y] of [z]" below the Preview query title. This option will still return the total row count even if the Number of rows to receive is set to a lower number than the total row count. Please bear in mind, that due to collector retrieving all the data from the source system to count all the rows, this process takes a significantly more time than retrieving only a part of data defined in the Number of rows to receive. |
| Include Logs | This setting allows you to enable logging of the preview. The number of logs can be large and require significant additional network traffic to return. |
| Generate detailed log | This setting allows you to enable detailed logging, including the "debug" logs. It should only be used in troubleshooting situations as it will add considerable overhead on network traffic. |
Staging preview
Paging of data is an essential part of the preview functionality. For collectors not supporting data paging, the preview will not display any data if the Cancel button is pressed while the preview request is processed.
Data paging in the preview window does not require any additional configuration. It is possible to set the page size in the preview dialog, but it does not affect how data is downloaded from the collector.
However, it is possible to configure how many data rows should be processed and displayed in the preview window. You can define this in the Settings dialog.
This functionality is handled differently for collectors that support paging and collectors without paging support.
For collectors that support paging, the service will download only the amount of data pages required to display the number of rows specified in the Settings.
For collectors without paging, all data will be downloaded, and then the specified number of rows will be displayed in the preview window.
This difference has a significant impact on the performance of the preview functionality and volume of data downloaded from the target system.
Data preview logs
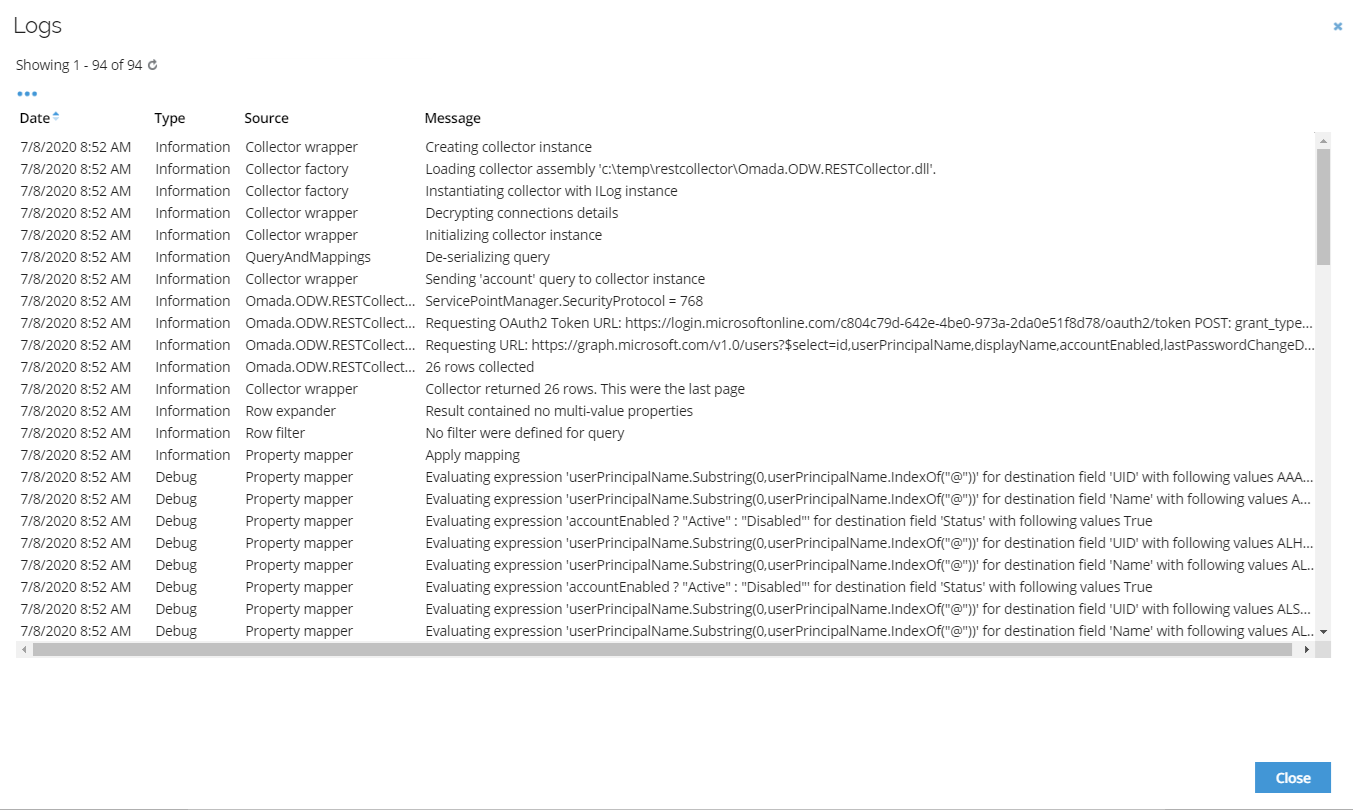
If you configure the Preview settings to Include Logs the Preview query window will include the Logs button.
You can press the Logs button to bring up a new window where you can view all logs created during the preview generation. The logs will include logging from the collector.
The Logs window displays the logs in a grid and allow you to sort the logs.
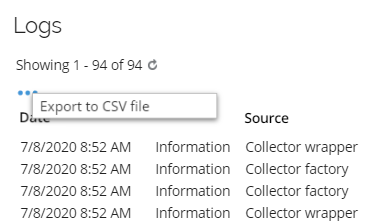
By clicking the ellipsis menu, you can open the Export to CSV file option that allows you to download the logs in a CSV format file.
Data Preview Service Installation on-prem
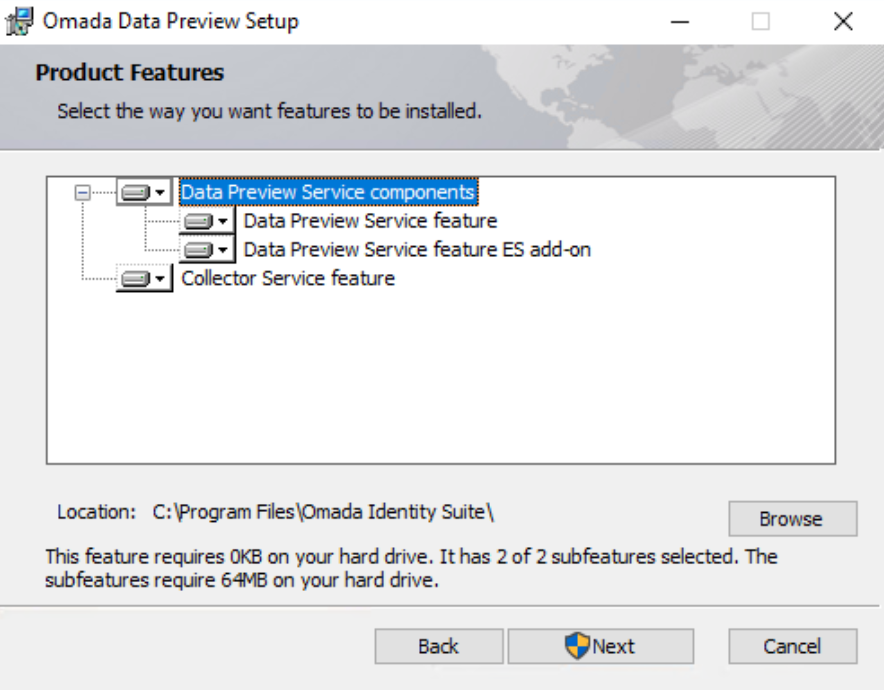
Omada Data Preview Service comprises of two distinct services that need to be installed for the feature to work correctly. These two services, the Data Preview Service and the Collector Service, are displayed in the installer's Product Features window as separate features.
Data Preview Service components contain the services responsible for the calculation of preview data and placing the necessary files in the Enterprise Server.
Data Preview Service feature
The Data Preview Service is a Windows service that generates previews based on data received from the Collector Service. The service is created in .Net 6 and for communication with the Collector Service and ES gRPC technology.
Requirements:
- .NET Desktop Runtime version 6.0.0 or higher
- Microsoft .NET Runtime 5.0.17 or higher
- Microsoft ASP.NET Core 5.0.17 – Shared Framework or higher
- Microsoft Windows Desktop Runtime 5.0.17 or higher
The .NET version required cannot be lower than the version required by other Omada Identity installations.
ES add-on for Data Preview Service feature
This feature includes all files that need to be added to Enterprise Server to enable it to display the preview data and communicate with the Data Preview Service. It uses gRPC as the communication technology.
Requirements:
- Enterprise Server version 14.0.8 (Update 8) needs to be installed before the installation of this feature.
Collector Service feature
The Collector Service is a Windows service responsible for hosting collectors' DLLs. It is created in .Net Framework 4.8, and it is using gRPC for communication with the Data Preview Service.
Requirements:
- .Net Framework 4.8
- Access to collectors' assemblies
Installation process on-prem
The Data Preview Service is installed with the standard Windows installer package. To install the service, follow the below steps:
-
Download the latest version of the Data preview installer from the Omada Community.
-
Start the installer as a Administrator using the elevated command prompt.
infoIf the installation process is not run by the Administrator, the installer may fail to start the installed Windows services.
-
In the first step, Data Preview Service utilizes classic Windows installer where single features can be disabled for the installation by setting them to unavailable.
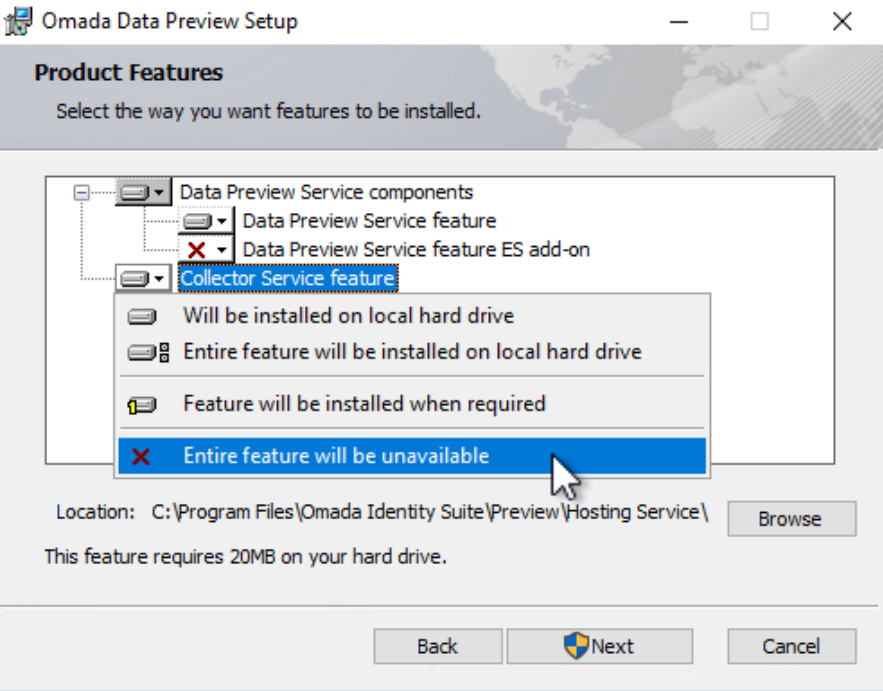 note
noteAll 3 features should be enabled for this functionality to work. Each of the features has corresponding steps that need to be completed to finish the installation process.
tipIf the Omada Identity Suite is installed on a drive other than C:, the services must be located on the same drive.
-
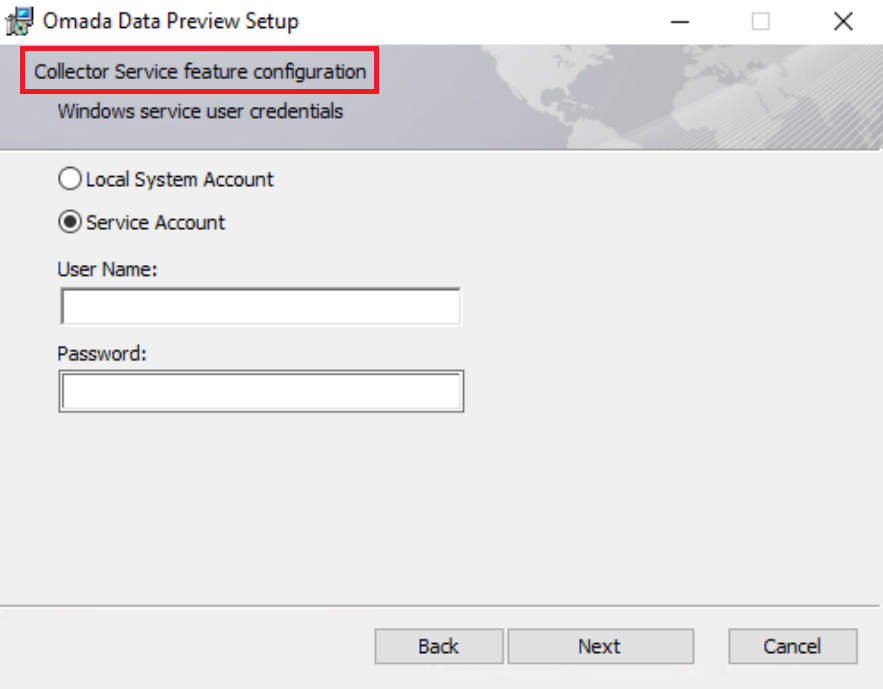
For both the Data Preview Service and Collector Service features, a Windows service user that will run the service can be selected. This Windows service user can either be a Local System Account or Service Account.
For the Local System Account, the User Name and Password fields are disabled.
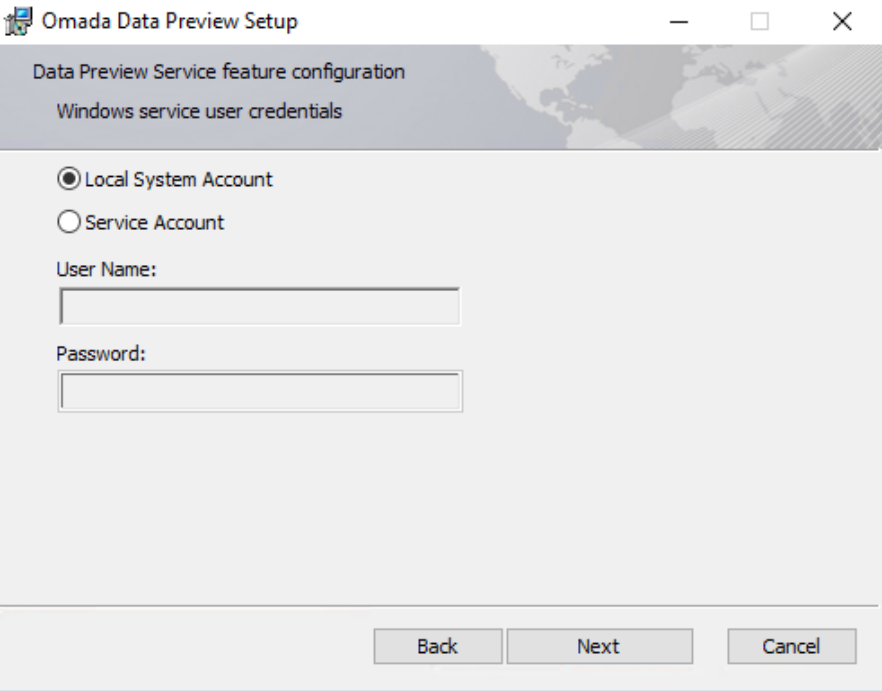
While for the Service Account, you need to provide the user name and password in the User Name and Password fields respectively.
Specifying an actual service account is important if you expect the connectivity to utilize integrated security, for example, SQL Query connector.
The service that is being configured is indicated in the description of the step window.
-
The installation process of the ES add-on for Data Preview Service feature does not have any additional steps.
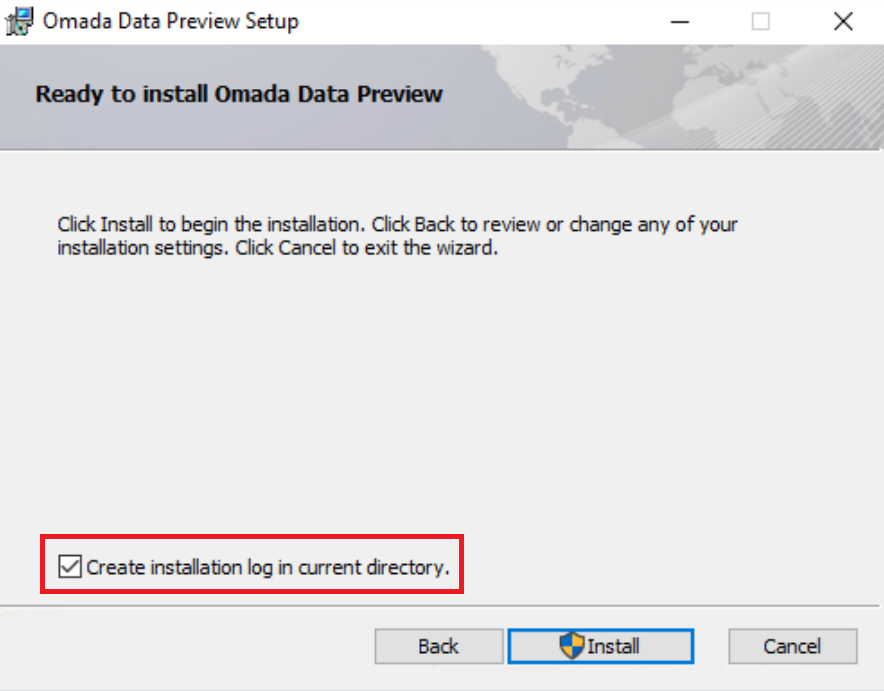
-
In the last window you can choose to save the installation log in the location of the MSI installer by selecting the Create installation log in current directory checkbox.
Uninstalling the Service on-prem
If you no longer need the Omada Data Preview Service, you can uninstall it.
To uninstall the service:
-
Stop the website on which the Enterprise Server portal is hosted.
-
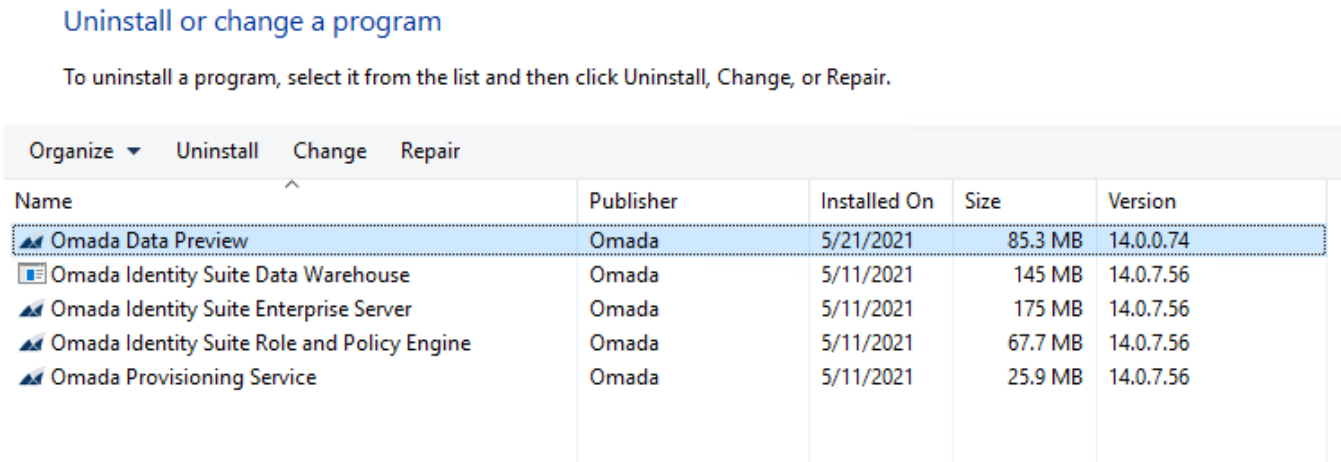
Uninstall Omada Data Preview from the Control Panel.
-
Restart the previously stopped website.
The uninstallation process will remove all files, and the Preview button will disappear from the UI. However, the data object form will still refer to the javascript file installed by the Data Preview Service.
This reference is not harmful to the system, but you can remove it by following these steps:
-
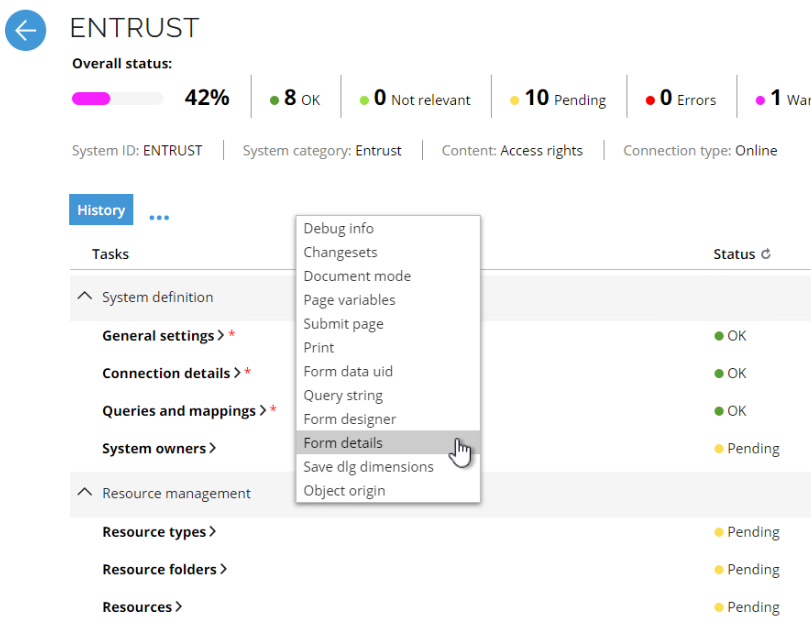
Navigate to any system details page.
-
Ctrl+right click the page and select Form details.
-
Select Script files.
-
Remove the
jsinc/OIM.SystemOnboarding.DataMapping.Preview.QandM.jsentry.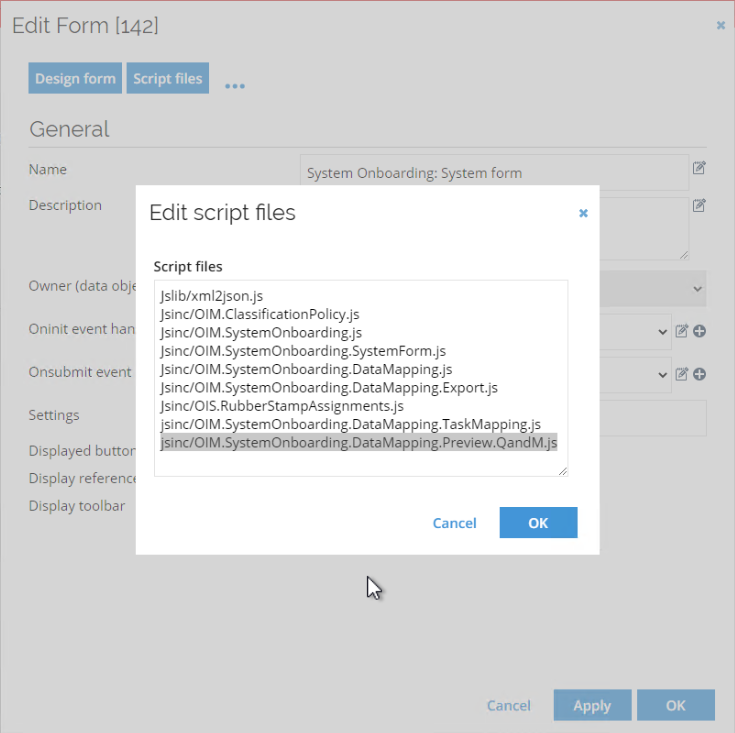
Similarly, the set of customer settings created during installation is also not removed. These settings are also not harmful and can be removed directly in the Enterprise server database, using the following statement:
DELETE FROM [OIS].[dbo].[tblCustomerSetting] where [Category] = 'Data Preview Service'
Data Preview Service Configuration on-prem
Service location
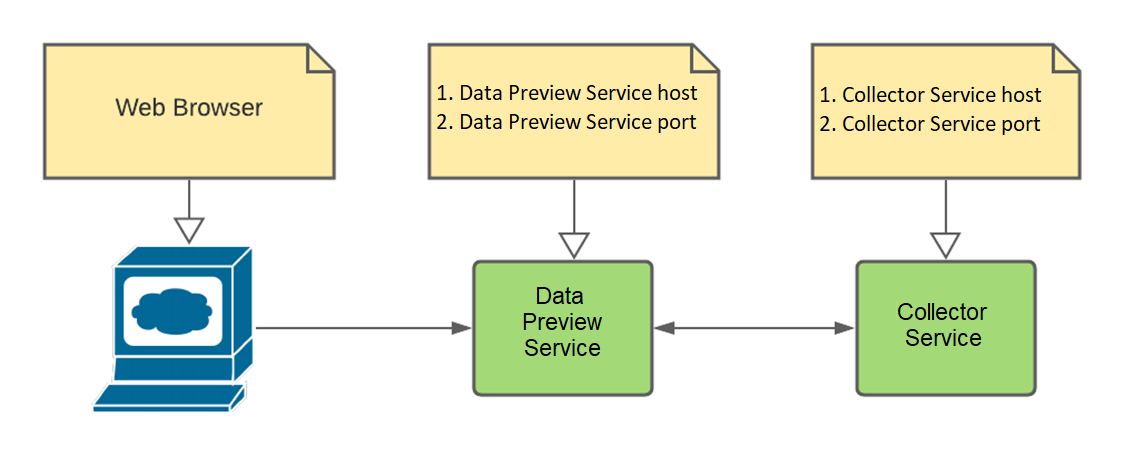
The location of the staging services, that is Preview and Collector Services, is defined through a set of four parameters: Data Preview Service host, Data Preview Service port, Collector Service host, and Collector Service port. The schema below presents the relation between the services and the parameters.
These parameters are defined both in the services configuration files and in Omada Identity Customer settings.
Configuration in Customer settings
The location of the Data Preview Service and Collector Service is configured through a set of customer settings. These settings can be found in Administration -> More -> Customer settings in the Data Preview Service section.
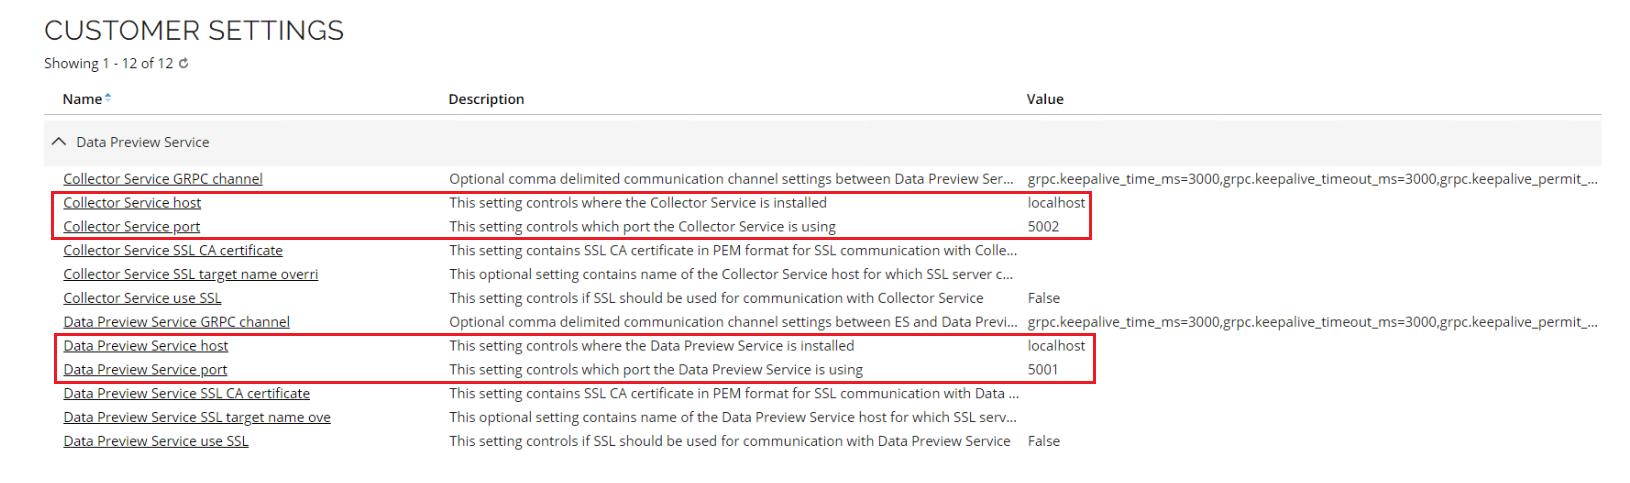
The customer settings are as follows:
| Setting | Description | Default value |
|---|---|---|
| Collector Service host | This setting defines the name of the host or IP address where the Collector Service is installed | localhost |
| Collector Service port | This setting defines the port used by the Collector Service to expose its endpoint to the web browser client. | 5002 |
| Data Preview Service host | This setting defines the name of the host or IP address where the Data Preview Service is installed | localhost |
| Data Preview Service port | This setting defines the port used by the Data Preview Service to expose its endpoint to the web browser client. | 5001 |
The port numbers configured in the Customer settings must match the port numbers defined in the configuration files for the Preview and Collector Services.
Configuration in config files
Configure Data Preview Service
The configuration file of the Data Preview Service is named appsettings.json. This file allows you can configure the both the host and the port parameters.
To do so, provide the address with the port in the Url endpoint setting within this file:

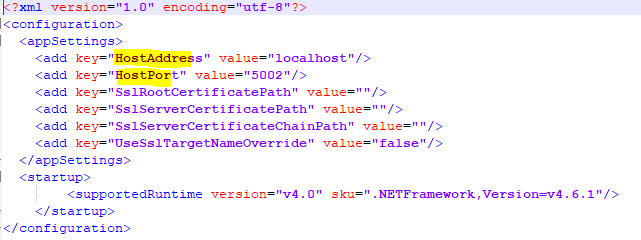
Configure Collector Service
The configuration file of the Collector Service is named Omada.ODW.Staging.HostingService.exe.config. You can configure the address and port in the HostAddress and HostPort application settings within this file:
Service secure communication on-prem
You can strengthen the security of communication between the Vault Service and the Enterprise Server by using the SSL/TLS 1.2 protocol.
The use of secure communication is not required for all components, and it can be used only between, for example, Preview and Collector Services.
Although, naming of all the settings dedicated to the secure communication refer to SSL, the used protocol is TLS 1.2.
Configure Data Preview Service
Configuration in config file
You can enable the TLS 1.2 protocol for the Data Preview Service by modifying its configuration file. The configuration file of the Data Preview Service is named appsettings.json.
To enable TLS 1.2, you need to remove the default node:

You must replace the removed node with HttpsFromPem node, as follows:
"EndPoints": {
    "HttpsFromPem": {
        "Url": "https://localhost:5001",
        "Certificate": {
            "Path": "C:\\SslCertificates\\server.crt",
            "KeyPath": "C:\\SslCertificates\\server.key"
        }
    }
}
Where:
- the Path in the Certificate node is a full path to PEM formatted chain of the SSL certificate.
- the KeyPath in the Certificate node is a full path to PEM formatted private key of the SSL certificate.
Configuration from Computer Store
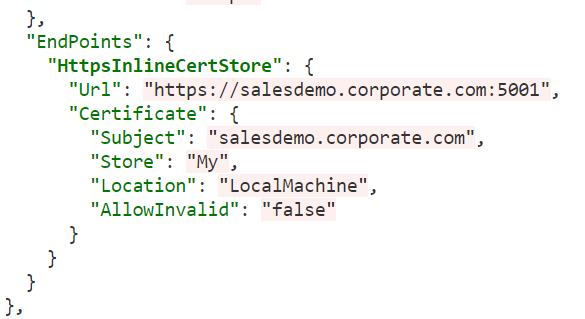
To enable the TLS 1.2 protocol for the Data Preview Service by modifying its configuration file from Computer Store. The configuration file of the Data Preview Service is named appsettings.json.
To enable TLS 1.2, you need to remove the default node as explained above and replace the removed node with HttpsInlineCertStore node, as follows:
Configuration in Customer settings
The TLS 1.2 setting of the Data Preview Service is configured through a set of customer settings. These settings can be found in Administration -> More -> Customer settings in the Data Preview Service section.
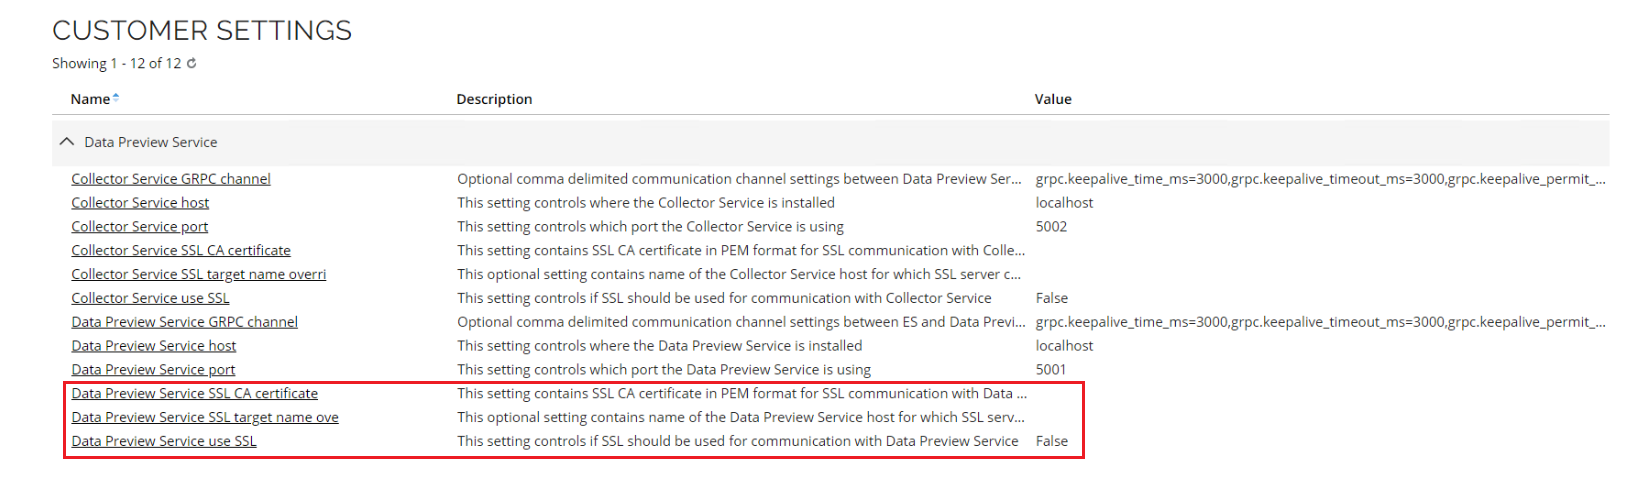
The customer settings are as follows:
| Setting | Description | Default value |
|---|---|---|
| Data Preview Service SSL CA certificate | This setting contains SSL CA certificate in PEM format for SSL communication with Data Preview Service | - |
| Data Preview Service SSL target name override | This optional setting contains name of the Data Preview Service host for which SSL server certificate is created | - |
| Data Preview Service use SSL | This setting controls if SSL should be used for communication with Data Preview Service | False |
Configure Collector Service on-prem
Configuration in config files
To enable the TLS 1.2 protocol for the Collector Service you need to modifying the configuration file named Omada.ODW.Staging.HostingService.exe.config.
To enable TLS 1.2, you need to add the following keys:
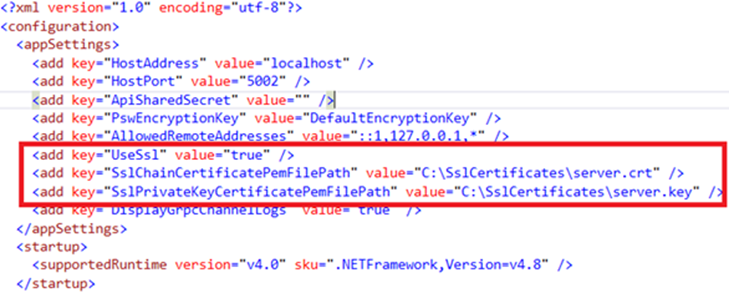
Where:
- the
UseSslmust be set to True. - the
SslChainCertificatePemFilePathkey is a full path to PEM formatted chain of the SSL certificate. - the
SslPrivateKeyCertificatePemFilePathkey is a full path to PEM formatted private key of the SSL certificate.
Configuration in Customer settings
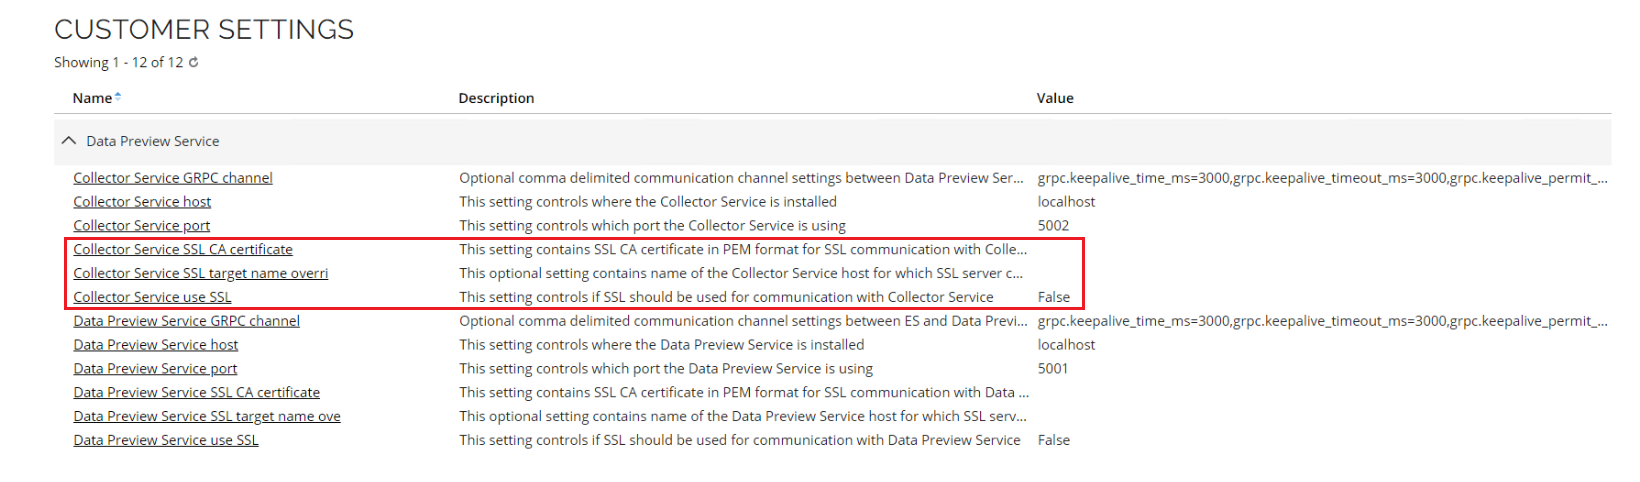
The TLS 1.2 setting of the Collector Service is configured through a set of customer settings. These settings can be found in Administration -> More -> Customer settings in the Data Preview Service section.
| Setting | Description | Default value |
|---|---|---|
| Collector Service SSL CA certificate | This setting contains SSL CA certificate in PEM format for SSL communication with Collector Service | - |
| Collector Service SSL target name override | This optional setting contains name of the Collector Service host for which SSL server certificate is created | - |
| Collector Service use SSL | This setting controls if SSL should be used for communication with Collector Service | False |
When deploying the services, bear in mind that communication might require specific network connectivity. In certain environments, firewall rules may need to be updated to allow traffic on the configured service ports (the port numbers are not commonly used and might be blocked in restrictive environments). Ensure that the ports are open in the firewall configuration to enable proper communication.
Authorize communication using ApiSharedSecret on-prem
The Data Preview Service requires two authorizations within the preview process communication.
Required authorizations
The first authorization step requires the Omada Identity's Enterprise Server to be authorized against the Data Preview Service.
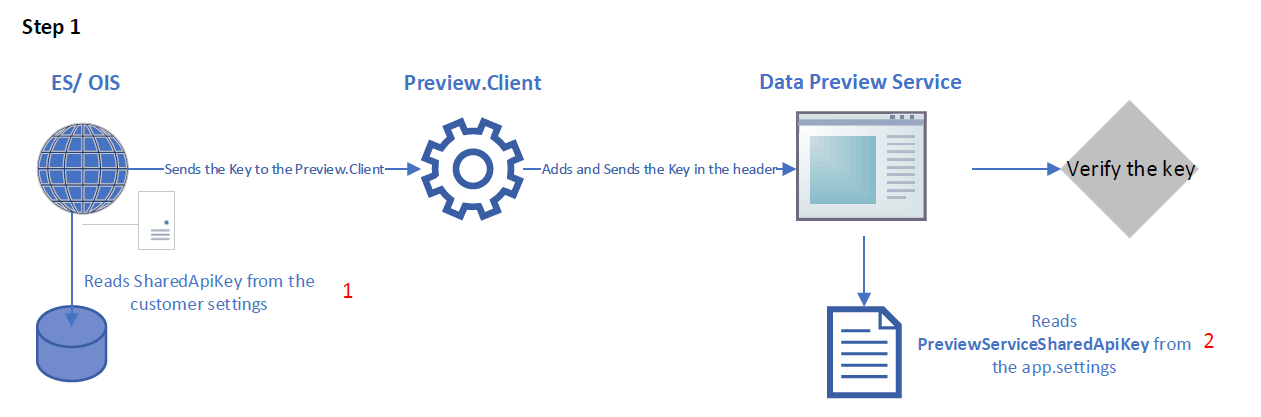
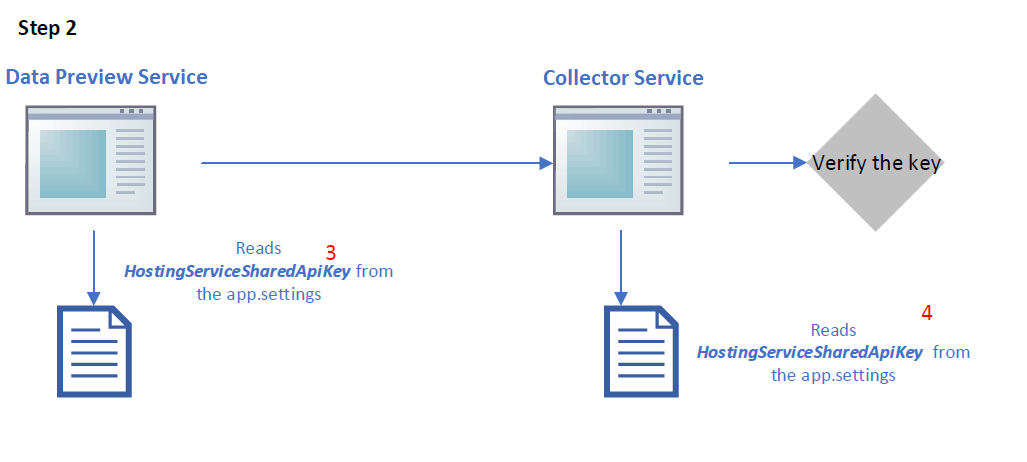
In the second step, the Data Preview Service is authorized against the Collector Service.
By default, all keys are empty in the configuration places, and all the services are able to work with the default values.
In addition, all PswEncryptionKey keys are set to DefaultEncryptionKey, and all the services are able to work with the default values.
Authorization configuration process
In order to configure the authorization of the Data Preview Service, follow the steps below:
- Generate the ApiSharedKey with the use of StringEncrypter.exe tool.
- Configure the Data Preview Service ApiSharedKey customer setting in Enterprise Server.
- Enter the ApiSharedSecret and PswEncryptionKey in the appsettings.json/ CommunicationSettings/AuthenticationSettings section of the Data Preview Service's configuration file.
- Enter the ApiSharedSecret and PswEncryptionKey in the App.config file of the Collector Service.
- Alternatively, you can enter the ApiSharedSecret and PswEncryptionKey in the Windows Registry file (only for Data Preview Service client for PswEncryptionKey).
IP Address whitelisting on-prem
Thanks to this configuration option, you can limit the number of clients allowed to communicate with the services. The Data Preview Service and Collector Service are secured and configured individually.
Data Preview Service
The clients who can access the Data Preview Service instance should be limited to the servers hosting the Enterprise Server website. The IP addresses must be defined in the CommunicationSettings\AuthenticationSettings\AllowedRemoteAddresses setting in the appSettings.json file for the Data Preview Service.

The AllowedRemoteAddresses setting utilizes provided format corresponding to the Data Preview Service host setting value in the Customer settings.
- If the Data Preview Service host uses IPv4, the AllowedRemoteAddresses setting should be configured using IPv4 -> 127.0.0.1 for default settings.
- If the Data Preview Service host uses IPv6 or host name, the AllowedRemoteAddresses setting should be configured using IPv6 -> ::1 for default settings.
Multiple addresses should be separated by commas.
It is possible to use wildcards, but only at the ends of addresses, such as ’10.17.92.*’, which would enable addresses in the specified subnet.
You can leave the value empty to disable the validation.
Collector Service
Again, the clients who can access the Collector Service should be limited to the servers where the Data Preview Service is running. You must define the IP addresses in the AllowedRemoteAddresses appSetting in the Omada.ODW.Staging.HostingService. exe.config file.
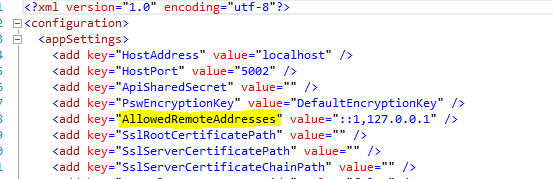
The AllowedRemoteAddresses setting utilizes provided format corresponding to the Collector Service host setting value in the Customer settings.
- If the Collector Service host uses IPv4, the AllowedRemoteAddresses setting should be configured using IPv4 -> 127.0.0.1 for default settings.
- If the Collector Service host uses IPv6 or host name, the AllowedRemoteAddresses setting should be configured using IPv6 -> ::1 for default settings.
Multiple addresses should be separated by commas.
Like in the Data Preview Service, it is possible to use wildcards, but only at the ends of addresses, such as ’10.17.92.*’, which would enable addresses in the specified subnet.
You can also leave the value empty to disable the validation.