Import and onboarding
System Onboarding is the process of registering an external system to Omada Identity. When the two systems are connected, you can manage and provision user and access rights for the relevant external system from inside Omada Identity.
The feature is in the Enterprise Server Portal with a separate view from which you can work task-by-task to safely import the systems and their data.
The separate view serves as a checklist and guides you through all the necessary and recommended configuration steps when adding new systems to Omada Identity. For example, after finishing the configuring tasks, you can start the data import and then view the data in the Compliance Workbench for further reconciliation.
You can register the following systems to Omada Identity:
- Active Directory
- Exchange
- SAP
- Systems based on a generic formats and protocols, such as LDAP, OData Service and SAP SuccessFactors
A default installation of Omada Identity supports a number of collectors and connectors to different systems and directories. You can also create and add custom connectivity to other systems if your organization requires connection of additional types of systems to Omada Identity.
For more information about how to create and setup custom connectivity, see the Software Development Kit document in the Connectivity section.
Experience system onboarding with Omada Identity Cloud interactive walkthrough. Learn how to onboard a system and then import data from that system to Omada Identity Cloud.
Users with rights to onboard systems
On a new system, on which no activity has yet taken place, only the system administrator is allowed to register systems. To enable more roles to be able to work with system onboarding, the system administrator must specify the relevant role as the system owner for the individual system.
The system administrator registers an Active Directory in Omada Identity. To delegate the work of specifying settings, the system administrator defines a role on the registered AD as a system owner. This role is now allowed to specify settings.
Alternatively, the system administrator can add other users to the system administrator role. For this to be possible, you must add new users to the system.
To make sure that you get the best possible use out of the system onboarding functionality, Omada highly recommends that you onboard an HR system before you register and onboard any other system to Omada Identity. By first onboarding an HR system, you make it possible for Omada Identity to match identities with the data that you receive from other registered systems.
In typical implementation, the role of the data administrator is also used for system onboarding. To enable the data administrators, you need to navigate to the Authorizations for the data administrator role and add the Create and Update permissions for Data Object Types.
Registering and removing systems
When you want to onboard a system, click Services > Register New System in the Omada Identity Portal.
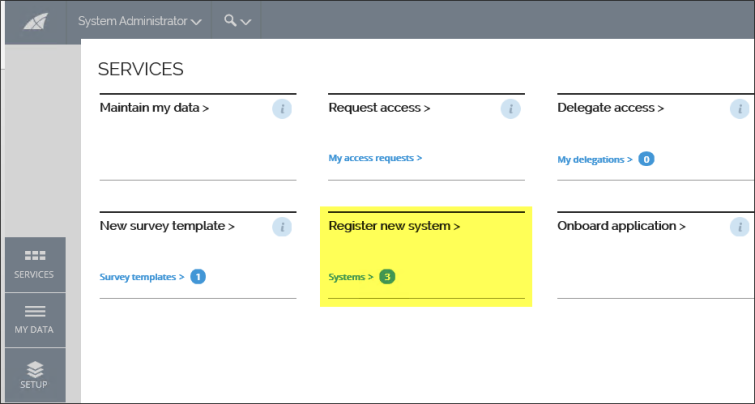
Alternatively, you can go to Setup > Systems and start the same process from there.
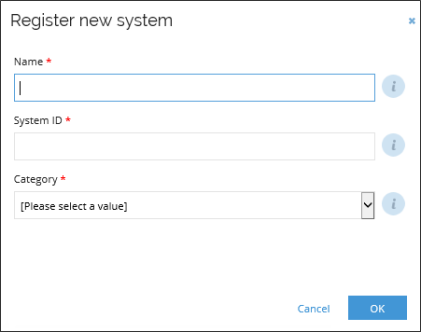
To register a new system you have to provide following information:
- Name
- System ID
- Collector technology/System category
Some legacy collectors are classified as a Deprecated technologies and are only available if there are already registered system utilizing the same collector.
When you have registered the system, a green message bar should appear to inform you that you have registered a new system. Click the link in the green message bar to go to the system and specify settings.
On the Systems page, you can see the systems that have already been onboarded by clicking Setup > Systems or Services > Systems. If you have not yet registered any systems to be onboarded, this page will appear empty.
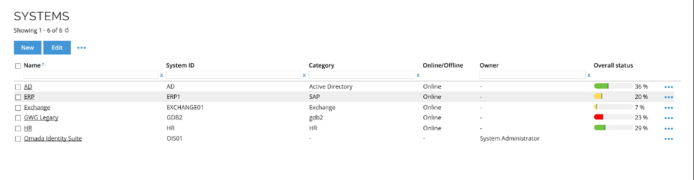
In the Systems view, you can register, edit, and delete systems and see an overview of all systems that are registered to Omada Identity. Each system that you add to Omada Identity is listed on this page.
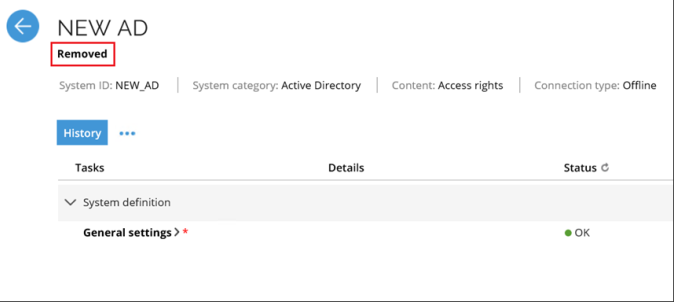
You can only delete a system if you have not yet imported any data from it. If the system already contains data, you will not be able to permanently delete it in the Systems view. However, you can still remove such a system from use. A removed system will stay on the system list, but its configuration information is permanently deleted. Even though it is possible to reactivate a removed system, the removed configuration information will not be recreated. When an offline generic system or an offline AD system is removed from the Portal, the data stored in the system will be deleted from tblSystemUploadFile in the ES database. For generic systems, data will also be deleted from the Source System Data database. If you want to reactivate a removed system, you will need to upload the data again.
To remove a system, click its name to open its individual page, and change its status in the General settings from Active (default) to Removed.
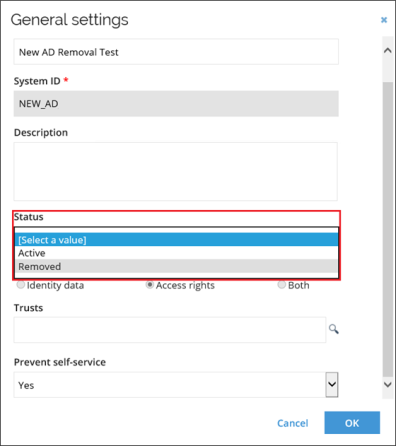
After you select the Removed option and acknowledge the warning, Omada Identity will set the system status to Removed.
Removing a system does not automatically update the Source System database. So, if you want to re-use the same System ID name given to a system previously removed, you must first manually clean up the Source System database.
The status of a system cannot be set to Removed if the system is trusted by other system and/or its content is set to Identity Data or Both.
You can see the progress of the onboarding process in the Overall status column.
The color of the progress bar allows you to determine the current state of the individual system.
: all required tasks are OK and the system is ready to be included as part of a data import.
: the system still has pending tasks that you must perform before the system can be fully included in a data import.
: at least one task related to the particular system is in a warning state and requires attention.
: at least one task related to the particular system is in an error state and requires attention.
Above the first listed system, there are a number of actions that you can optionally perform before you move on to configure the system or that you can use at a later time.
New and Edit are separate buttons, and the rest of the actions are available if you first click the ellipsis (…).
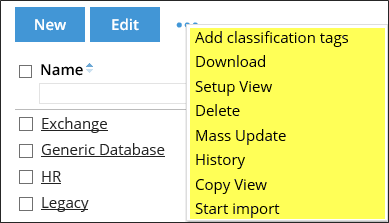
- New: register a new system from the Systems view.
- Edit: Edit an already registered system. An alternative to clicking the system.
- Add classification tags: initiate a survey to add classification tag categories and classification tags to one or more systems. For more information about Classification, see the Omada Identity - Configuration Guide.
- Download: download the Systems view as either comma-separated values (.csv) file or a PDF file and specify paper size and paper orientation. The CSV format enables you to open the file in a spreadsheet application. The PDF format enables you to save the data in an electronic print format and, for example, view this in Adobe Acrobat.
Due to security measures, the text values in the CSV files cannot begin with = (equal), - (minus), + (plus), or @ (at) characters. If they do, problems with editing values in Excel for subsequent upload using a DataExchange may occur.
- Setup view: here, you can change a number of settings for the accessibility of the view. You can, for example, change who can see this view, who administrates the view, and which fields are displayed.
- Delete: delete registered systems, for example, if they are no longer relevant. Any deletion of a system must take place before you import data.
- History: on the Systems page, you can see the history of changes made to objects. You can, for example, specify the period of time to see history for or choose a specific user to view history for.
- Copy view: click this option to copy the current view.
- Start import: starts the import of data from registered systems that are ready for import.
If an error occurs during the last part of the import (Resolve primary identities [IdentityPicker] or later), the next import will start at the IdentityPicker step to finish/finalize the previous import correctly. In order to run a regular import of all the data, yet another import is required.
Just below these actions, there are a couple of search fields that you can also use to improve your use of the Systems view, particularly if you have many types of systems onboarded in your setup. Press Enter to submit the search.

- Name: type one or more characters to search for a particular system name.
- System ID: type one or more characters to search for a particular System ID.
- Category: type one or more characters to search for a particular system category.
- Owner: type one or more characters to search for a particular owner of a system.
Individual page for registered systems
When you have registered a system, you can either click the individual system or the Edit button above the listed systems on the Systems view to begin configuring the system and its data itself. Regardless of the method that you choose, you are taken to an individual page for the registered system.
On the individual page for the registered system, you must go through a number of tasks to configure settings for onboarding the new system and importing its data to Omada Identity.
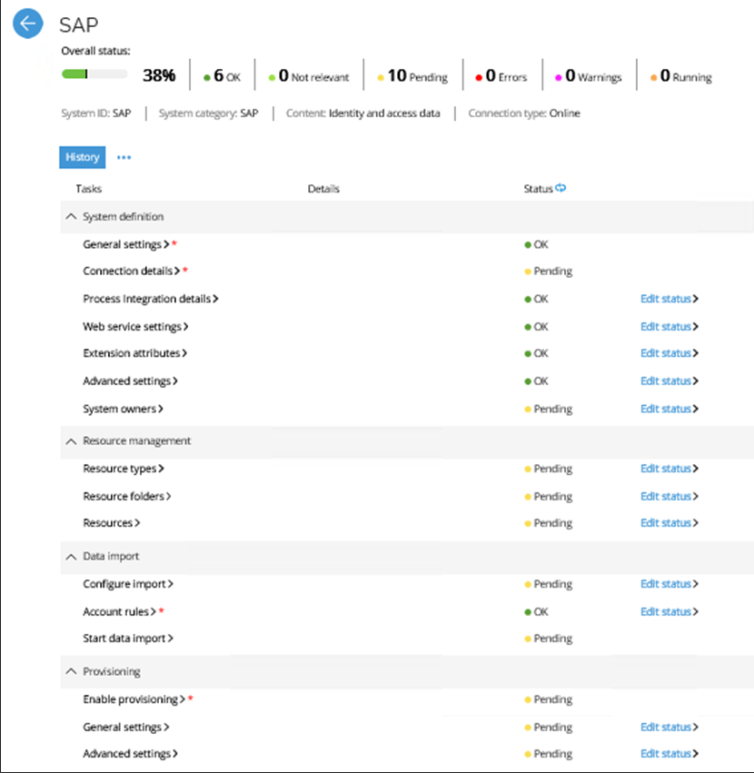
As you may see in the image above, the tasks are divided into four categories: System definition, Resource management, Data import, and Provisioning. If you onboard an HR system, you only see the tasks System definition and Data import.
You do not necessarily have to go through all tasks one-by-one from top to bottom, but all the various types of systems that you can onboard include some tasks that are mandatory for you to set up before you can import data and enable provisioning of rights. Such mandatory tasks are marked with a red asterisk (*). See the image above.
If you register an offline Active Directory or generic system, a fifth task category, Data upload, also appears in the list of tasks on the individual system page.
Tasks on the individual page
The following tasks appear on the individual onboarding page:
- System definition: include all the basic and advanced settings that you must specify or select in order to ensure that the connection between the system and Omada Identity is set up correctly. ome tasks include settings that apply to all systems in the same category, for example for all AD systems that are connected to the system. For such tasks, there is a light-blue note at the top of the task’s settings dialog box that explains this.
- Resource management: include tasks and settings that allow you to add new or edit existing resource types, resource folders, and resources.
- Data import: relate to how Omada Identity should process the data that it receives from the imported system. You can set up classification and ownership rules for accounts and start importing data from the system to begin onboarding it to Omada Identity.
- Provisioning: relate to Omada Identity taking control of the imported data when they are fully imported to the system. Here, you can enable provisioning and configure a number of related settings.
- Data upload: if you onboard an offline Active Directory or an offline generic database, the Data upload task category appears on the individual page for these systems. The task here allows you to upload the offline system or database files that are needed to onboard the system.
System actions and options
Above the tasks shown on the individual system’s page are a number of other actions and options that you can access for each system. History is a separate button, and the rest of the actions are available if you click the ellipsis (…).
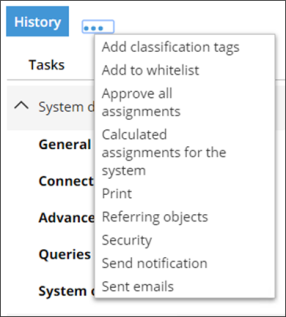
Select any of these options or the History button to open a dialog for the relevant action or option. You can either see some specific information about the system or carry out an action:
- History: lists all changes made to the onboarding of the system, the time and date of when the changes were made, and the users who have made the changes.
- Add classification tags: displays Initiate Survey screen. The survey allows you to review and manage classification of the system.
- Add to withelist: add a currently edited system to the whitelist.
- Calculated assignments for the systems: shows a list of calculated assignments that Omada Identity RoPE has calculated for an identity. The dialog box displays calculated assignments including compliance status, attribute values and assignment reasons and other details.
- Print: opens the Windows printing dialog box. Use this option to print your system onboarding progress.
- Referring objects: lists all objects that have a reference to your onboarded system. You can see what object it is, the type of object it is, and its link property.
- Security: set and change permissions for users and user groups of the individual onboarded system. You can set permissions for all types of administrators, users, and user groups. By default, the setting System inherits security from its parent object is enabled, so you cannot change any security settings. To change the security settings, you must clear the checkbox to disable this setting. If you do this, you can change permissions and the people to which to assign permissions.
- Send notifications: send an email to one or more users of Omada Identity regarding the status and settings of the new item.
- Sent emails: shows a list of emails sent from the Send notification dialog in the onboarded system. You can see to whom the emails were sent, what the subject of the emails was, and when they were sent.
- Register derived system: this button only appears when you register generic databases. Click this button to add systems that are part of the database.
Transferring onboarded systems
Most configuration changes for onboarded systems can be transferred between environments through changesets. Generally, Connection details values are stored in the Data connection data object, so Omada doesn't recommend importing Data Connection changes when you want to have different systems in different environments.