Configuring the onboard application objects
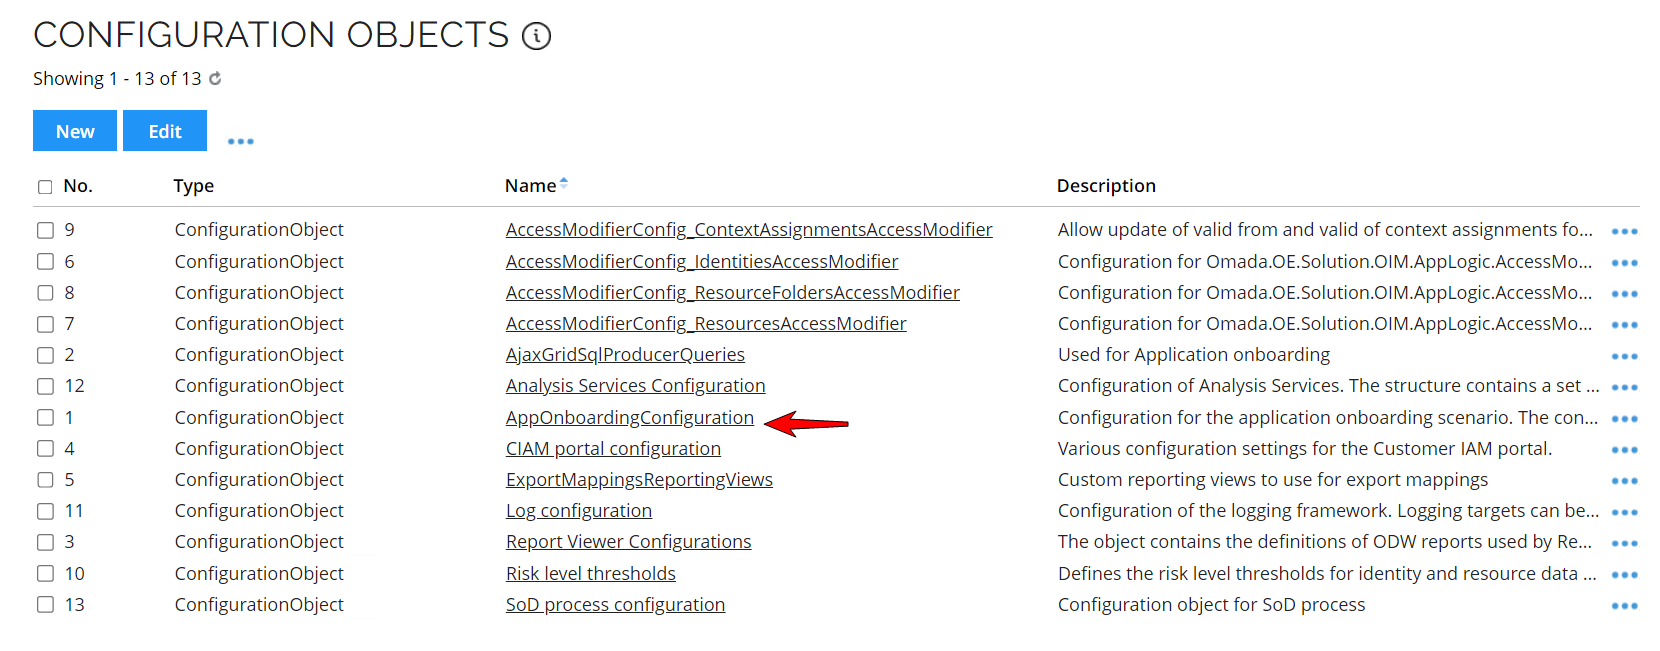
This section explains how you can configure the onboard application objects. To do that, go to Set up > Administration > More > Configuration Objects.
-
In the Configuration Objects view, look for the object AppOnboardingConfiguration and open it.
-
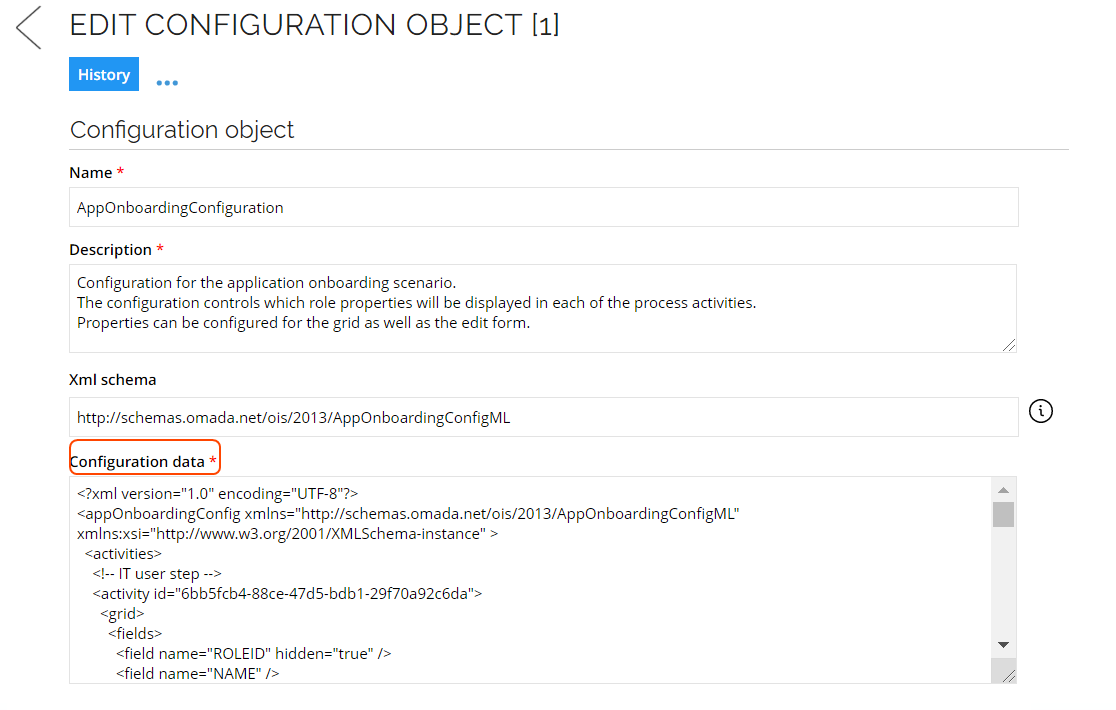
The edit page will open and here you will see the information you can edit. Here you are able to change the appearance and behavior of the grids and forms by making changes to the .xml configuration data.
Grid configuration
In the grid section of the .xml, specify which properties to load in the process by adding the property system name in the grid list. If certain properties should be loaded but not visible, then you can hide them by specifying hidden = true.
You can control the width of the columns by specifying a width attribute with the desired width in pixels. The default width is 200.
    <activity id="6bb5fcb4-88ce-47d5-bdb1-29f70a92c6da">
      <grid>
        <fields>
          <field name="ROLEID" hidden="true" />
          <field name="NAME" />   width= “175”  />
          <field name="DESCRIPTION"  width= “130”  />
          <field name="SYSTEMREF" width= “100”  />
          <field name="ADDREQUESTINFOATTRS" hidden="true"/>
          <field name="CHILDROLES" hidden="true"/>
          <field name="ROLEFOLDER" width= “100”  />
          <field name="ROLETYPEREF"  width= “130”  />
          <field name="ROLECATEGORY" hidden="true" />
          <field name="PREVENTSELFSVC" hidden="true"/>
          <field name="MANUALOWNER" width= “100”  />
        </fields>
      </grid>
Form configuration
The form section controls which fields are displayed in the Add and Edit forms. Add all required fields by adding the property system name in the form list. You have the following true/false options:
RequiresValueReadOnlyHiddenAllowMassEdit
Each activity has its own form and can be customized for each.
<form helpUrl="http://omada.net">
        <fields>
          <field name="ROLEID" requiresValue="true"/>
          <field name="NAME" requiresValue="true" />
          <field name="DESCRIPTION" />
          <field name="SYSTEMREF" readOnly="true"/>
          <field name="ROLEFOLDER" requiresValue="true" allowMassEdit="true"/>
          <field name="ROLETYPEREF" readOnly="true"/>
          <field name="ROLECATEGORY" readOnly="true"/>
          <field name="MANUALOWNER" allowMassEdit="true"/>
          <field name="ADDREQUESTINFOATTRS" allowMassEdit="true"/>
          <field name="CHILDROLES" />
          <field name="PREVENTSELFSVC" allowMassEdit="true"/>
        </fields>
      </form>
    </activity>
Edit validation rules
Fields that have the property requiresValue="true" in the form section in the configuration .xml file are validated on submit. In certain cases, you may want to skip the validation of certain objects. To do this, you need to enable skipping validations:
-
Add a Boolean property to the resource data object type (for example, skip validation with the system name:
SKIPVALIDATION) -
Add the property system name as the return value for the
GetSkipValidationPropertyfunction. This will add a checkbox to the grid, and if the checkbox is ticked, validation will be skipped for the object.omada.appOnboarding.configuration.GetSkipValidationProperty = function (){return 'SKIPVALIDATION';} -
Add the skip validation property to the form manually. This is not mandatory but allows the user to select to skip validation in the form as well as in the grid.
-
GetDontSkipValidationPropertiesfunction (just belowSkipValidationProperty) controls which properties are validated even if theSkipValidationcheckbox has been checked.omada.appOnboarding.configuration.GetDontSkipValidationProperties = function (){return ['ROLEID', 'NAME', 'ROLECATEGORY', 'ROLETYPEREF', 'SYSTEMREF', 'ROLEFOLDER', ‘OWNERREF’];}
The general recommendation is to not change any of the default properties, but it is possible to add and remove properties if required.
Edit additional system properties in the process
The process writes back edited information to the system data object when the final activity has been completed, for example, if you add additional owners, then you can add additional properties that this will work for.
Add the properties to the form and add the system property name as the return value for the GetAdditionalSystemProperties function.
omada.appOnboarding.configuration.GetAdditionalSystemProperties = function ()
{
  return 'CRITICALSYSTEM';
}
Alternate configuration object
You can use an alternate configuration object for the application object if desired. This can be used for testing purposes, for example.
Add the name of the configuration object as the return value for the GetConfigurationName function.
omada.appOnboarding.configuration.GetConfigurationName = function ()
{
  return 'AppOnboardingConfigurationTEST';
}
The alternate configuration object can be created in Set Up > Administration > More > Configuration Objects.