Access management
The Access management processes include the request of identities, as well as the evaluation and actions that must be taken in connection with the request(s). These processes in turn, help decentralize the user access management processes by introducing self-service access requests, workflow-supported approvals, and provisioning.
The following subchapters describe the processes included in the framework:
Request Access Rights
One of the central pillars of Omada Identity is the ability to request access rights, as this is essential when onboarding a new employee.
Access request
The Access request process enables users to apply for access rights as a self-service. Some access rights are automatically assigned to an identity, based on the organization unit or job role. When a user requires additional access rights, a manual request process must be started. After the request has been made, an optional approval task is triggered for the identity’s manager and/or Resource/System owner, who is then notified of a new task by email.
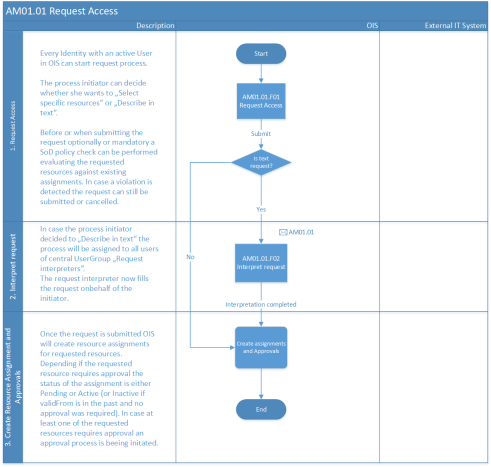
The Request Access service option can be seen and invoked by each identity with an active user in Omada Identity. When invoked, Omada Identity opens a form that must be filled.
By default, the requester (that is, a manager or an owner of technical identities) can request access for themselves as well as any other identity that the requester manages or owns. When a user wants to request additional access rights, the requester can define the scope of the access request and describe why they would like the requested access. The requester does it by submitting a form in either free-text format, or optionally by directly selecting a list of predefined required systems.
Once the request form is filled, and if selected resources require approval, the submission request triggers the follow-up processes for approval. On the users’ portal start page, in the Services area, on the My Access Requests view the user can see the status of their access request in terms of approval, violations and provisioning status.
In the My Access Requests view, each access request is described as follows:
- Green (Access rights are ready to be used)
- Yellow (Access rights are in progress)
- Purple (Violation in evaluation)
- Red (Access rights have been rejected)
Stakeholder in the process
- Requester
- Beneficiary Identities
- Request Interpreter
Pre-conditions
- The Process initiator is an active user in Omada Identity.
- Requestable resources must be available and at least one resource must be requested.
- The Request Interpreters user group has members assigned to it. Optionally, approval steps are configured on the requestable resources.
Post-conditions
- Resource Assignments are created.
- Status information is available for the requester.
- If the role needs approval, an approval process is triggered, and the approval task is in the task list of the approver(s).
- If no approval is required, provisioning processes are triggered.
- New and generated data is available via Omada Identity standard forms and reports.
Data objects
- Identity
- Resource
- Resource Assignment
- Attributes
- Approval
Process flow
- Log in and begin the access request workflow. Fill in the details of the request such as:
- Identity the request is for
- Reason for the request
- Business context.
- Make a request for your own identity and/or for other identities managed or owned by you.
- Optionally, you can also specify a user account for which the resource is requested for, as well as specify a validity period for the requested access.
- Search for roles and resources to request, and, if required, select or specify an attribute.
The resources that can be requested depend on the selected business context, and on the resources being globally allowed to be requested. Further restrictions might apply, based on the user’s attributes such as user group memberships.
- Selected resources are added, and then you can review and remove accesses again before the final submittal of the request.
Optionally, when submitting a request, you can run a Policy check. This check simulates the possible outcome of assigning new access rights in the context of constraint violations and informs the requester about possible violations before their request is sent to the approver.
- Submit the request. You can also track the progress of the request.
You must select at least one resource.
The process flow is also illustrated on the figure below.
Best practices, considerations and recommendations
-
Optionally, an Interpretation step can be added to the Access request process to allow a user to submit a request in plain text and describe which access rights they would like to request. Then, an interpreter accepts or rejects the resource selection.
An Interpretation step can be useful for non-technical users, who might not know the correct systems and resources to request. However, it can also result in loops in the access management process. This process limits automation and should not be used as a standard practice.
-
Validity periods can be enforced by Omada Identity based on the resource or identity attributes. For example, an external user can only get access for a certain number of days, and by consequence these limitations must be defined within the company rules and outside of Omada Identity.
-
Optionally, notifications can also be added to the process. For example, you can notify the user of a successful submittal, and/or to the beneficiary for identity if it's different from the requester.
-
The Manager Approval context owner is always the owner of the selected context, and not the Line Manager of the identity.
-
Make sure to check out the interactive walkthrough of the Request Access functionality that covers the full scenario.
The process of prolonging the end date of an identity’s validity is not an OOTB process.
- Who can request access rights on behalf of whom?
- Which predefined reason can be selected?
- Should the Business context concept be used when requesting access?
- Are free-text requests allowed or should this default to selecting specific resources?
- Can the requester define the validity and are there any validity rules?
- Is the SoD preview optional or mandatory?
Evaluate and Act
This subchapter outlines the necessary processes to assess and take action in regard to the approval of an access request, the delegation of access, and the removal of access.
Approval of Access Request
Requested access is either approved or rejected.
Non-technical description
The Approval of access requests process takes place when an employee submits a request for access rights. Upon submittal, Omada Identity creates tasks for the relevant approver(s), who can then find the tasks on his/her portal start page.
The approver can then approve or reject each requested resource. When the approver opens an approval task, and depending on the configuration of Omada Identity, an SoD Policy check is executed.
When the resource is approved or rejected, the Resource Assignment status changes to Active or Rejected, respectively, and an approval history or log is created for each requested resource assignment, enabling approvers to see the identity and the reasoning for the approval.
If Active, RoPE calculates the identity and the related accesses. In this scenario, assignment rules as well as SoD conditions are relevant. When the RoPE calculation is finished, the provisioning data is sent to OPS. Approval levels are configured on the Resource Folders which dictate which approval steps are required for a requested resource. Optionally, approvers can also change the Valid to date.
You can configure up to 9 levels for approval steps. Out of the box, 3 are already predefined: Manager, Resource owner and System owner.
In addition, an approval step is always completed automatically if:
- The requester is assigned to approve the approval step.
- One or more of the assigned approvers has already approved it.
Organizational approval
If an access request is made for a business context (default setting), find the owner(s) of the stated business context. If none is found or if the beneficiary is amongst the owners, then repeat for the parent business context.
If an access request is not made for a business context, and the beneficiary has one or more supervisors/managers, then these supervisors/managers are used to approve access.
Resource and System Owner approval
- Resource owner approval – steps in resolving the approvers:
- Find the owner(s) of the requested resource.
- If none is found, then find the owner(s) of the Resource Folder which the requested resource belongs to.
- If none is found, then find the owner(s) of the system which the requested resource belongs to.
- System Owner approval – steps in resolving the approvers:
- Find the owner(s) of the system which the requested resource belongs to.
Approval History
An Approval History is maintained for each requested resource assignment. The history is accessible for the approvers in the survey and enables them to see who previously approved the request, in which step of the process, when and why. The history is also accessible on the ResourceAssignment data object and can be viewed during and after the approval workflow is completed. It also keeps a log stating if and why an approval step is skipped (or is completed automatically).
Stakeholder(s) in the process
- Context Owner
- Resource or Resource Folder Owner
- System Owner
Pre-conditions
- Approver levels are defined by Resource Folder.
Post-conditions
- Resource Assignment status is either Active or Rejected.
- Status information is available to the requester.
- RoPE calculations are done, and the provisioning data is sent to OPS.
- New and generated data is available through Omada Identity standard forms and reports.
Data objects
- Identity of the requester
- Identity of the beneficiaries
- Identities of the approvers
- Resources
- Access Requests
- Status attributes
- Future provisioning of data
Process flow
- Individual resources in different approval steps are either approved or rejected.
- Resource Assignment statuses are set to either Active or Rejected.
- If necessary, RoPE calculation including an SoD Violation Evaluation process is triggered.
- Provisioning to target systems takes place.
The process flow is also illustrated on the figure below.

Best practices, considerations and recommendations
-
Consider establishing a workflow whereby Approvers can directly approve through an email notification.
-
Typically, resources have up to 3 levels of approvals:
- Manager (context)
- Resource owner
- System owner
Additional levels can be added; however, approval steps can be added based on criticality and risk.
-
Any approval by a manager is assigned to the manager of the relevant business context (typically this is selected during the Access request process).
-
You can configure notifications for each step in the process, for example notifying the approver that a new approval task is awaiting review. You can also configure approvals (reminders and reassignment) for each task in the process. Optionally, you can configure a final approval notification to the requester and/or beneficiary.
Make sure to check out the interactive walkthrough of the Approval of Access Requests process that covers the full scenario.
- How many approval steps are to be configured?
- Should the Approver be able to modify the request, for example, the Valid to date?
- Which notifications should be sent to the requester?
Remove Access
Access rights expire when the validity date is reached or when an identity with the appropriate permission removes access.
Non-technical description
Any identity can remove its own direct access. Managers can also remove direct access of managed identities. System/Resource Owners can remove direct access related to any systems or resources owned. Data Administrators can remove direct access of any identity. Access removal does not require an approval. After removal, the direct resource assignment has a status of Obsolete and the Valid to date is set to UTC (Coordinated Universal Time).
In Omada Identity, the Remove access process is an implicit process.
Access rights are also removed when an object has reached its validity. Relevant objects either carry a status or a Valid to date. Some examples of those objects are: ResourceAssignment, Resource, AssignmentPolicy, ContextAssignment, AccessDelegation.
Another reason for the removal of access rights can also take place as part of a transfer process such as an Intra-organizational transfer or an attestation survey.
Stakeholder(s) in the process
- Identity
- Manager
- System / Resource Owner
- Data Administrator
Pre-conditions
- Access must be assigned.
Post-conditions
- Direct assignment(s) have expired.
- The validity date has been reached or status is set to non-Active.
- Provisioning to target systems has been performed.
Data objects
- Identity
- Resource
- Resource Assignment
- Context Assignment
- Assignment Policy
- Access Delegation
Process flow
- Log in to Omada Identity and open the Identity Form for the identity that they want to remove access from.
- Select the Direct Assignments and then select the assignments that should expire.
- Click the Expire button and confirm.
Best practices, considerations and recommendations
- Notifications after the removal of access rights should be considered by the company/ organization.
- Who should be able to remove access rights, and for whom?
- Are there certain access rights that must always be assigned to at least one person for business continuity? The removal of access rights can subsequently trigger an approval flow.
Delegate Access
Access delegation enables a user to temporarily or permanently delegate his/her access rights to someone else.
Non-technical description
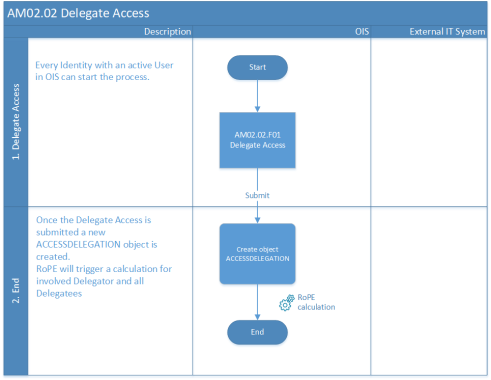
The Delegate access process allows any identity with an active user in Omada Identity to delegate direct resource assignments from one user to another. This can be relevant for shorter periods of leave, for example, if an employee takes vacation, or for delegating certain tasks to another user, while still maintaining formal responsibility (for example, a manager delegating approval tasks to a personal assistant).
However, if the person delegating the access loses said access before the period of delegation has expired, then the delegated access expires immediately.
Moreover, Omada Identity internal functions such as Org. Unit Manager, Identity Manager, System or Resource Owner can also be delegated. In this scenario, the delegate has the same permissions, access, approval tasks, reports and data in Omada Identity as the delegator.
Omada Identity functions are delegated completely. For example, if employee 1 from department A delegates a function as an Org. Unit Manager to employee 2 , he or she is not only an Org. Unit Manager of department A, but an overall Org. Unit Manager.
Stakeholder(s) in the process
- Delegator
- Delegate
Pre-conditions
- An identity has direct assignments which can be delegated.
- The resources are classified according to the company’s governance rules as either:
- Allowed to be delegated.
- Not allowed to be delegated.
Post-conditions
- Assignments are temporarily delegated.
- Segregation of Duties conflicts are found and resolved.
Data objects
- Identity
- Resource Assignment
Process flow
- Using the self-service feature Delegation, choose an identity to which you want to delegate the access rights.
- Choose the access rights to be delegated and fill the Valid from and Valid to fields.
- Submit the request. Then, RoPE calculates the identity and provisioning is started.
A Delegate can re-delegate access that was received from a delegator.
The process flow is also illustrated on the figure below.
Best practices, considerations and recommendations
- To ensure compliance, you should base OU delegation on previously defined written policies, and delegation should be made possible only for a limited period.
- Permanent delegation should be replaced by the standard Request Access process.
- To mitigate risk and follow compliance rules, you should classify the resource as:
- Allowed to be delegated
- Not allowed to be delegated
- Consider enabling a notification of delegation.
Make sure to check out the interactive walkthrough of the Delegate access process that covers the full scenario.
Provisioning
Resource assignments are created in connected and non-connected systems by means of provisioning.
Provisioning can be automated, for example, by using the Omada Provisioning Service (OPS) or another provisioning engine, such as MIM/FIM Synchronization Service. It can also be done manually, using a process where <Variable Name="ProductName"> instructs a user to perform manual provisioning. Finally, it can be also carried out by relaying the provisioning task to an external system (for example, an ITSM system, such as ServiceNow or similar).
Methods of provisioning
Automated provisioning
In automated provisioning, the Omada Provisioning Service (OPS) module or another provisioning engine is used to provide the provisioning data directly to the connected system. OPS processes the provisioning jobs using the connector built for the appropriate connected system.
For more details on the data flow involved in automated provisioning, see the data flow in Basic Structure of Omada Identity.
Manual provisioning
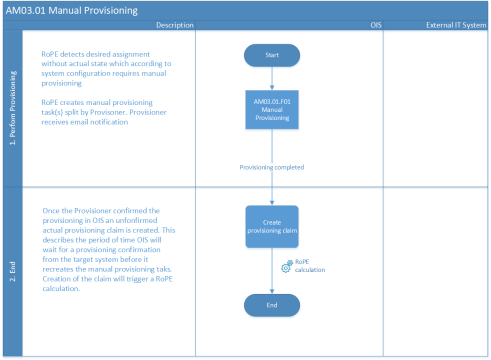
Manual provisioning is performed if Omada Identity cannot perform provisioning automatically for a given system. You must create a manual provisioning ticket, which includes an action of sending an e-mail notification to each person responsible for the manual provisioning. These persons need to review the request, and then access the target system and provision the required access manually. When the manual provisioning is confirmed in Omada Identity by the provisioner, Omada Identity updates the provisioning ticket.
Relayed provisioning
In relayed provisioning, the provisioning jobs are relayed by Omada Identity to a connected system for further processing. It can be used to relay both manual and automated provisioning jobs.
This type of provisioning can be used, for example, if integration with an external IT Service Management (ITSM) system is needed, so that the ITSM system can be used to handle manual provisioning tasks.
It's possible to configure how to map the provisioning tasks to the connected system data model. It's also possible to configure how the status of the relayed provisioning jobs is monitored in Omada Identity.
Manual Provisioning
Depending on the Omada Identity configuration, provisioning is sent as a manual provisioning task to a user or a user group (referred to as the Provisioner).
- A manual provisioning task is sent to the Provisioner.
- The Provisioner reviews the task and performs manual actions required to create assignments between identities and resources in the target system.
- The Provisioner confirms the task, which then creates a temporary provisioning claim, and the task is closed.
- The provisioning claim is used as an unconfirmed actual state until a confirming data import is be done from the target system.
- The confirming data import that shows the assignments being provisioned correctly will permanently confirm the provisioning and the temporary provisioning claim will expire.
If the confirming data import detects an incorrect or missing provisioning in the target system, then a correction task is created and assigned to the Provisioner.
Manual provisioning tasks are grouped and distributed to relevant Provisioners.
Stakeholder(s) in the process
- Beneficiary
- Provisioner
Pre-conditions
- A Provisioner is defined in the Resource Folder.
- Provisioning validity must be configured in the system.
Within the timeframe set, Omada Identity expects a confirming data import, otherwise the provisioning task is created again and sent to the Provisioner.
- The target system is enabled for manual provisioning.
- Access is assigned and approved, and the identity is calculated by RoPE.
- An actual state assignment does not exist yet.
Post-conditions
- Access is granted in the target system, and it must be confirmed by the Provisioner.
Data objects
- Resource Assignment
- Beneficiary Identity
- Resource Folder
- Provisioner
Process flow
- The identity is calculated by RoPE.
- RoPE detects the desired assignment without an actual state status, which according to system configuration requires manual provisioning.
- RoPE creates manual provisioning tasks divided between Provisioners.
- Provisioners receive an email notification.
- A Provisioner administers access in the target system and confirms it in Omada Identity.
- Omada Identity creates an unconfirmed provisioning claim.
- When the provisioning has been confirmed in a data import, the unconfirmed actual state status will be replaced by the actual state status.
The process flow is also illustrated on the figure below.
Frequency of process runs
- When RoPE starts a manual provisioning process based on the modification of assignments.
Best practices, considerations, and recommendations
- You should consider enabling notifications after access rights removal.