Exchange Online
The Exchange Online connectivity provides support for governing and managing Exchange Online instances. You can perform the following activities:
- Register and onboard any number of Exchange Online instances.
- Load information about mailboxes, distribution groups, and admin roles.
- Automate the provisioning and deprovisioning of Exchange Online mailboxes access, mailboxes, and distribution group memberships.
Each Exchange Online instance must be onboarded in a separate onboarding process.
Supported objects and operations
Exchange Online connectivity retrieves user, equipment, room and shared mailboxes, permission access to these mailboxes, distribution groups/members, and admin role groups. The Exchange Online Connectivity always runs a full data import. Delta mode is not supported.
| Microsoft Exchange object | Omada data model | Operations |
|---|---|---|
| User Mailbox | Resource Assignments | There are no available actions. User Mailboxes are assigned through licenses in Microsoft Entra ID |
| Equipment Mailbox | Resource Assignments | Create, read, delete |
| Room Mailbox | Resource Assignments | Create, read, delete |
| Shared Mailbox | Resource Assignments | Create, read, delete |
| Distribution group | Resource | Create, read, delete |
| Distribution group members | Resource assignments | Create, read, delete |
| Admin Roles | Resources | Read |
| Admin Role memberships | Resource Assignments | Read |
Accounts are not imported from Exchange. Instead, they are looked up and referred from Microsoft Entra ID.
Minimum required permissions
You must have sufficient permissions to register the application in the Azure Portal and perform the preliminary administrative setup. Review the Prerequisites section for details - you can grant the Exchange administrator role, or create a dedicated group with assigned permissions.
Implementation notes
The Exchange Online connectivity supports all Exchange Online versions currently supported by Microsoft, as the service is continuously updated as part of Microsoft 365.
Exchange Online administration is performed through the Exchange Online PowerShell V3 (EXO V3) module, which uses REST-based cmdlets. This modern approach replaces legacy remote PowerShell (WinRM) and is recommended by Microsoft for all current administrative operations due to its improved performance and security.
This version of the connector no longer uses the Omada.OPS.Connector.Powershell.Exchange.ps1 script. To modify the connector's behavior, use an extension script. See Extension script for details.
Network requirements
If you encounter issues with configuring the connection, verify your network configuration including physical and software firewalls. PowerShell uses the following TCP ports by default:
- 5985 or 80 for HTTP
- 5986 or 443 for HTTPS
Prerequisites
Install ExchangeOnlineManagement PowerShell module
To use the certificate authentication, install the ExchangeOnlineManagement PowerShell module. Additionally, when using the certificate authentication with thumbprint, install a valid certificate on the servers where OPS and ODW reside. The certificates are imported via the Management Portal. The Exchange connectivity relies on Microsoft Entra ID Connectivity for the correct operation. Configure and import data from Microsoft Entra ID before importing data from Microsoft Exchange. You can manage more than one Exchange system.
-
For each Exchange system, configure:
- Connection details
- Microsoft Entra ID trust
- Provisioning (OPS)
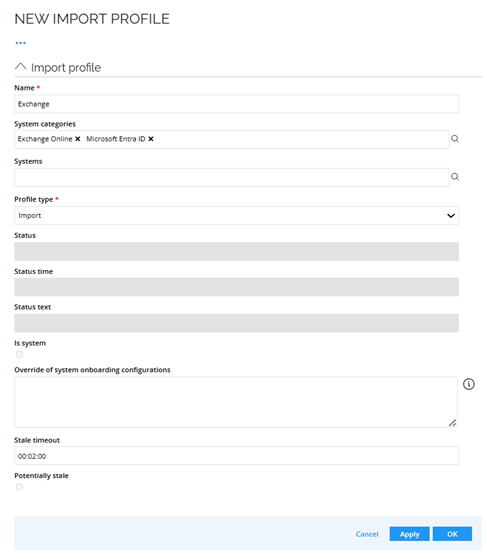
- Import profile: The import profile that feeds Exchange Online connectivity must include all trusted systems referenced by Exchange (for example, Microsoft Entra ID). Otherwise, imports may fail with unresolved lookups. To configure import profile go to Setup > Connectivity configuration > Import Profile. Click New.
-
Exchange connectivity integrates with Exchange using remote PowerShell. Specify all of the parameters required by the selected authentication method.
-
After the initial load from Exchange, the new Exchange system is created in Omada Identity. It is then ready for the remaining configuration.
-
Configure the Microsoft Entra ID trust by specifying the system's domain that the Exchange system integrates with.
-
Configure the Exchange system to use OPS for provisioning of resource assignments.
Edit attributes to resolve display values for customer settings
Configure the Omada Identity Portal to display human-readable values for access to other users' mailboxes.
- In the Omada Identity Portal, go to Setup > Administration > More... > Customer settings.
- In the Role and Policy Engine group, edit the Attributes to resolve display values for customer setting.
- Add MAILBOXREF to the comma-separated list of attributes and click OK.
Register a new application in Azure Portal
-
In the Azure portal (the default URL: https://portal.azure.com), go to your directory. In the Manage section, find the App registrations, then click New registration.
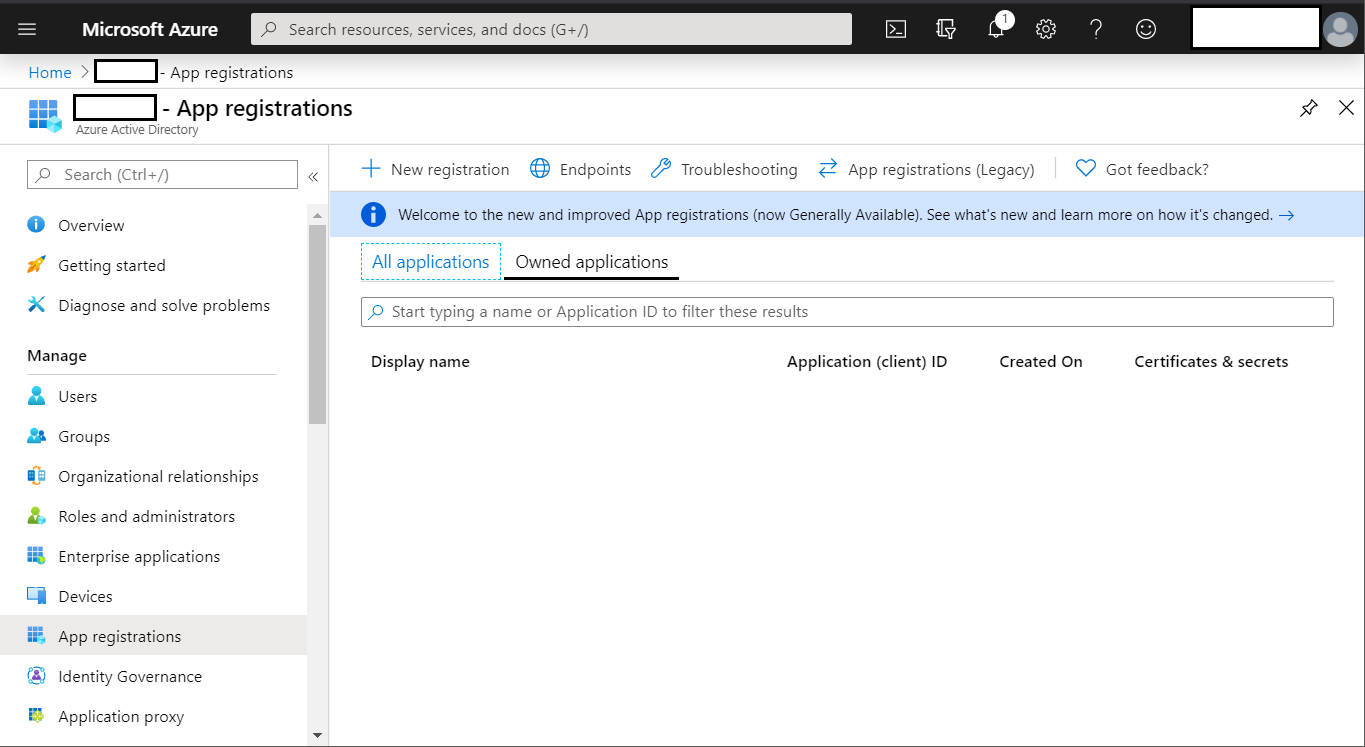
-
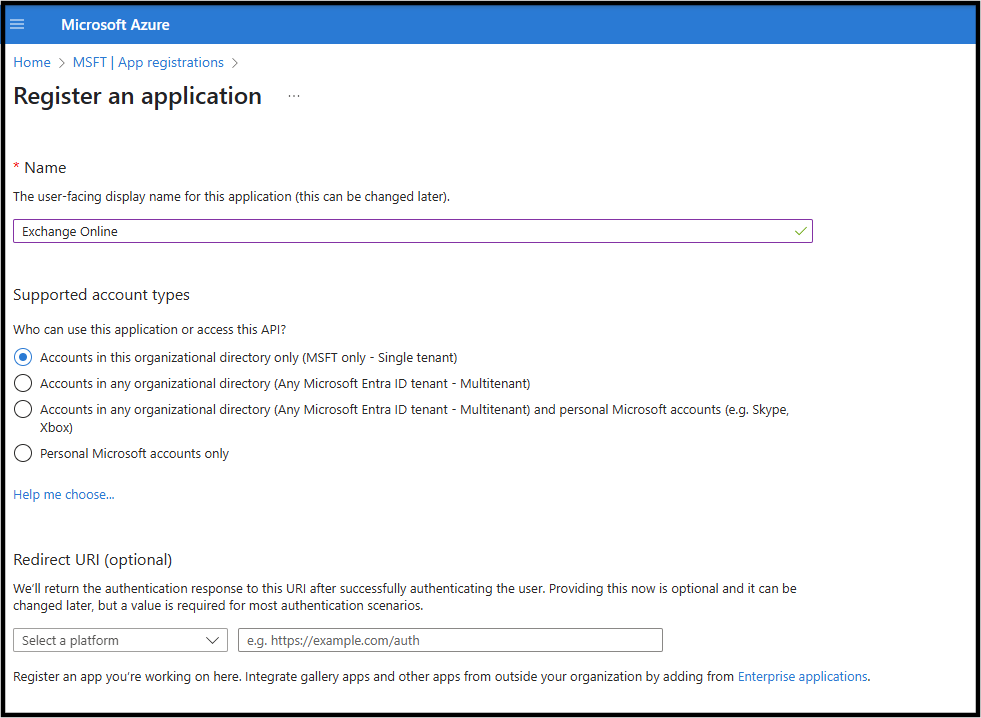
In the Register an application dialog box, enter a Name. In the Supported account types section, choose Accounts in this organizational directory only (Single tenant).
-
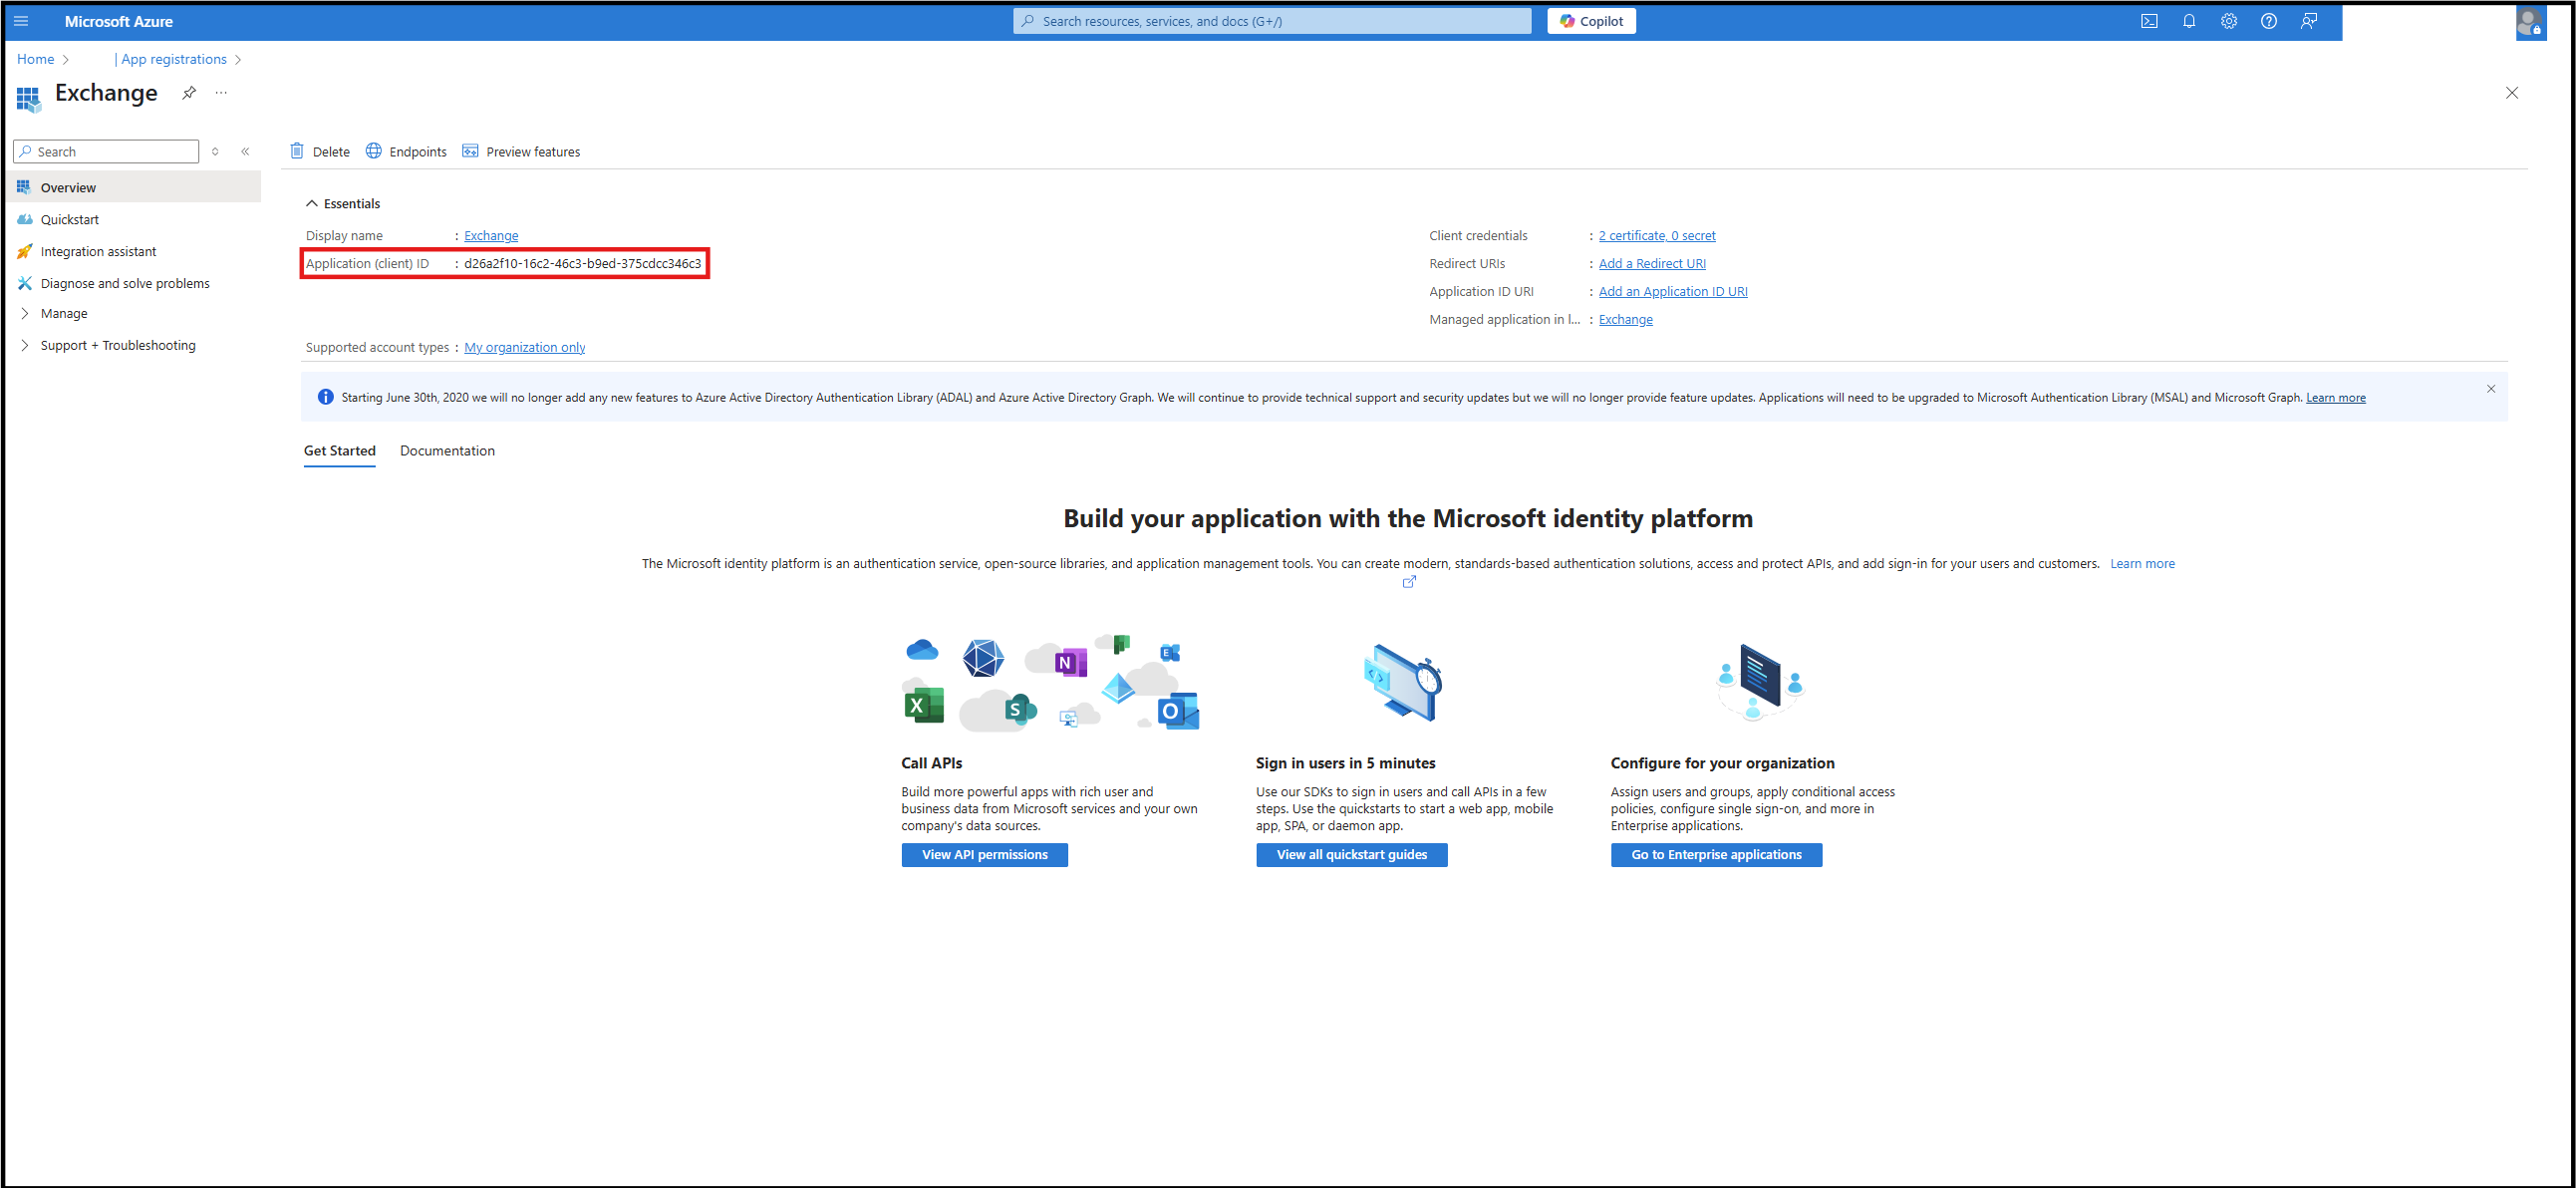
Click Register. Copy and store the Application ID. You must use this Application ID when you onboard the system to Omada Identity.
infoThe Application ID shown in the following image is only an example. Your Application ID contains a different value.
Add Graph API
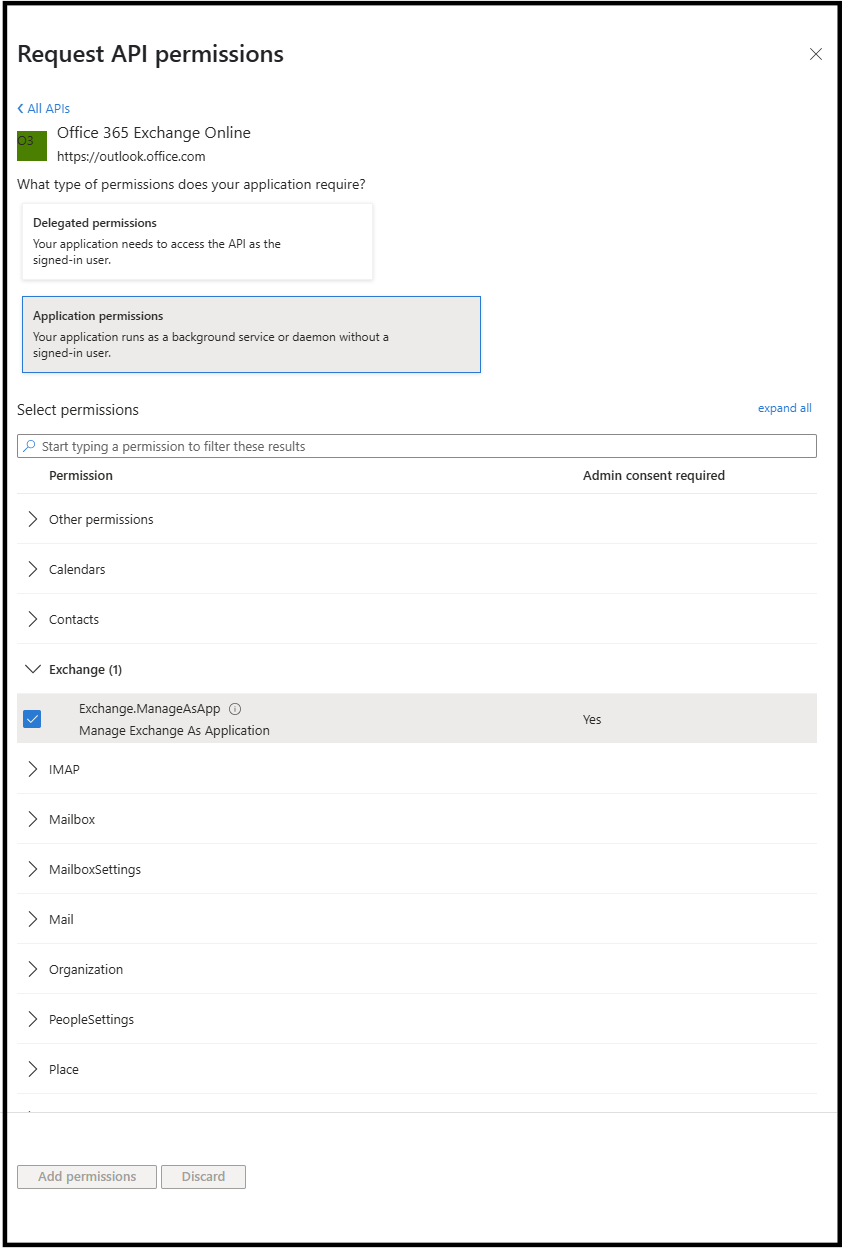
The connectivity add-on uses the Office 365 Exchange Online to read and write information to the directory. Add the Office 365 Exchange Online for the registered application:
-
Go to API permissions and select +Add a permission.
-
From the APIs organization uses tab, choose Office 365 Exchange Online.
-
Select Application permissions, and then Exchange.ManageAsApp.
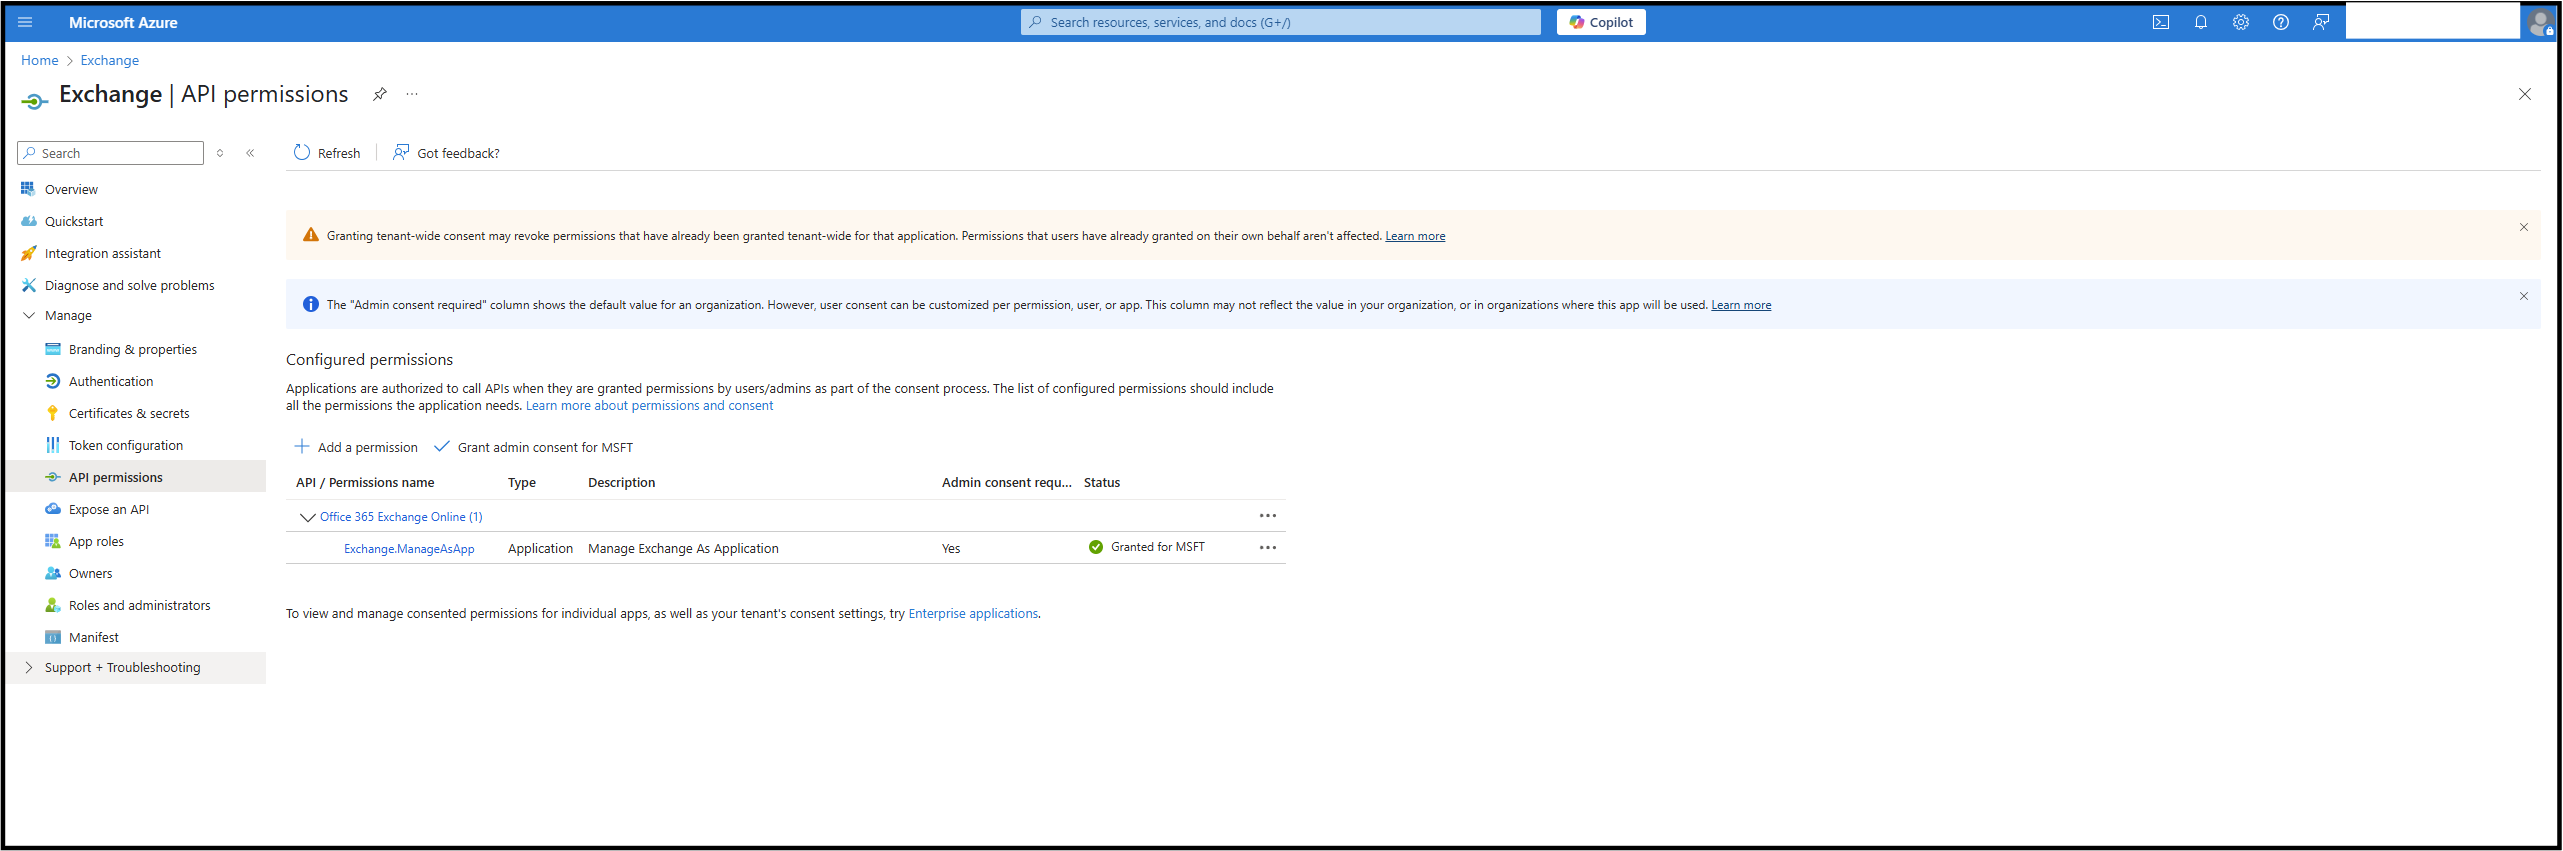
-
Click the Add permissions button.
The table below presents the minimum required permissions for the correct connection between Exchange Online and Omada Identity.
MICROSOFT GRAPH
Permission Type Description Exchange.ManageAsApp Application The Exchange.ManageAsApp permission allows the application to access and manage Exchange Online mailboxes and settings without user interaction, using app-only authentication. -
After adding the permission, grant consent to the permissions. Click the Grant admin consent button.
Generate and export a certificate for app authentication
To authenticate Omada Identity with Exchange Online, create and export a certificate that will be used during the app registration process in Azure. Review the following example of a PowerShell script to export both the .pfx and .cer versions of the certificate:
# Define the output paths and password for the .pfx file

$exportCertSplat = @{

    FilePath = 'C:\<Path>\OmadaExchangeCert.pfx'

# <-- Replace <Path> with your desired export location

    Password = (ConvertTo-SecureString -String "<StrongPassword>" -AsPlainText -Force)

# <-- Replace <StrongPassword> with your desired password

}

# Locate the certificate by subject name

$mycert = Get-ChildItem -Path cert:\CurrentUser\My | Where-Object { $_.Subject -eq 'CN=<CertificateName>' }

# <-- Replace <CertificateName> with your actual certificate name

# Export the certificate to a .pfx file (includes private key)

$mycert | Export-PfxCertificate @exportCertSplat

# Export the certificate to a .cer file (public key only)

$mycert | Export-Certificate -FilePath 'C:\<Path>\OmadaExchangeCert.cer'

# <-- Replace <Path> with your desired export location
The password defined in the $exportCertSplat block (<StrongPassword>) is used to protect the .pfx file and will be required later when configuring the certificate-based authentication in Omada Identity. Be sure to store this password securely along with the generated .pfx and .cer files. Without it, the .pfx file cannot be imported or used.
Create a certificate
- In the Azure portal, go to Certificates & secrets. Select Certificates.
- Select Upload certificate. Choose the certificate file to upload. Click Add. Once the certificate is uploaded, the details are displayed.
Assigning minimum required permissions
Choose one of the following options:
Option 1: Assigning Exchange Administrator role to the app
To allow the application to manage Exchange Online, you must assign the Exchange Administrator role to the app’s Enterprise Application in Microsoft Entra ID.
-
In the Azure portal, click Microsoft Entra ID and then Roles and administrators.
-
Click Exchange Administrator.
-
Click + Add assignments.
-
In the search box, enter the name of the application you have created. Click Add.

Option 2: Creating a dedicated role group with permissions for provisioning the mailbox object
- Open a PowerShell session. Connect to Exchange Online with an administrative account:
Connect-ExchangeOnline -UserPrincipalName <adminUPN> -DisableWAM -ShowBanner:$false
Replace <adminUPN> with the UPN of your Exchange Online admin account (for example, admin@company.onmicrosoft.com).
-
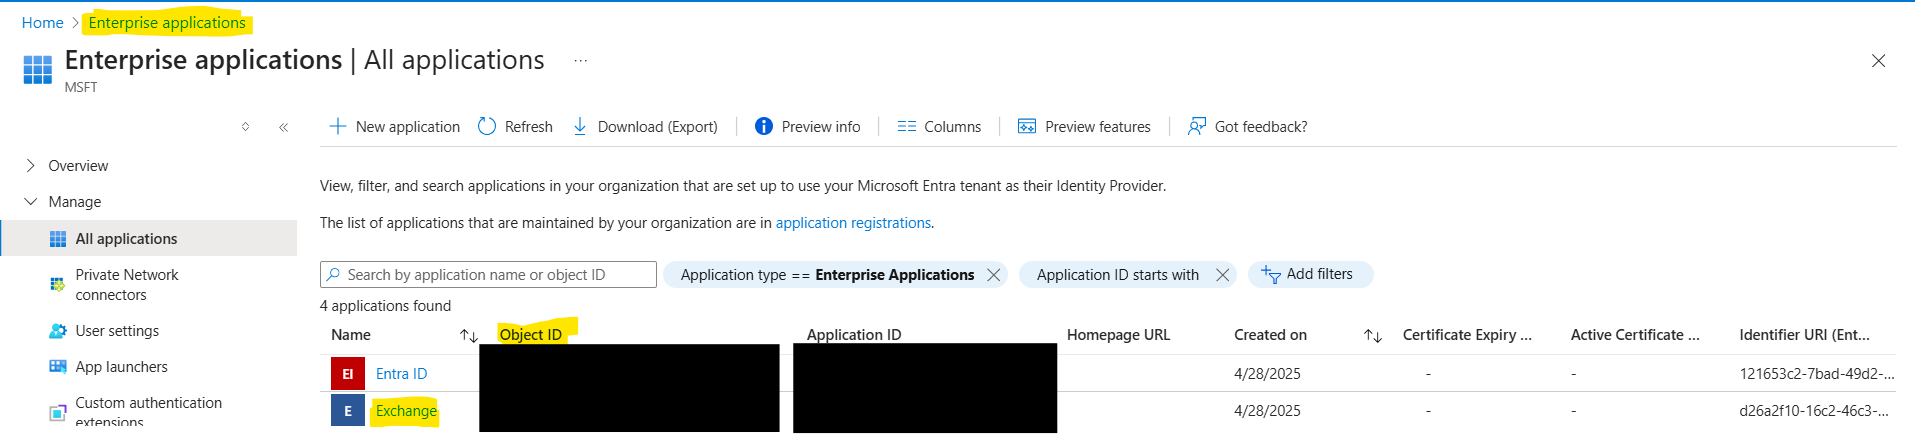
Retrieve the Application IDs from the Azure portal (Azure Portal > App registrations). Collecting the following information:
- Application (client) ID – available in the Overview section of the App registration.

- Go to Enterprise Application > Object ID. Open Enterprise applications, locate the registered app, and copy the Object ID.
-
Create the Service Principal in Exchange Online. Run the following commands in the same PowerShell session that is already connected to Exchange Online (see step 1). Replace the placeholders below (
<Application (client) ID>and<Enterprise App Object ID>) with the corresponding values obtained in step 2 (EXO-App-e95andEXO-App-Recipients-Minin the example below are example names, you can choose any other name):
$AppId     = "<Application (client) ID>"
$ServiceId = "<Enterprise App Object ID>"

New-ServicePrincipal -AppId $AppId -ServiceId $ServiceId -DisplayName " EXO-App-e95"
- Create a custom role group with minimal permissions:
New-RoleGroup -Name "EXO-App-Recipients-Min" -Roles "Mail Recipients","Mail Recipient Creation","Distribution Groups","View-Only Configuration"
With this configuration, the application can:
- create and manage mailboxes, shared mailboxes, room/equipment mailboxes, and distribution groups.
- assign permissions such as full access, send as, and send on behalf — without full Exchange administrator privileges.
- read Exchange role groups and their members via Get-RoleGroup and Get-RoleGroupMember.
For a detailed overview of available Exchange Online roles and role groups, see the official Microsoft documentation: Permissions in Exchange Online.
Register a new system in Omada Identity
- In Omada Identity, go to Setup > Systems > All systems.
- In the top left-hand corner, click New. In the dialog box, enter a name and system ID. Both values must be unique. Select New as the category and Exchange Online in the collector technology. In the content section, choose Access Rights. In the trusts section, choose Microsoft Entra ID. Click OK.