Release highlights
We've just released Omada Identity update! What's new?
Security
With the 15.0.4 on-prem release, we are starting the deprecation process of current cryptographic algorithms (Rijndael cipher and the AES-256 implementation). We are beginning the transition to the JWE (JSON Web Encryption).
No immediate migration is required of you. For details, see the full release note below: Deprecation notice: cryptographic algorithms.
Breaking change: Migration from System.Data.SqlClient to Microsoft.Data.SqlClient
To ensure the security of your data and prepare for the deprecation of the System.Data.SqlClient package by Microsoft, we are transitioning to the Microsoft.Data.SqlClient library. This updated library introduces enhanced security measures to protect your connections, which means your connection strings will need to meet the new security requirements.
This transition is currently in progress. The migration is not yet complete, with some components still being updated. Further details will be provided as the rollout continues.
Explore the tabs below to learn what will change (including a related CommonLib update), what to do next, and how to troubleshoot.
What changes
The Microsoft.Data.SqlClient library introduces enhanced security features, such as:
- SSL/TLS encryption enabled by default: Connections to the database are now encrypted unless explicitly disabled.
- Certificate validation: The client validates the SQL Server’s SSL certificate. If the certificate is not trusted, the connection will fail.
For more details about these changes, refer to the official Microsoft documentation:
Introduction to Microsoft.Data.SqlClient Namespace.
As part of this migration, CommonLib has also been updated. Therefore, CommonLib dlls need to be updated as they would with any other CommonLib update. Ensure that the latest version of CommonLib is deployed to avoid compatibility issues.
What you need to do
If you are not already using an SSL certificate for your SQL Server, you will need to configure one to comply with the new security requirements. This ensures that your database connections are encrypted and trusted.
To set up an SSL certificate for your SQL Server, follow the official Microsoft documentation:
Configure SSL Certificates for SQL Server
By enabling SSL/TLS encryption and ensuring the certificate is trusted, you can avoid connection issues and ensure compliance with the new security requirements.
-
Immediate Action Required
After updating to the version that includes the migration to the Microsoft.Data.SqlClient library, you must implement the required security updates. Connections to databases without SSL encryption will fail due to the enforced security requirements. -
Test Before Deployment
We strongly recommend testing the new update in a test environment before applying it to production. This will help you identify and resolve any potential issues related to the new security requirements in a controlled setting.
Troubleshooting: options to resolve certificate validation errors
If the SQL Server’s certificate is not trusted, you have two options:
- Trust the SQL Server certificate (recommended for production)
- Install the SQL Server’s SSL certificate (or its Certificate Authority) into the Trusted Root Certification Authorities store on the web server.
- This ensures secure, trusted connections and resolves the error.
- Disable certificate validation (not recommended for production, but useful for test environments)
- Add
TrustServerCertificate=Trueto every SQL connection string to avoid the security check.
Using TrustServerCertificate=True disables certificate validation, which means the client will not verify the authenticity of the SQL Server’s certificate. This is not secure and should only be used in testing environments.
UI and UX
We have introduced the following improvements:
-
Utility columns (Checkbox and More) now have a fixed width and position in data grids and their menus have been disabled. Also, they are now blocked from being hidden.
-
Mandatory columns in the Approvals view are now marked with indicators to improve clarity and ensure required information is provided. They also cannot be hidden by the user/administrator.
-
When an access request is rejected and the approver has added a comment with the reason for the rejection, the requester can now see the comment.
 note
noteTo make the comment mandatory (and visible to the requester), enable a new customer setting
ApprovalRejectionReasonRequiredin the Standard Application category. When set to true, users need to enter comments for each rejected item, otherwise they won't be able to submit them. -
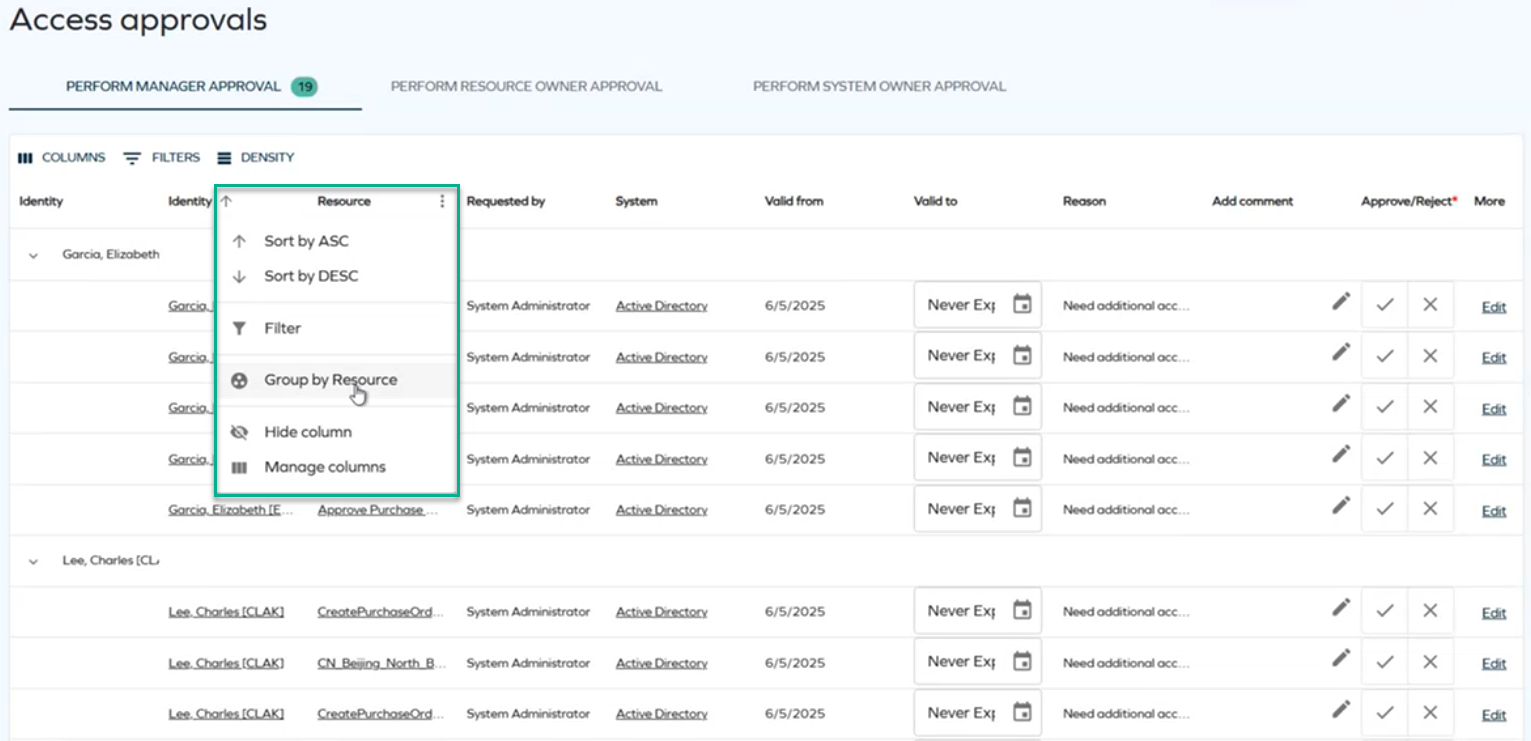
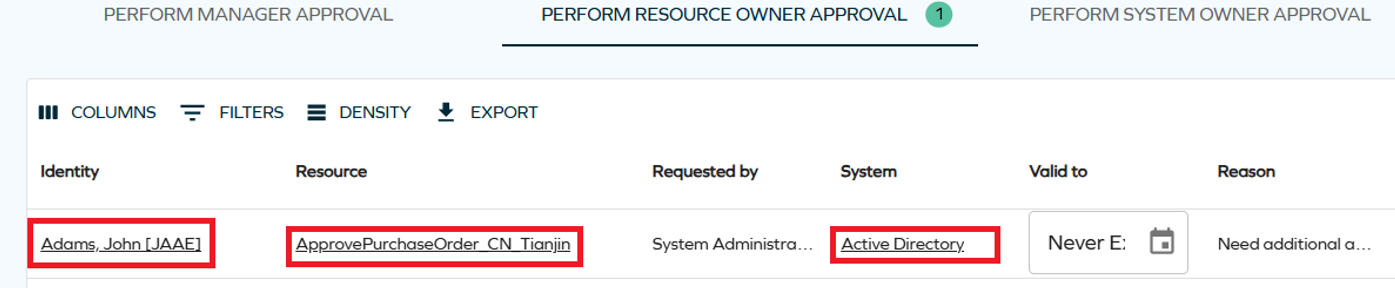
In the access approval process, rows can now be grouped either by identities (the default option) or by resources, which gives the approver a better overview of the assignees and resources.
To group by identities or resources, select the ellipsis icon (three dots) next to Identity or Resource, and select Group by Identity or Group by Resource. For more information on enabling and disabling the grouping, see the Row grouping section of Access approval.
-
Before, the approver was only able to see the new valid to date of the access request, which did not inform them if it was the first access request or an access extension request. Now, if a user submits an extension request, the approver will see both the original and new valid to date.

-
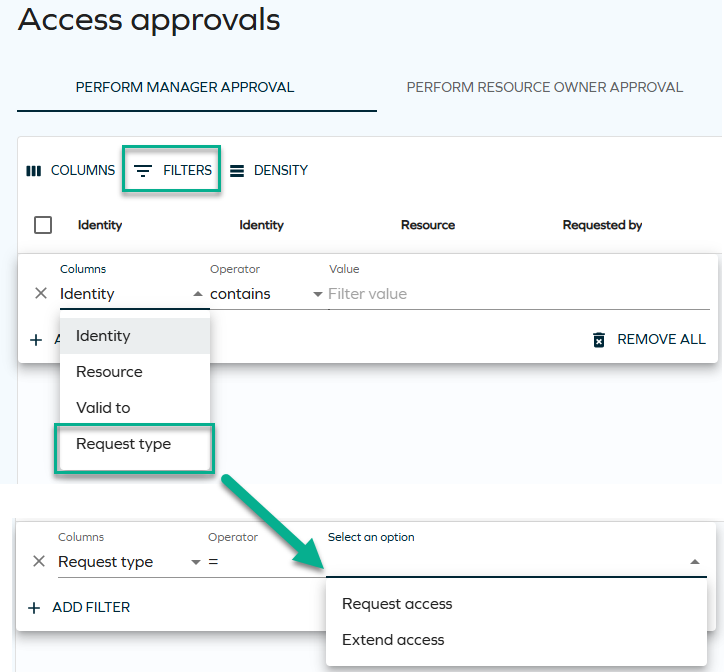
While reviewing requests sent for approval, you can now filter them by request types (access extension or access request). This way, you can work separately on those two types of requests and have a better insight into both of them. To do that, on the Access approvals page, select Filters and choose Request type from the drop-down. Then, select Request access or Extend access. See Access approvals for more information.
-
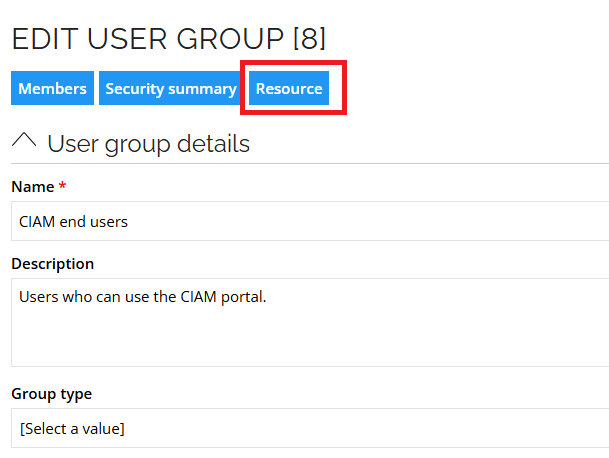
We have enabled easy navigation from user groups to resources. You can now click Resource while viewing user groups.
-
Various optimizations and improvements were introduced to provide better readability and UX for forms (in the new UI).
-
In the main left-side menu, the counter badge for the Tasks item now shows the total number of tasks pending, including the pending approvals.
-
In the Access view (in the list of submitted requests), the approval state now includes the comment from the approver.
-
In the Approvals view, when a request is rejected, you can now make the comment field mandatory. You can achieve this through enabling the IsRevokeAssignmentCommentMandatory customer setting (it is disabled by default). If the comment is set to mandatory in the approval survey, it will be mandatory when both rejecting and approving a request.
-
The character limit for the identity's first name (
FirstName) was removed. Now the values exceeding 20 characters are accepted. -
In the Access requests and Approval views, the calculation method of the number of violations was changed (in the summary banner and the column chip). The summary banner now shows the number of violated policies, and the chip shows the number of policies that a specific resource violates.
-
The data object list view now supports displaying custom forms for specific user groups and defining which details are loaded for each view. In the edit panel of a data object list view, click ellipsis to expand details and select Forms to choose the form you want to use for the list view.
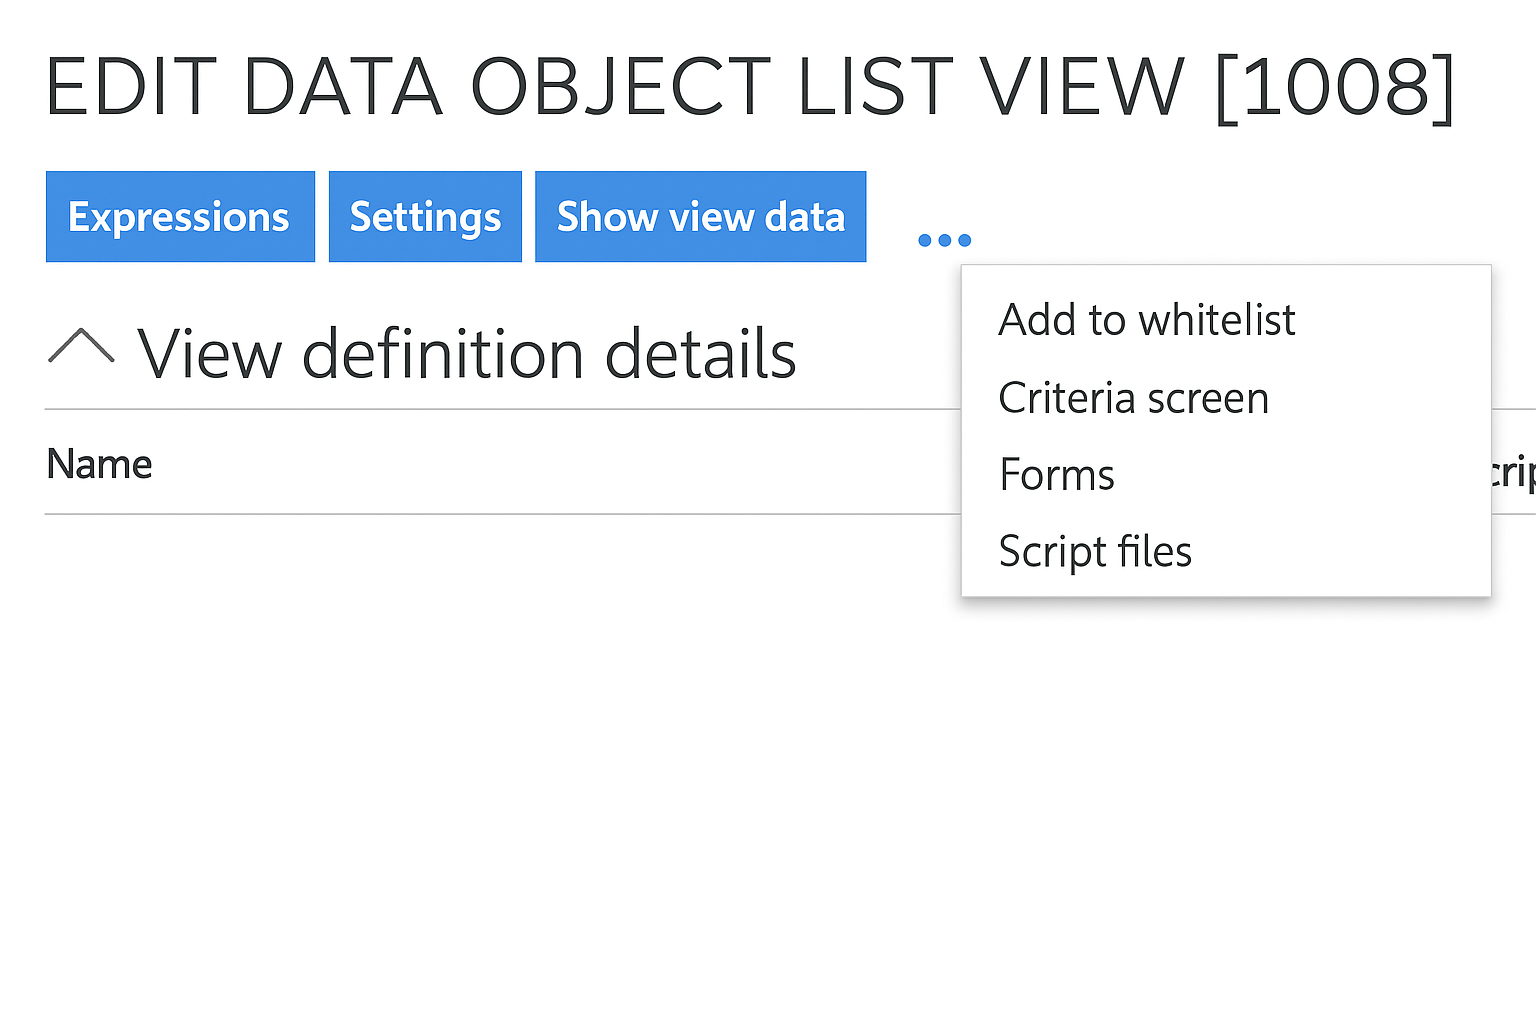
Confirm your selection with Ok. Changes may take up to one minute to apply.
Requesting access for non-human identities
We have introduced a new, tailored workflow for requesting access for non-human (technical) identities. See Access request for details.
New homepage widget: Request access for non-human identities
You can now add a homepage widget for creating access requests for technical identities. Go to Setup and then, in the Administration section, click Homepage configuration. Add a new widget using the + button. See Access request configuration for details.
Eligibility filters – Strict mode
Strict mode is an extension of the Eligibility Filtering feature, allowing you to enforce stronger governance over resource assignments by restricting context selection during the Review step in Access request.
In both Normal and Strict modes, resources are filtered from search results based on the configured eligibility contexts. Resources that do not meet the eligibility criteria are not shown. The difference between the two modes occurs during the review step when selecting the context for the resource assignment:
-
With Strict mode enabled, the selectable contexts are limited to those shared between the selected beneficiary and the resource. If no shared contexts exist, no context will be available for selection, and the request cannot be completed.
-
Without Strict mode, any context configured on the resource can be selected, as long as the resource itself is eligible. You can therefore proceed even if there are no shared contexts between the beneficiary and the resource.
To enable Strict mode, modify the Enable resource eligibility filtering customer setting value to 2.
See the Customer settings - maintenance for configuration details.
Improved filtering of access rights
We have improved the filtering options to make finding access rights assigned to an identity faster and easier.
This feature is currently only available on the Access Rights tab in the Identity form.
For more details, see the Access Rights tab section of Identities.
Access request cancellation
You can now cancel access request in the pending state (one at a time) using the UI if you are the requester or beneficiary. See Access request for details.
Quick filter
We have added a new filtering option referred to as the quick filter, which makes searching faster and more efficient.
When you start entering text in the input text field, your search string is filtered in different columns at once. For example, if you type the letter "g", you get results from various columns starting with this letter:

You can find the quick filter in all list views and a variety of side panes for forms, for example: Countries, Tasks, Identity owners, or Resources in the Access request process.
For more details, see the Quick filter section of Data object search.
Approval process launched by timer service
We now fully support launching the approval process with the timer service, which was released as a technical preview feature in the February 2025 Cloud release.
The LaunchApprovalProcessWithTimerService customer setting allows the approval process to be launched by the timer service instead of during the request access process. This enhancement aims to improve the performance of the access request process, enabling faster completion as users no longer have to wait for the approval process to launch. For more details, see:
- Customer settings, row Launch approval process with timer service
- Approval process launched by timer service
Improved export
We have introduced a new, adaptable version of the export module for List views, which helps better control the export.
You can access the panel by selecting Export in any of the list views.
All export options are available in a modernized side panel.
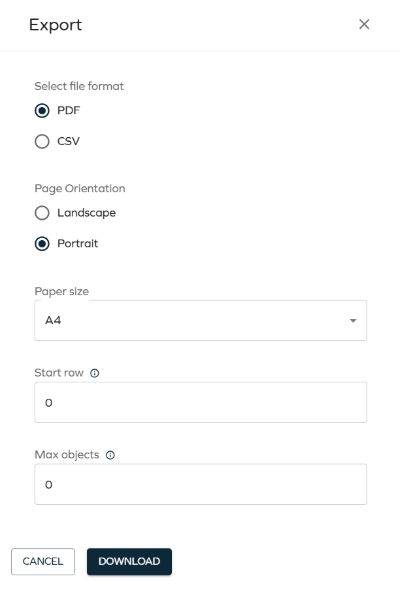
You can select between csv and pdf format, with the following enhancements to the pdf option:
- Full datasets are printed across pages.
- Applied filtering, column visibility, and sorting are included in the export.
- You can download the pdf without requiring the default stylesheet to be assigned.
Configurable panes with details
We have introduced configurable panes with details for Access request and Access approval, allowing an insight into the object's Identity, Resource, and System information.
For the Access request process you can access different information on step you are currently on.
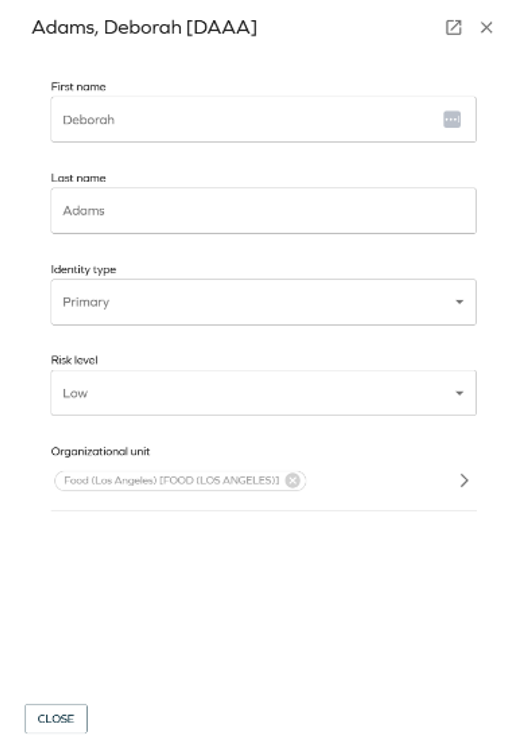
- In the Who is it for? step, you can access identity details by clicking on the identity's name. This opens a summary in a side panel. If you still need more information, click the opening icon in the top right corner of the side panel to open an external page with identity details.
-
In the What do they need? step you access both selected resource and system details by clicking on the resource or system name.
-
In the Review and Submit step you can access identity, resource, and system details by clicking the identity, resource, or system name.

In the Access approval you can access identity, resource, and system details by selecting appropriate name in the survey.
You can customize the scope of information available in the configurable details pane. You can customize details panes through View on a system related to the corresponding Form.
You can edit which fields are visible in the details panes by editing corresponding forms listed below.
- For identity details pane, configure the Identity Summary Form (Read Only) form
- For resource details pane, configure the Resource Infor form
- For system details pane, configure the Type form: System form
The Type form: System is used in various areas, and introducing changes to the form affects all of them.
Revoking resource assignments for multiple identities
We have added an option to revoke resource assignments for multiple identities at once. In the Identities view, you can now select more than one identity and then, in the top right corner, click the ellipsis (three dots) > Access Rights. A side panel with details will let you perform a quick review before the revoke. See Removing assignments (multiple identities) for details.
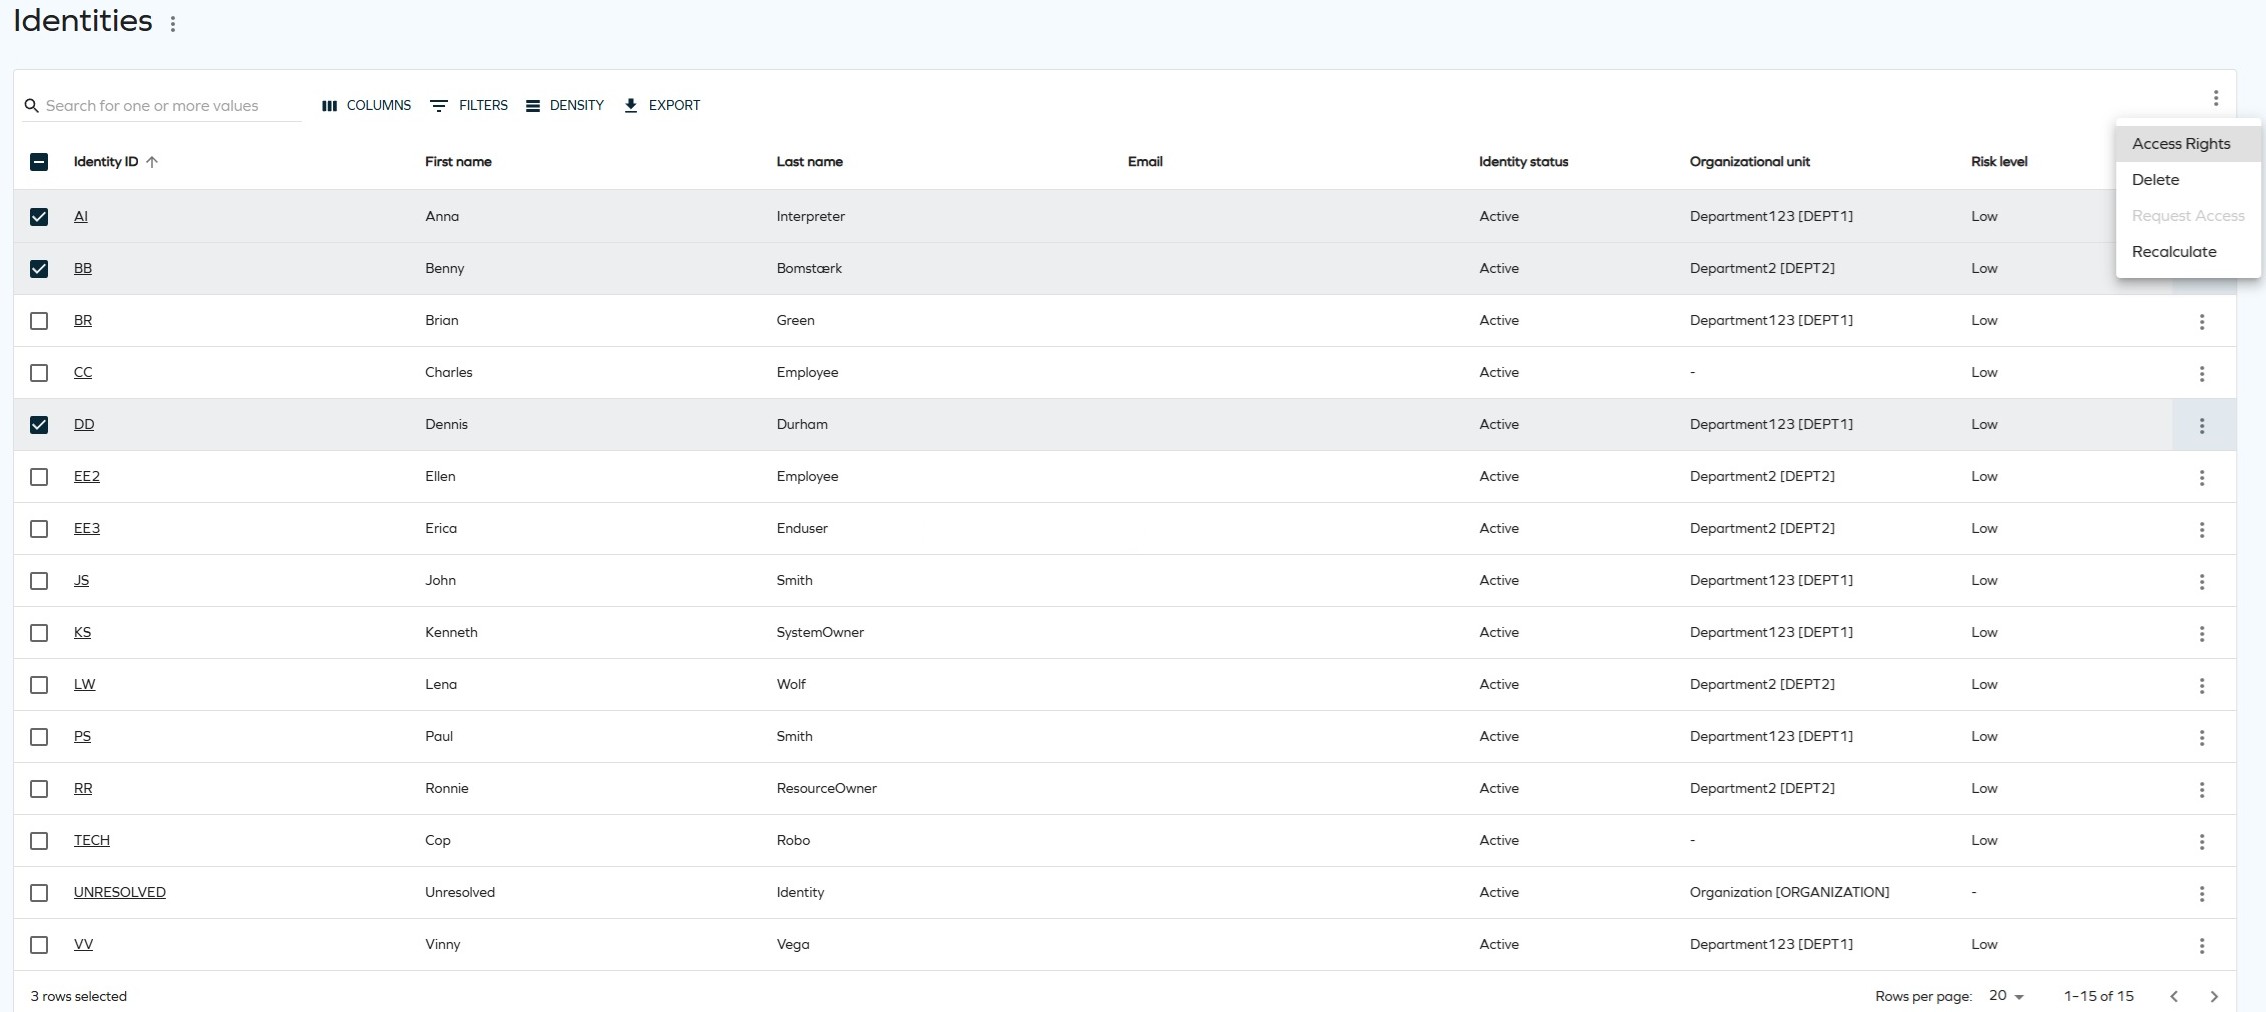
To allow users to revoke multiple assignments at once, change the Allow mass revoke of resource assignments (key: AllowMassRevoke) customer setting value to True. See Customer settings - User Interface for details. Otherwise, users will be able to revoke one assignment per action only.
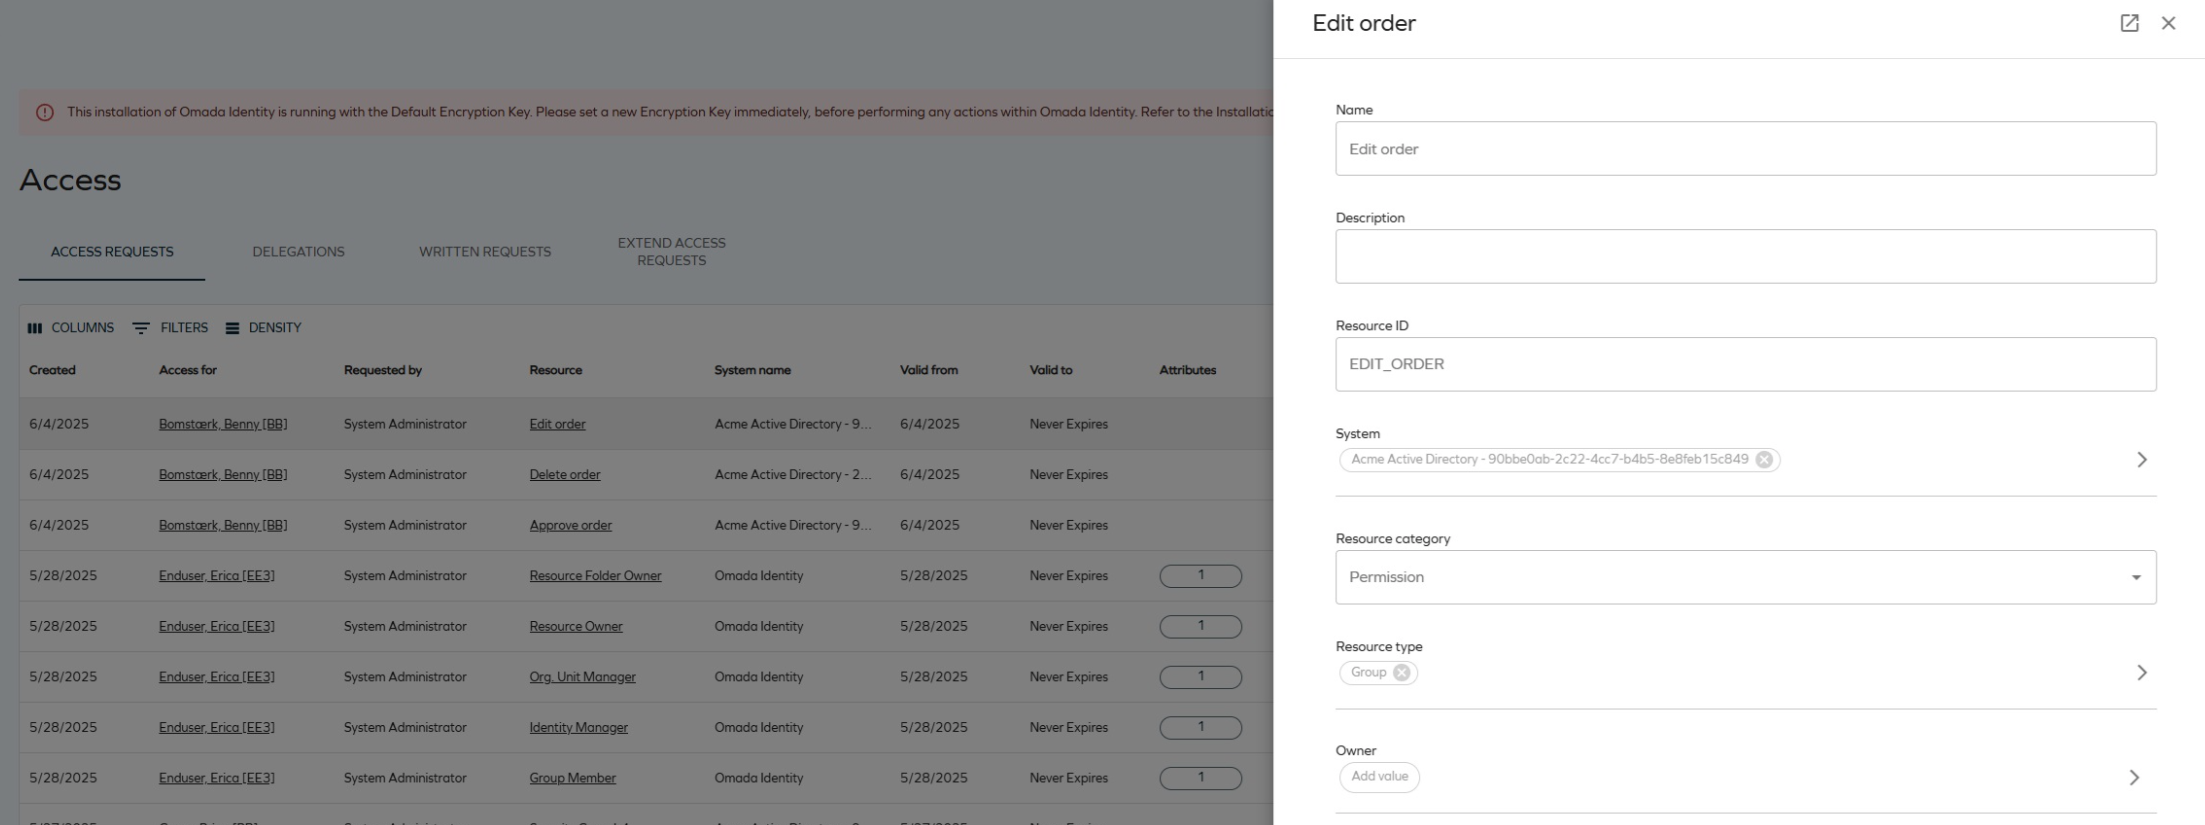
Clickable columns in the Access view - displaying additional information
In the Access view (after navigating to Access from the main menu on the left in Omada Identity), the Access for and Resource columns are now clickable. An additional side panel is displayed, presenting more information about the data object in the read-only mode.
Violations count in Policy and Rick Check
To ensure clarity when investigating access requests for potential policy violations, the message in the side panel has been changed from the [number] violations found to Policy violations found: [number].
Access request overview through the Assignment Timeline
You can use the Assignment Timeline to verify the progress of the access request, allowing you to review the steps that have already been completed, steps remaining, users/groups involved, and also the status of the background processes for this request. Color-coding will assist you in identifying the details quickly.
Access request streamlined account selection
In the request access second step, the Attributes column has been divided into Attributes and Accounts column. It simplifies the account selection for the chosen resource.
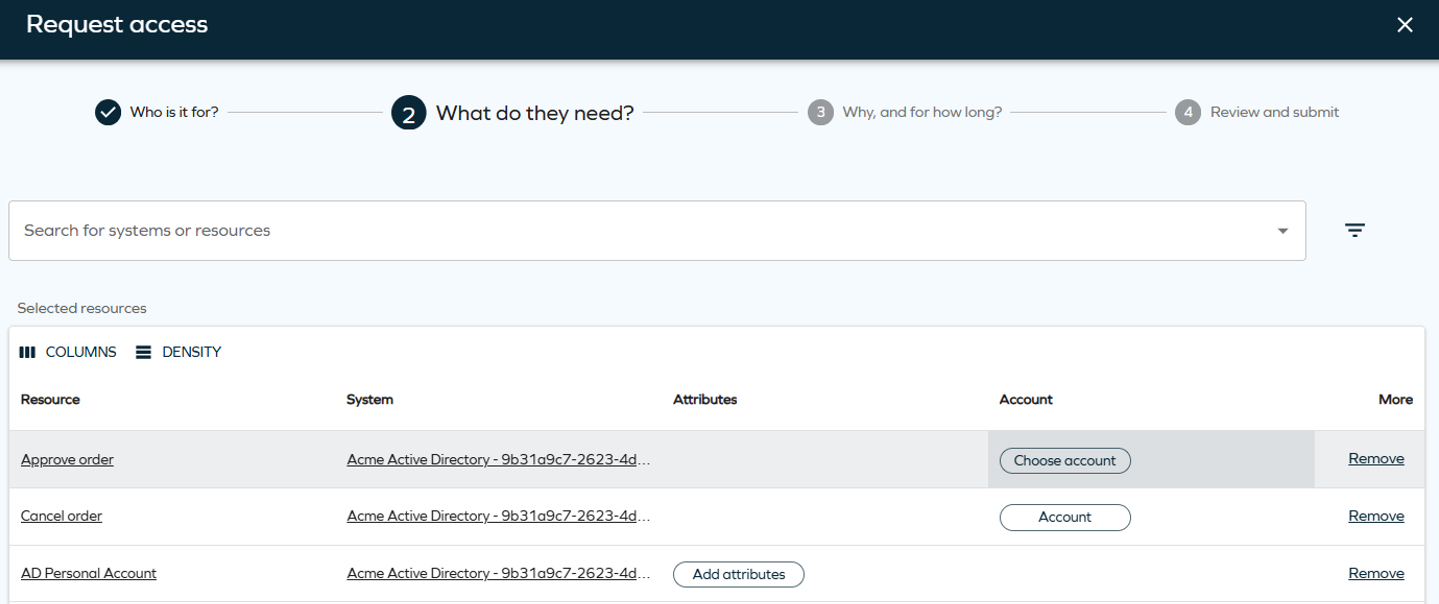
For more information, go to Access request.
Extending multiple resource assignments in one request
You can now select more than one resource assignment in the extension request. See Extend access for details.
Maximum validity period
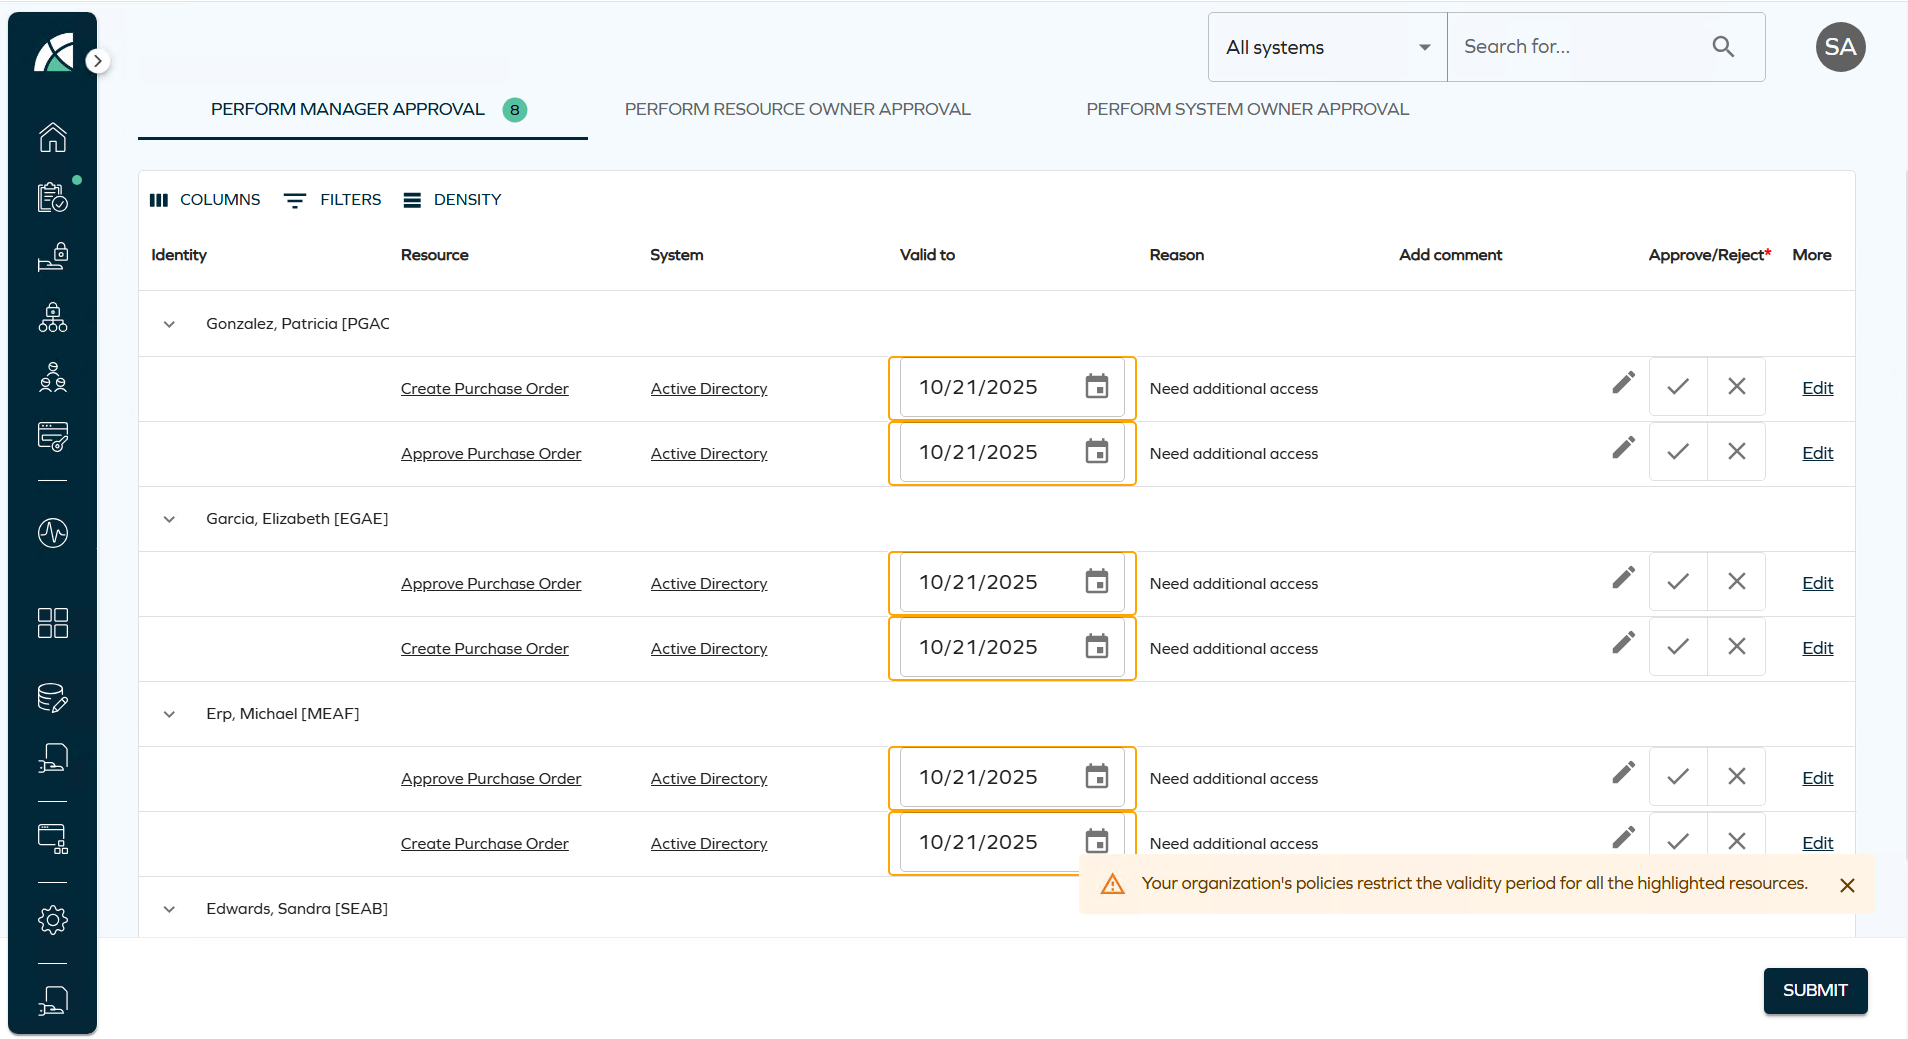
This release adds support for a configurable Maximum validity period property, which helps to set term limits on resource assignments.
This property can be configured for resources, resource folders, and systems. When defined with a value greater than zero, it limits the duration of resource assignments during the following processes:
- Access Request
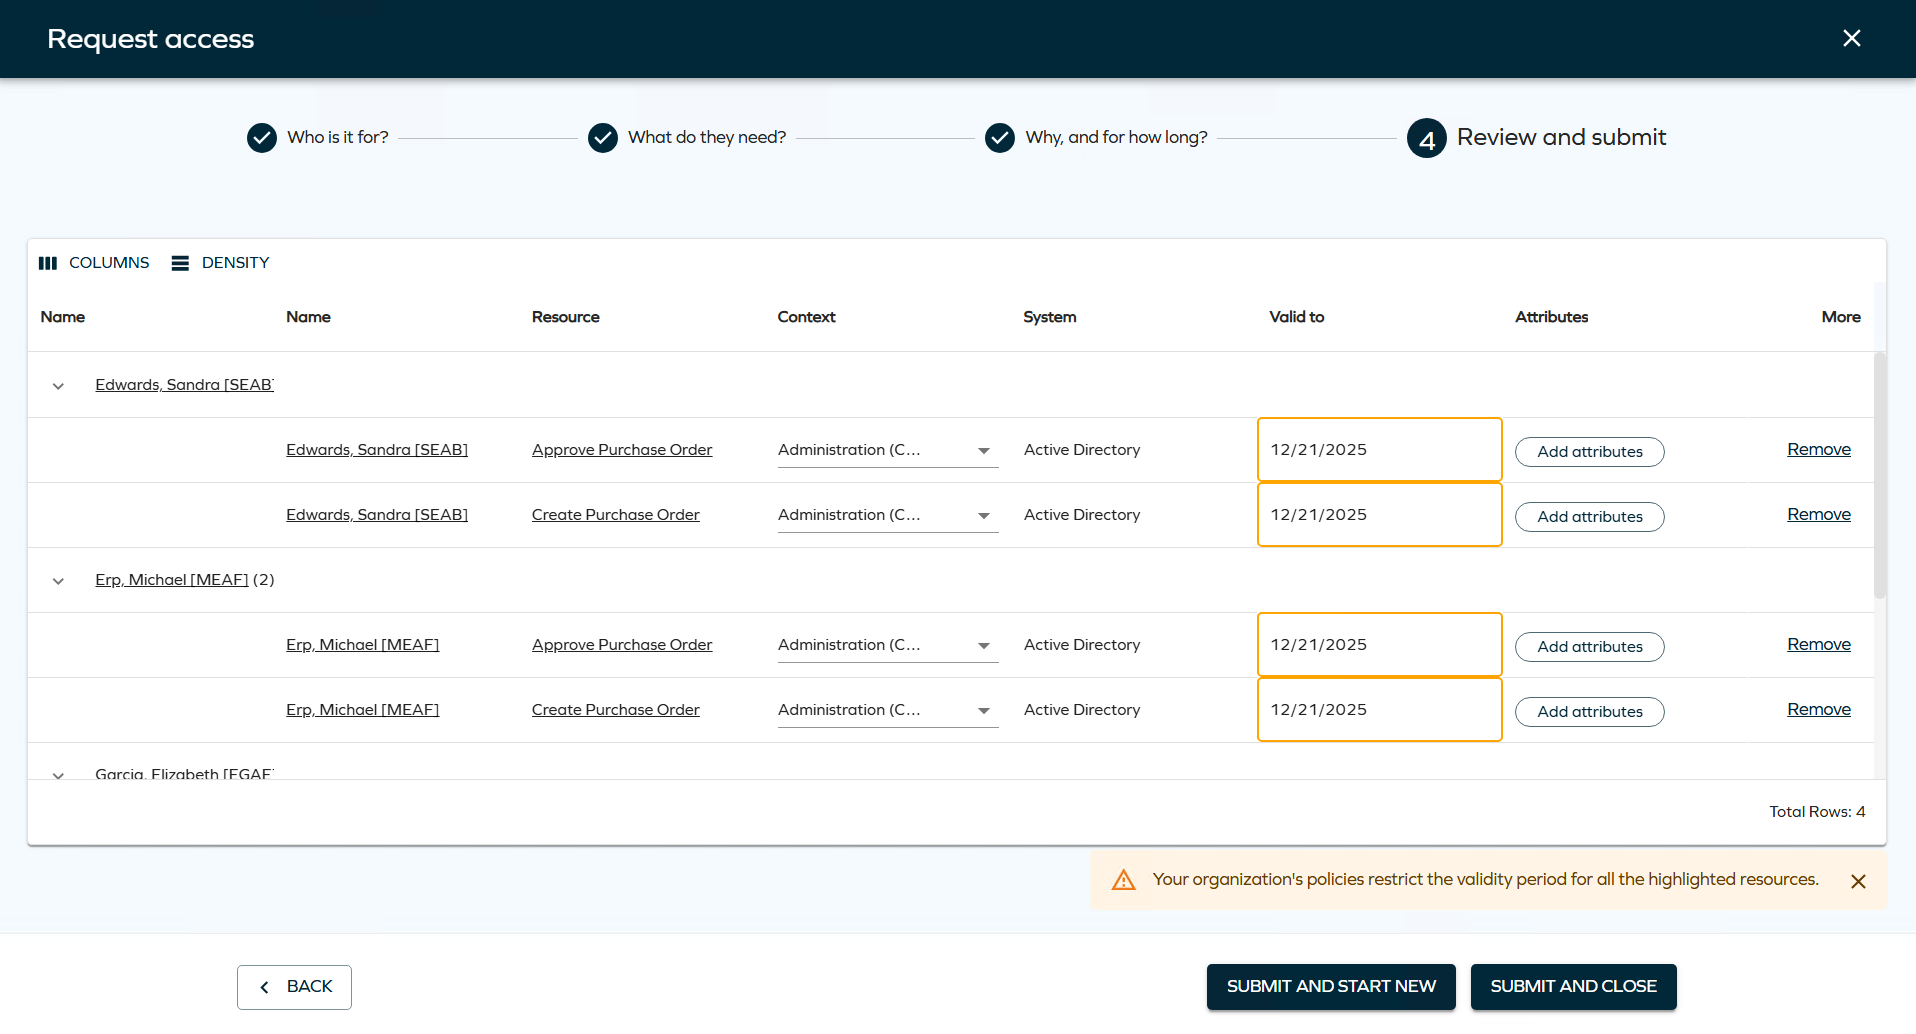
- Approval
- Extend Access

The system automatically shortens the requested validity period if it exceeds the configured maximum, using the most specific value available (Resource > Resource Folder > System).
In the new UI, affected validity fields are visually highlighted, and users are shown a warning of a potential restriction if there are any resources or assignments in the basket for which a maximum validity period restriction applies.
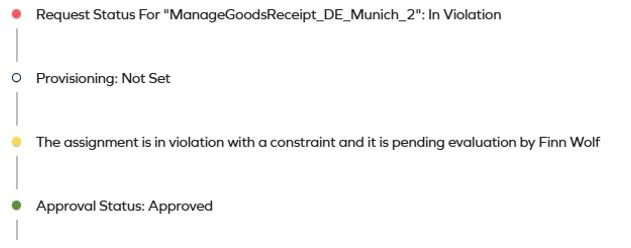
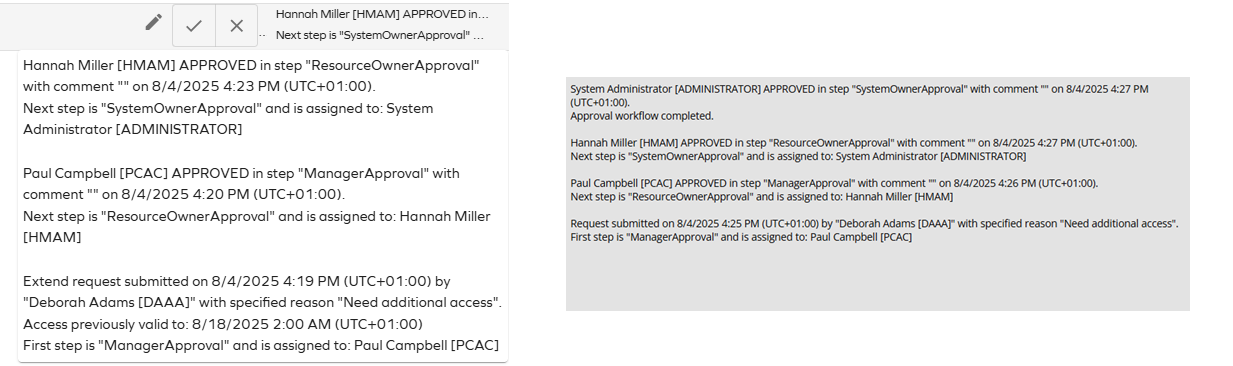
Access approval: expand history (description) field into a text timeline
Approval history logs will now show the most recent events on top and the earlier events at the bottom of the logs on both new UI and old UI. Each step will represent the action and the state:
Access request: new dynamic filter in identity search
We have added new dynamic filters to the identities dropdown in access request step 1, similarly to those implemented in step 2 for the resources dropdown.
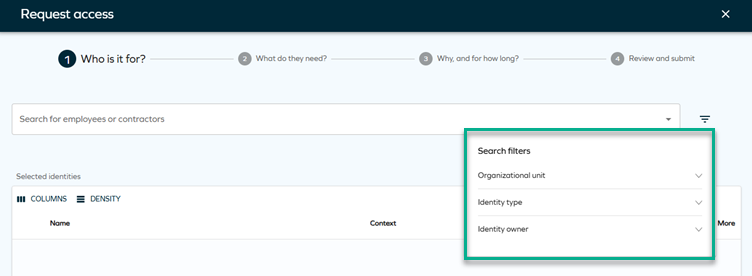
While filtering by organizational units is active by default, you can add other properties through a new customer setting with the key AccessRequestIdentitiesPropertyFilters. For more details, look up this setting in Customer settings and in Access request.
Using deep links to create an access request with preselected identities/resources
Smart request links take you directly to the right request flow, eliminating confusion and cutting support needs.
In step 2 of the access request process you can use the Get request link drop-down menu to reuse the access request setup – that is, copy the current request with identities or resources (the resources buttons are active if you have at least one resource selected):

Clicking the button opens a side panel with a deep link:
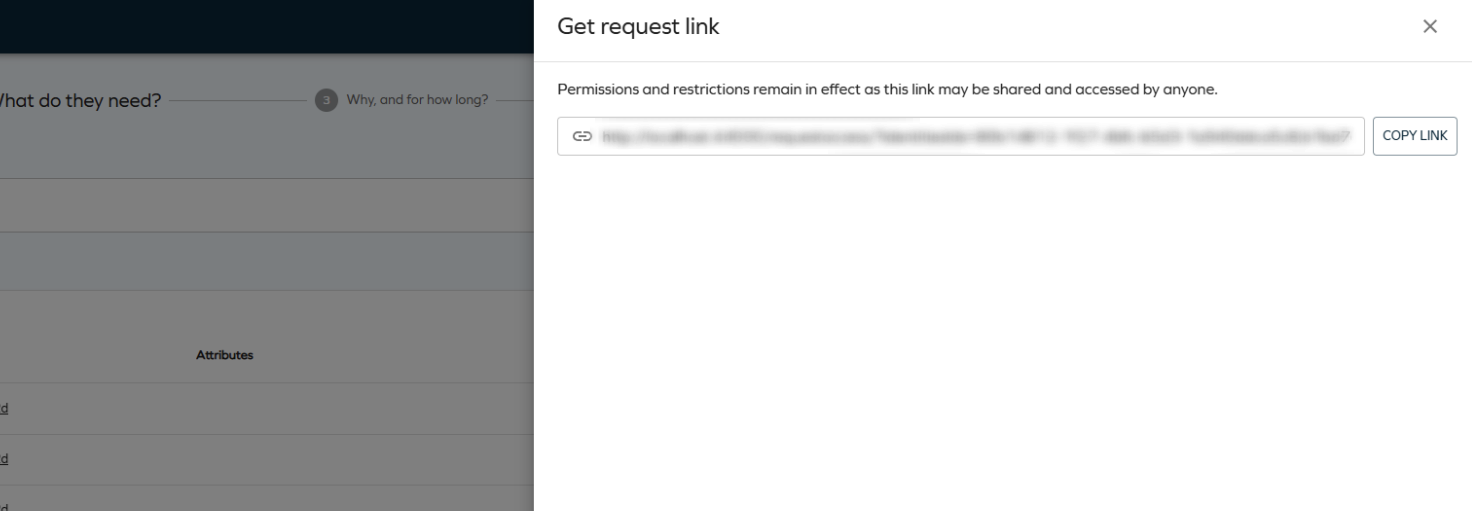
Deep links let you start the access request process with preselected identities and resources. They respect the security principles and the eligibility filter - if you cannot request for any of the selected identities (or cannot request for one of the prefilled resources), they are automatically removed and the user is notified.
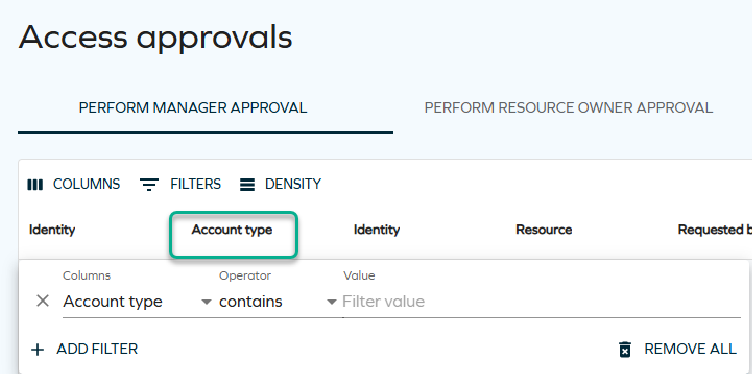
Account type
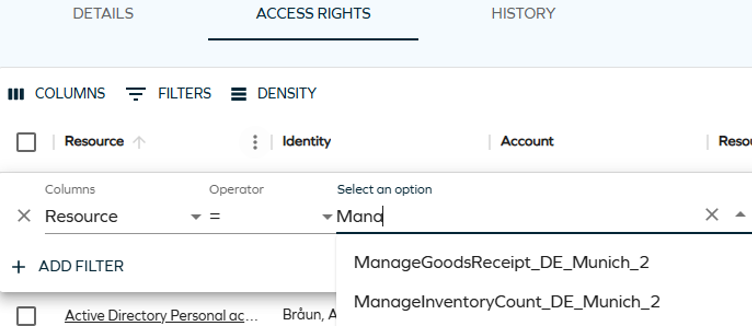
When approving survey questions, you can view the Account type column. For this column to be visible on the Approval page, select Columns and check the Account type option. From now, this column will be visible.
This column can also be filtered just like any other column on this page. To apply a filter, select Filters, and in Columns, select Account type. Choose the operator that you wish to use, and type the name of the account you want to filter by.
Hierarchical access rights view
Hierarchical access rights view shows relationships across resources, helping managers prevent over-entitlements.
While viewing the access rights of an identity, you can now see a hierarchical view of child assignments (without depth limitations). You can switch between the full-hierarchy mode (showing child assignments) and non-hierarchy mode (not showing child assignments) by switching the Use hierarchical view toggle in the top-right corner. Filtering supports expanding children in both modes.
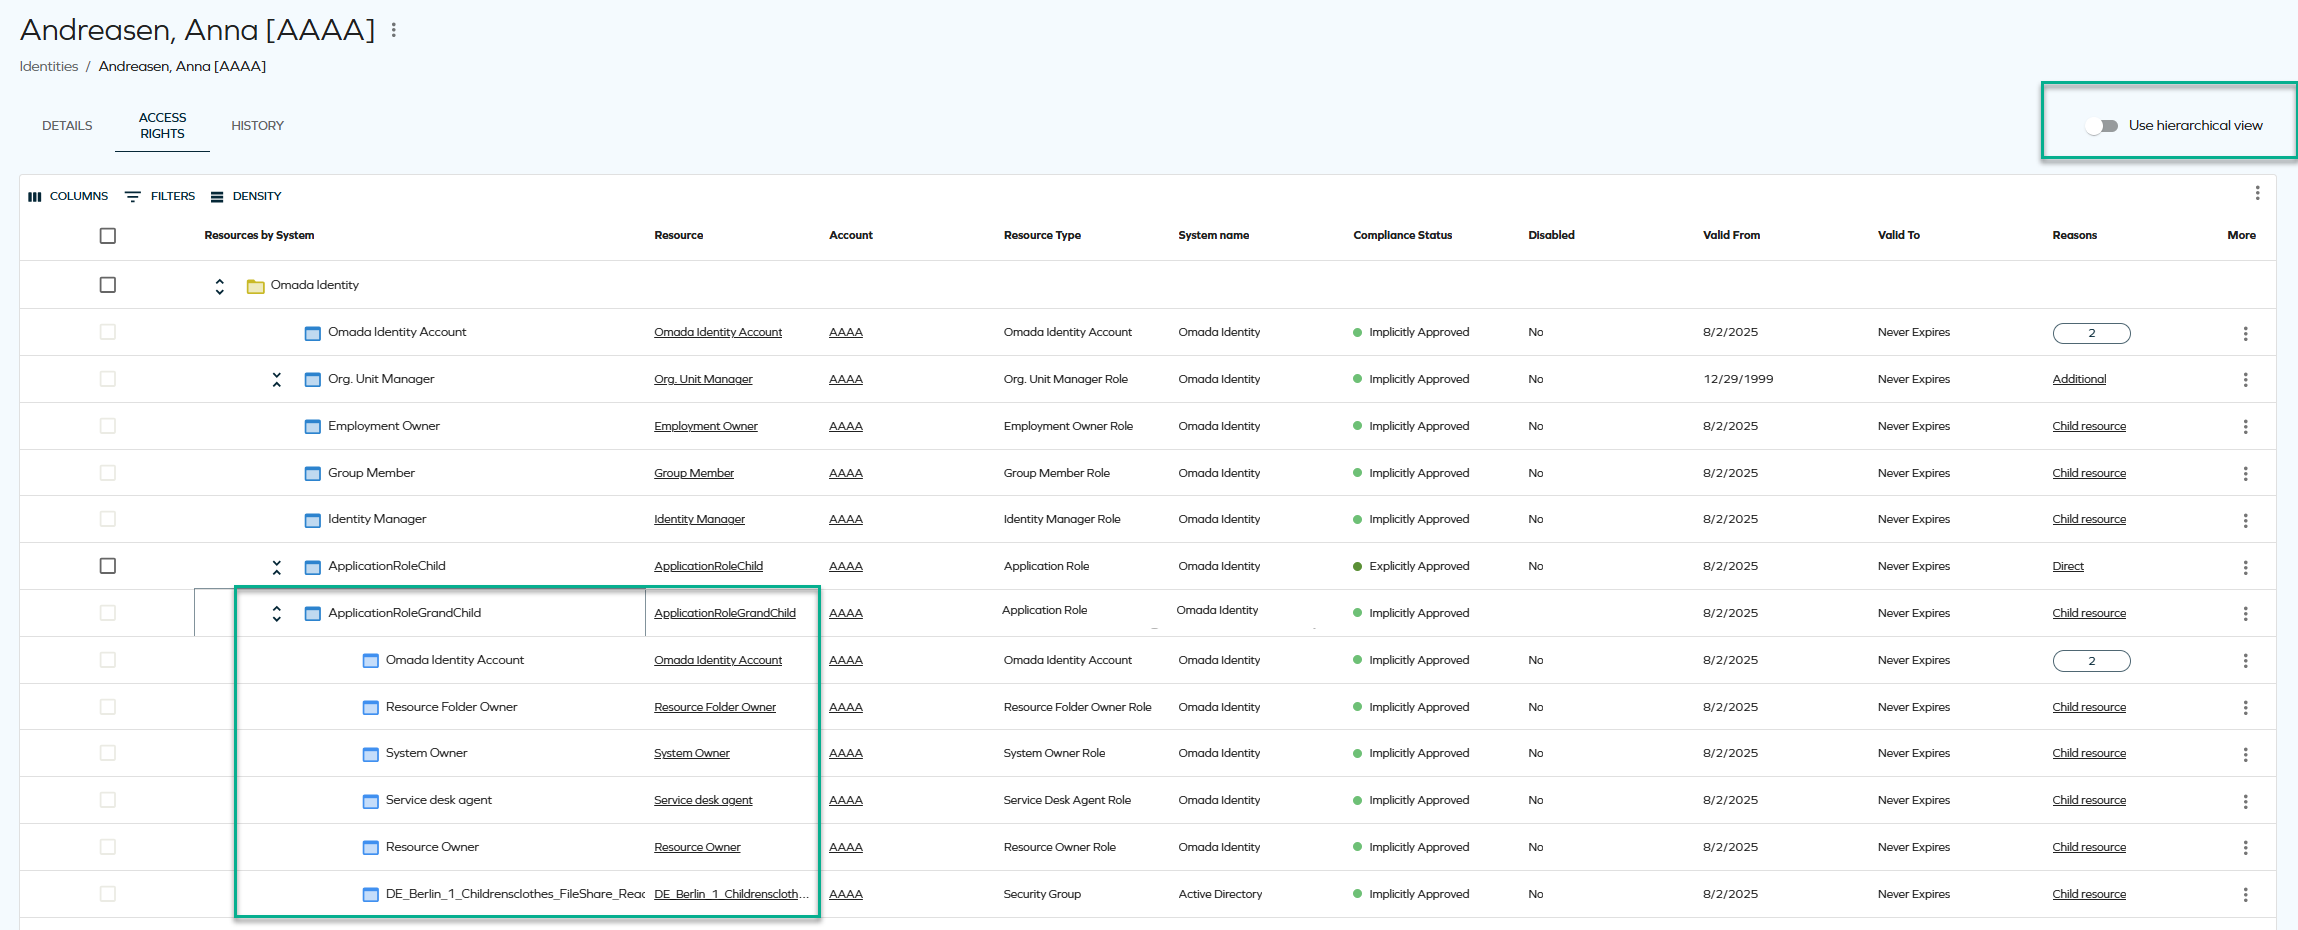
This feature has some limitations regarding sorting and filtering. For more information, see Showing child resources (hierarchical view).
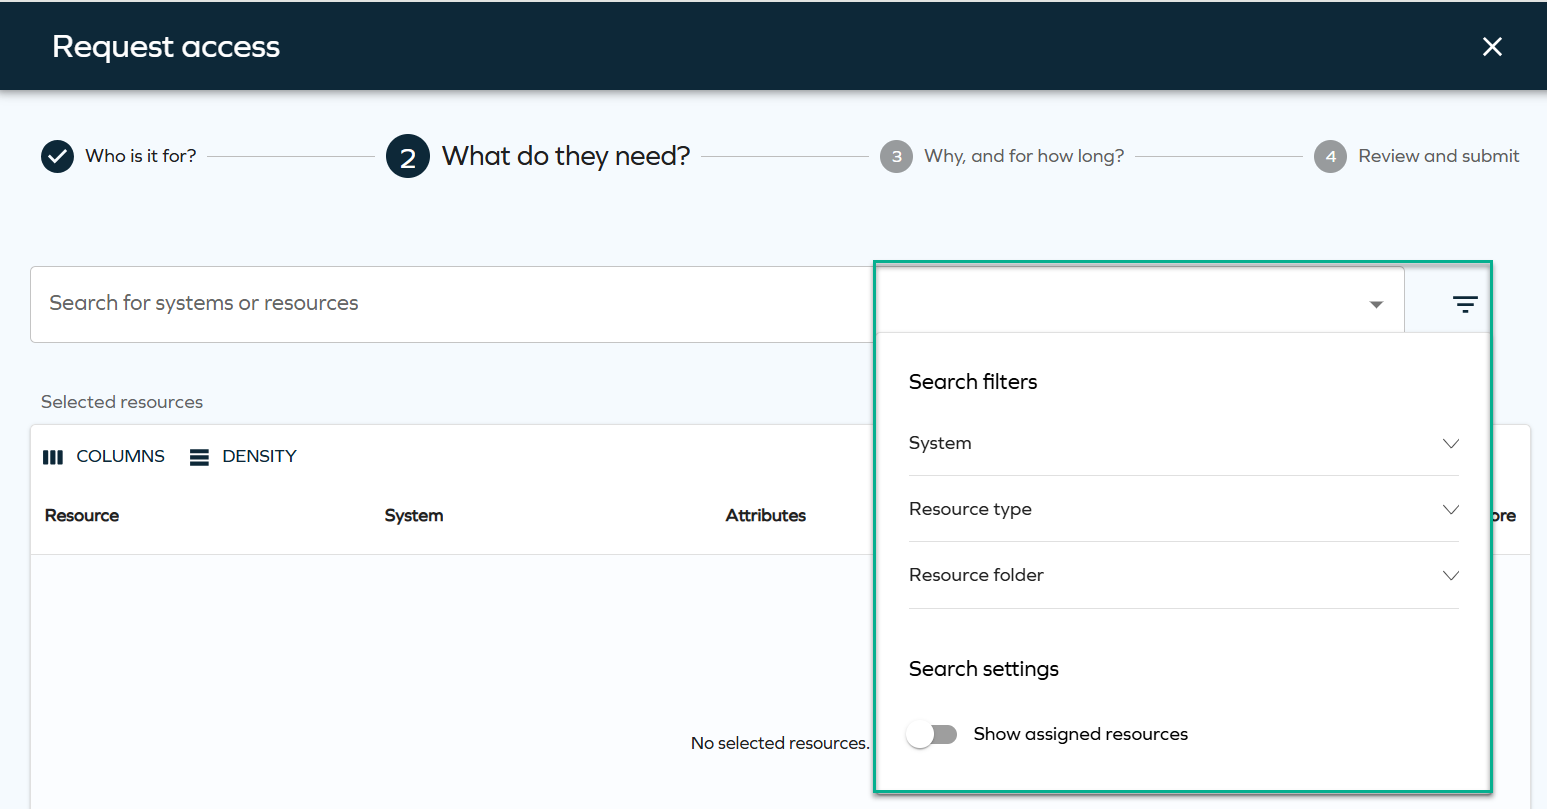
Configurable filters for resources in access request
Step 2 of the access request process now supports configurable filters for resources, similar to the filters already available for beneficiaries in step 1. Configurable resource filters make requests precise and relevant, speeding up onboarding and reducing IT bottlenecks.
The filters can be configured through the AccessRequestResourcesPropertyFilters customer setting and are displayed during the resource selection step. The behavior of these filters is consistent with how filters have worked previously.
For more technical details, look up this setting in User interface customer settings.
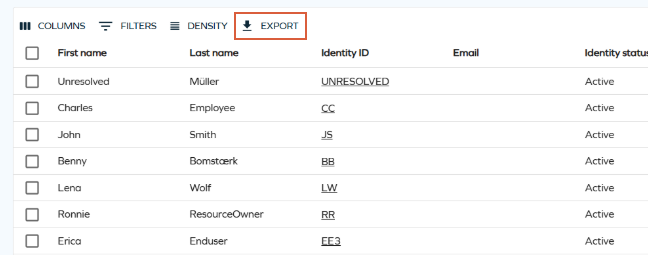
Exporting approval questions as a PDF/CSV report
You can now export all questions as a CSV/PDF report by using the Export button. In the Access view, in the the top grid, click Export:

In the panel, click Download:
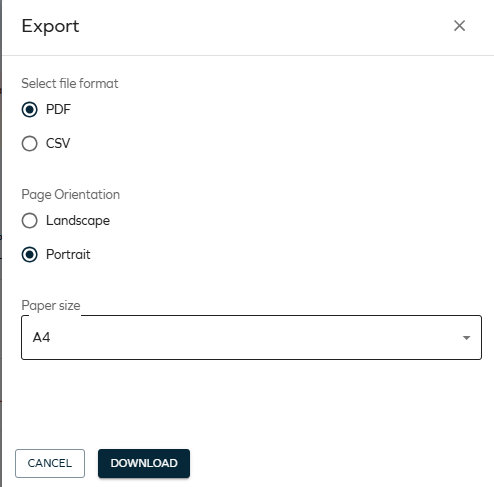
For more details, see Exporting questions as a CSV/PDF report.
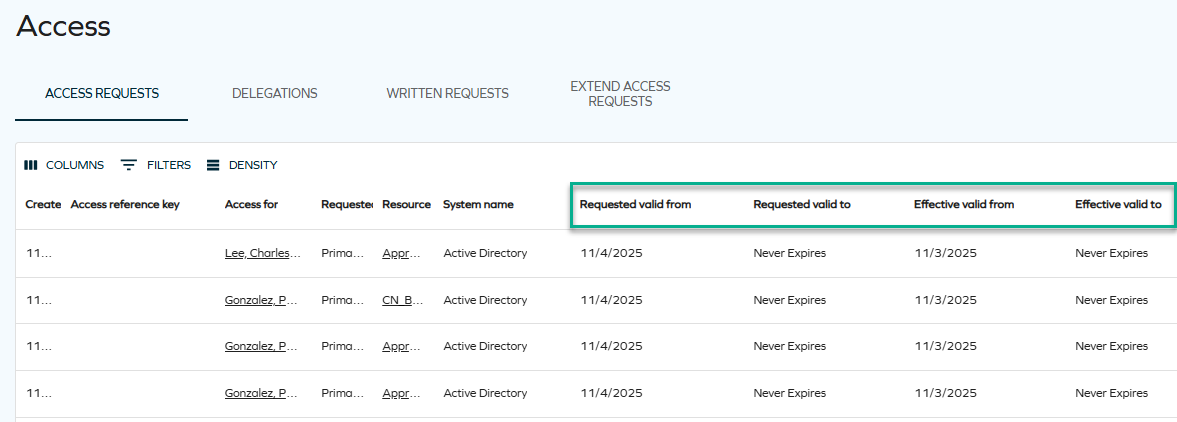
Access page: added effective validity columns to Access requests tab
We have added two new columns, Effective valid from and Effective valid to, to the Access request tab of the Access page. The existing Valid from and Valid to columns have been renamed to Requested valid from and Requested valid to to better indicate that they represent the validity period specified by the requester when submitting the access request.
The new Effective valid from and Effective valid to columns display the actual validity period set on the resulting resource assignment. This change ensures greater clarity, as approvers can modify the validity period during approval, which was not previously reflected in the old fields.
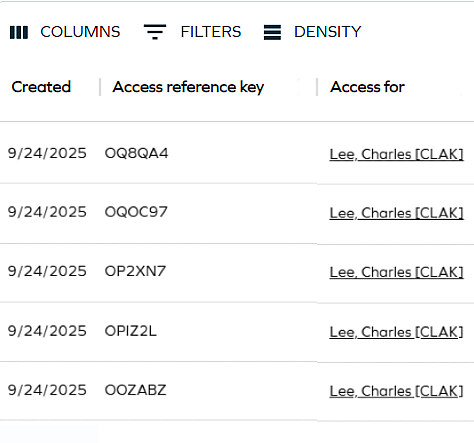
Access reference key - unique assignment code ID for resource assignments
A new customer setting (Create unique assignment code IDs for resource assignments) was added - when set to True, the system creates unique assignment code IDs for resource assignments when requesting access. This code will appear in the new Access reference key column that was added to the Access request and Approvals views.
The Access reference key is a six-character alphanumeric identifier that uniquely identifies each resource assignment created through an access request. It allows users, approvers, HR staff, and support teams to reference a specific request easily during follow-up conversations or troubleshooting.
Encryption
Deprecation notice: cryptographic algorithms
With the 15.0.4 release, we are starting the deprecation process of the Rijndael cipher as well as the AES-256 implementation. While they remain supported, we recommend that you get familiar with the new standards-based encryption built on JWE (JSON Web Encryption).
No immediate migration action is required of you.
New standard: JSON Web Encryption (JWE)
The new encryption mechanism recommended by Omada protects sensitive data using a modern, secure way of encrypting data defined by the JSON Web Encryption (JWE) standard, which combines a strong key derivation function with authenticated encryption.
It will strengthen security, work with common industry libraries, and make encrypted values easier to share and use across applications. Existing encrypted values will continue to work, and the system can handle both old and new formats during the transition.
To get familiar with the components of the new encryption mechanism, see the Encryption section of Additional security aspects. Afterwards, plan to adjust your infrastructure to support the new JWE format, and replace old encrypted strings before applying a future version of Omada Identity.
The new encryption mechanism is disabled by default and can be enabled by a feature toggle (the Use JWE customer setting). For details, look up the Use JWE customer setting in Security customer settings.
Enabling JSON Web Encryption (JWE) mechanism may cause significant performance overhead, and should be thoroughly tested in a non-production environment before being enabled in production. For more information, refer to the Known issues section.
Connectors
We have introduced a new connectivity package for Workday. See Workday for details.
Configurable content-type per operation for REST connectors
You can now use other content types for specific HTTP verbs by providing a JSON object with properties in the verb:content type format (you can also specify a default content type for all requests). See Provisioning configuration in REST connectivity for details.
Unfolding request and approval resources to fit SAP roles
Omada Identity now allows access requests for any collection of resources, representing access at any level (for example, permission, application role, business role) and unfolding into a distinct list of resources at the permission level. Each SAP role will match one-to-one with a resource permission in Omada Identity.
These enhancements to SAP GRC risk checks will enable greater mapping between Omada and SAP, and assist you in your migration to SAP S4/HANA.
You can read more about how to configure the SAP GRC in the Policy & Risk check documentation.
Generic database connector - support for PostgreSQL
The generic database connector now supports PostgreSQL (until this point, only OLE DB implementations were supported – typically Microsoft SQL Server and Oracle). There is a new Database Provider drop-down list selection available in the connector settings. See Generic database for details.
AWS connectivity package
We introduced a new connectivity package for AWS that supports governing and managing AWS IAM API environments. See AWS for details.
PostgreSQL support (generic database connector)
We have added support for data provisioning for PostgreSQL using the SQL Query Collector. See Generic SQL connector - data provisioning for details.
OAuth2 custom - support for nested token structure in REST connectivity
The REST data import/provisioning (collector/connector) now supports nested token structure (JSONPath) in the OAuth2 custom authentication option.
New virtual reference property
We have added a new virtual reference property named $ContextOwner that resolves the context owner for a context object based on the setting in the context type, for example, traversing to the parent context until it finds an owner.
The owner property defined in the context type can be overwritten with the OWNERPROPERTY parameter, for example: /$ContextOwner(OWNERPROPERTY=EXPLICITOWNER).
If the VRP meets the calling user, then it traverses to the next level. This can be overridden by specifying the parameter CRAWLMODE, for example, /$ContextOwner(CRAWLMODE=3), where:
- 0: traverse if the owner is undefined or only contain the calling user
- 1: traverse if the active user is among the owners
- 2: traverse and accumulate all the way to the top
- 3: return the first non-empty owner, regardless if it's the calling user.
For more details on virtual reference properties, see Virtual reference properties.
Surveys
Important changes to survey templates
A number of out-of-the-box (OOTB) survey templates have been updated and are now included in the packaged solution. This update introduces important changes to how these templates are managed and used.
The changes include: renaming existing templates with an _Obsolete suffix, making all OOTB templates read-only, requiring configuration updates if they are referenced, enforcing customization through copies, and allowing safe deletion of unused obsoleted templates.
For a full overview of changes to survey templates, as well as a list of affected survey templates, see the Managing and using out-of-the-box survey templates section of Survey templates.
Survey complete post-action handler
A new post-action handler (PAH) called SurveyCompletePostActionHandler has been implemented, which allows defining a property-value dictionary that is automatically applied to survey objects when a survey is closed by a system user.
This streamlines survey lifecycle management by enabling automatic tagging or classification, improving data consistency and reducing manual administrative effort.
For more information, see Survey templates - post actions.
Technical Preview: Direct Resource Assignments (DRAs) from surveys
With the latest enhancements to survey handling, organizations can now streamline access reviews, reduce compliance risks, and simplify identity lifecycle management.
Survey decisions like (Keep or Remove) made during access reviews now trigger the creation or update of Direct Resource Assignments (DRAs). This means that:
- Keep decision automatically generate DRAs, ensuring access is retained with a clear, auditable trail.
- Remove decision deactivate existing DRAs, triggering deprovisioning actions where needed.
Why it matters
-
Smart context and origin tracking: Each DRA now includes metadata about its origin—whether it came from a survey, access request, or Approve all assignments feature. This enables fine-grained filtering and reporting, custom event definitions based on assignment origin, and a better traceability for compliance and audits.
-
Seamless migration and compatibility: Existing surveys continue to function without disruption, while new surveys automatically adopt the improved behavior. Customers can easily add context fields to survey templates to enrich DRAs.
-
Compliance and audit-readiness: Survey verdicts are still created for audit trails. DRAs replace survey verdict as the primary desired state, improving clarity and reducing the risk of silent expirations. All actions are timestamped in UTC and include approver details for full transparency.
For more technical information, see section Technical Preview Feature: Approve survey questions create direct resource assignments of Survey verdicts.
Cleanup of deprecated survey tables
Legacy survey-related database tables (tblSurveyResult_Account, tblSurveyResult_ResourceAssignment) and their associated survey templates have been removed. These tables were unused and have been cleaned up to improve database maintainability and overall system performance.
Transfer Identity Assignments Survey - validation of the current assignment status
Improved transfer survey accuracy automatically removes expired or rejected assignments, ensuring data you can rely on.
If you select transfer for a resource assignment and submit your response, the system now validates the current status of the assignment. If the assignment is inactive during submission, the system automatically overrides the remove decision to prevent transferring inactive resources. A message is added to the survey question history log, indicating that the decision was changed from transfer to remove, as the assignment was inactive.
Role and Policy Engine
Self-management extension: configurable batch size for data object updates
A new configuration setting, UpdateDataObjectsBatchSize, has been introduced to control the number of data objects updated in a single batch during self-management operations.
This option allows administrators to fine-tune performance by adjusting the batch size to match system capacity and workload requirements. The default value is 5000.
For details, see Self-management, especially section Configuration and example.
Improvements to queuing methods
As part of our efforts to enhance RoPE performance, we have improved the speed of RoPE calculations. Updated documentation can be accessed here: RoPE queuing.
Pause/Resume calculations button
With the new Pause/Resume RoPE Calculations feature, admins can take control directly from the Operations Dashboard, cutting delays and eliminating support dependencies.
The button's label dynamically reflects the current state of RoPE calculations:
-
When you click the Pause calculations button, a confirmation message is displayed. If you confirm, the system sets the
Pausedsetting to true. While no new calculations will be initiated, any ongoing calculations will continue until they are completed. -
When you click the Resume calculations button and confirm, the system sets the
Pausedsetting setting to false. This enables RoPE to start processing new calculations.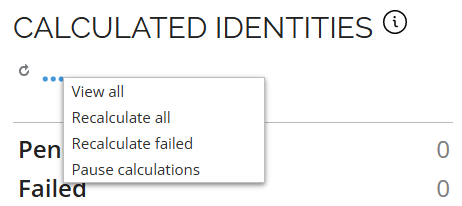
Updated conditional inheritance matching logic
The Conditional inheritance evaluator RoPE extension has been updated to align with the intended design for context-based matching. A child resource must now contain a value in the property configured in MatchContextMembershipTo; otherwise, the inheritance rule does not match and the child resource is not assigned. Earlier versions could match even when this value was missing, which was unintended.
If you're upgrading from prior versions of Omada Identity, you may observe changes in conditional inheritance results, including removal of child permissions that no longer meet the corrected matching criteria.
Administrators should ensure that resources participating in conditional inheritance have the required context attributes populated or adjust their configuration accordingly.
For more details, see Conditional inheritance evaluator.
Segregation of Duties
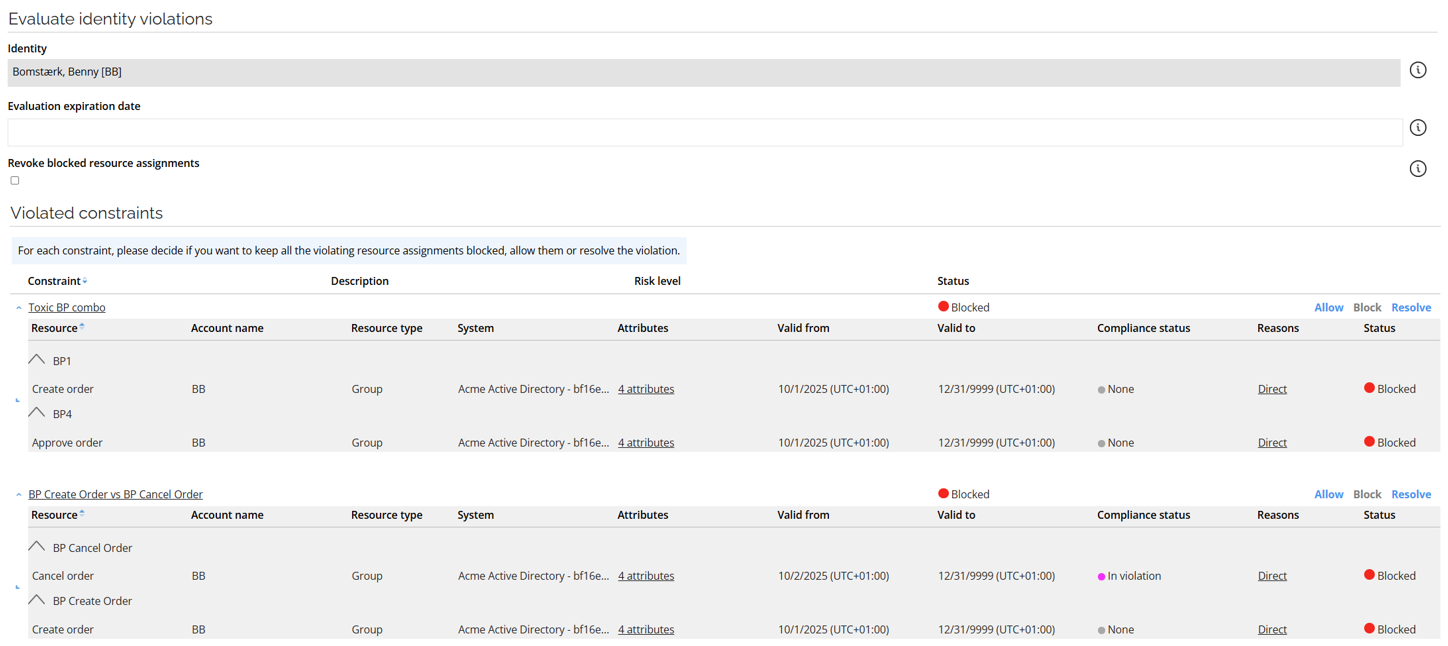
SoD: Improved handling of nested business processes
The handling of Segregation of Duties (SoD) violations in nested business processes has been improved. Violation reporting is now clearer and more accurate, helping auditors and business users quickly identify the true source of risk and act on it with confidence.
When a violation occurs for a resource assigned to a business process (BP) that is itself a child of other business processes, the resource is now shown at the grouping level of the business process directly involved in the toxic combination of the constraint.
For example, in the Toxic BP Combo constraint, the Create order resource is matched to BP1, even though it is part of multiple nested business processes (BP1 is the parent of BP2, and BP2 is the parent of BP1). In addition, Create Order is also shown as violating another constraint (BP Create Order vs BP Cancel Order), and appears in that grouping as well.
API
Omada Identity Graph API 3.0
The GraphQL API has been updated to version 3.0 with the following changes:
-
The API response code for error conditions in the GraphQL API has been updated to OK (200) in internal processing errors that previously returned a Bad request (400) status code inappropriately.
-
The logic for the Reason field in the access request configuration type has been updated from a simple Boolean (required/not required) to a more flexible enum-based configuration with three possible values: Required, Optional, and Hidden.
-
A resource assignment with no violations will now correctly have
NoViolationassigned as its violation status.
For more details, see GraphQL API Changelog.
Upcoming change: OData page size
Starting with the 15.0.5 update, the maximum page size for OData responses will be set to 1000 on production environments to improve performance and optimize data handling.
The change is controlled by the ODataPageSizeLimit customer setting. For more information, look up ODataPageSizeLimit in Customer settings - Standard application and OData documentation.
The new page size will only be applied to new environments and those existing environments whose current page size value is unset or 0.
You should review and update your scripts to ensure they implement pagination when retrieving data, helping maintain optimal performance and prepare for upcoming changes.
Documentation
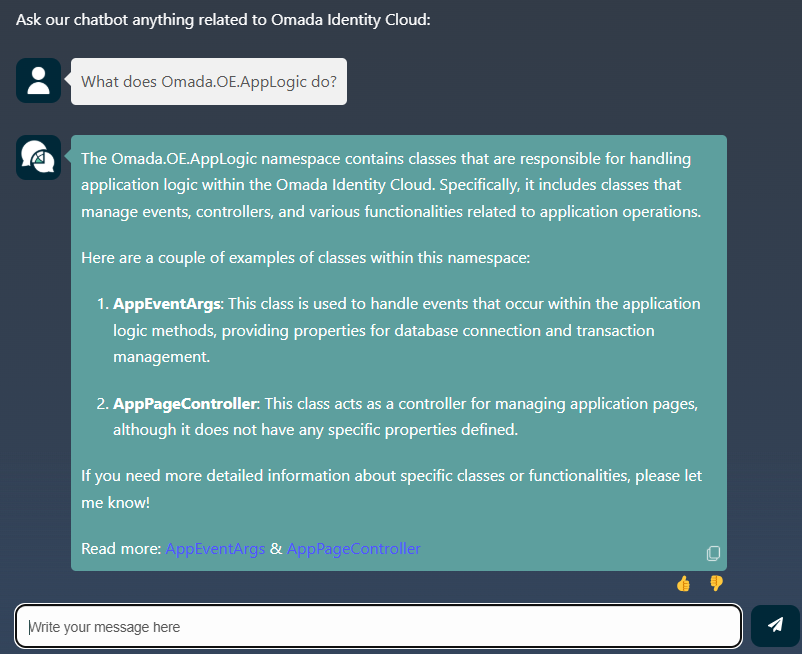
Javi AI assistant and Enterprise Server API documentation
Our Javi AI assistant for documentation now answers questions related to the Enterprise Server API documentation.
REST connectivity - practical examples
We added a new subsection that covers practical examples for REST connectivity (a comprehensive configuration and usage examples for anchor property, ResultValuesJsonPath, multivalue property handling, and other). See REST - practical examples for details.