Access request
New UI processes cannot be added to All services dashboard.
The Access request process allows you to define the scope of your access requests. You can easily select who should have access to specific resources or systems using this process. With the Access request process you can:
- Request access for multiple identities simultaneously.
- Request access more simply and intuitively.
- Check your access requests on a new page.
- Request access for multiple identities with different context.
Experience the request access process with Omada Identity Cloud interactive walkthrough. Learn how to perform a manager approval of access requested by one of your subordinates.
To create an access request for a non-human (technical) identity, use the dedicated access request process. The process steps are identical to the flow outlined below, but the dedicated process allows you to list non-human identities only. See Access request configuration to learn how to add the process to your homepage.
Creating an access request
Follow these steps to request access:
-
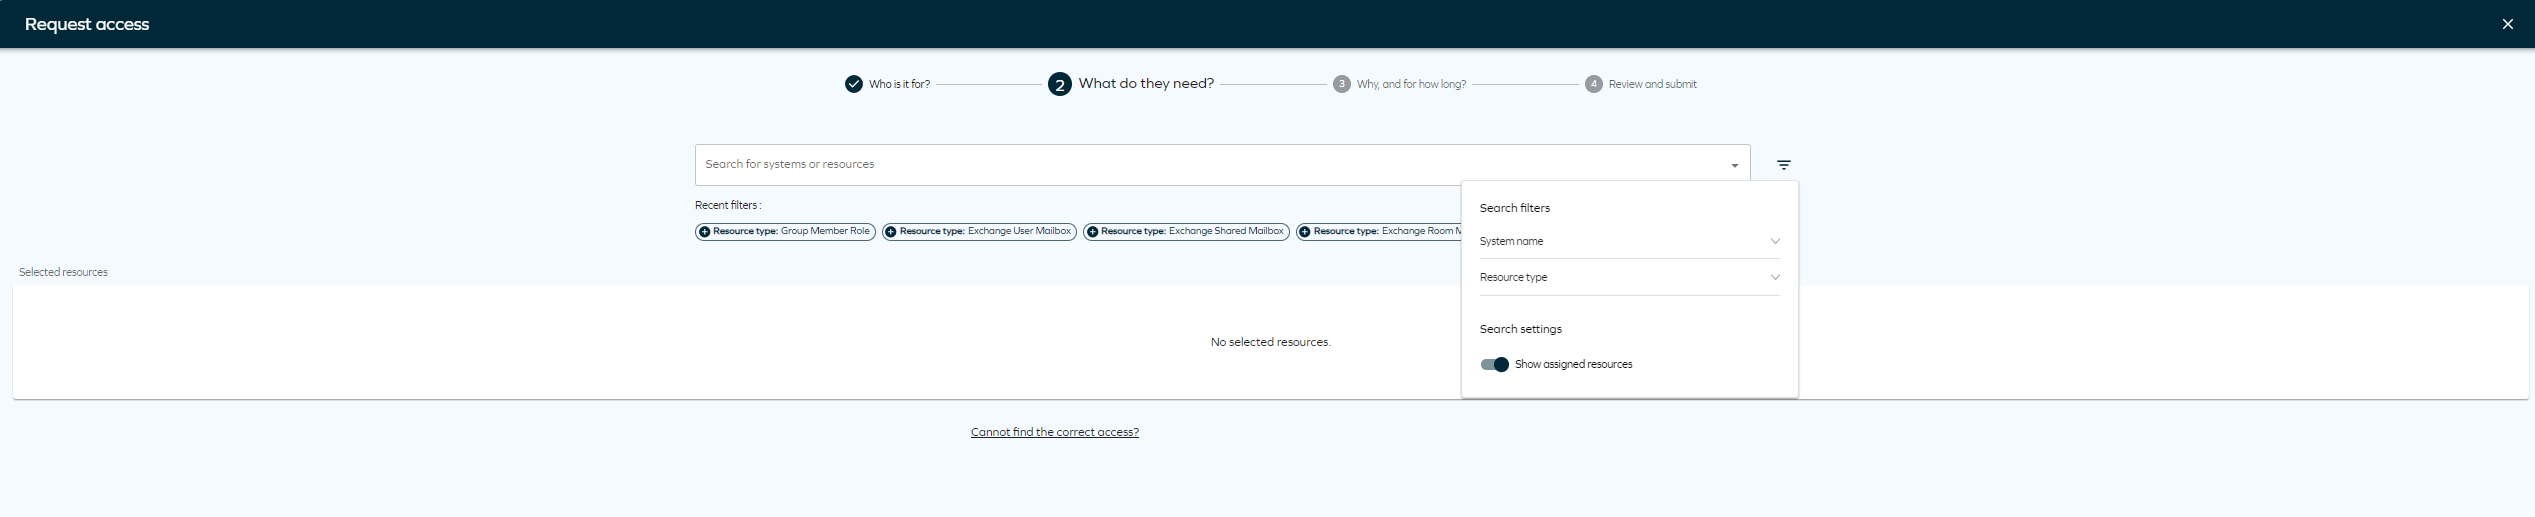
Click Request access tab in the Home page. The page will open, and you will see four steps.

-
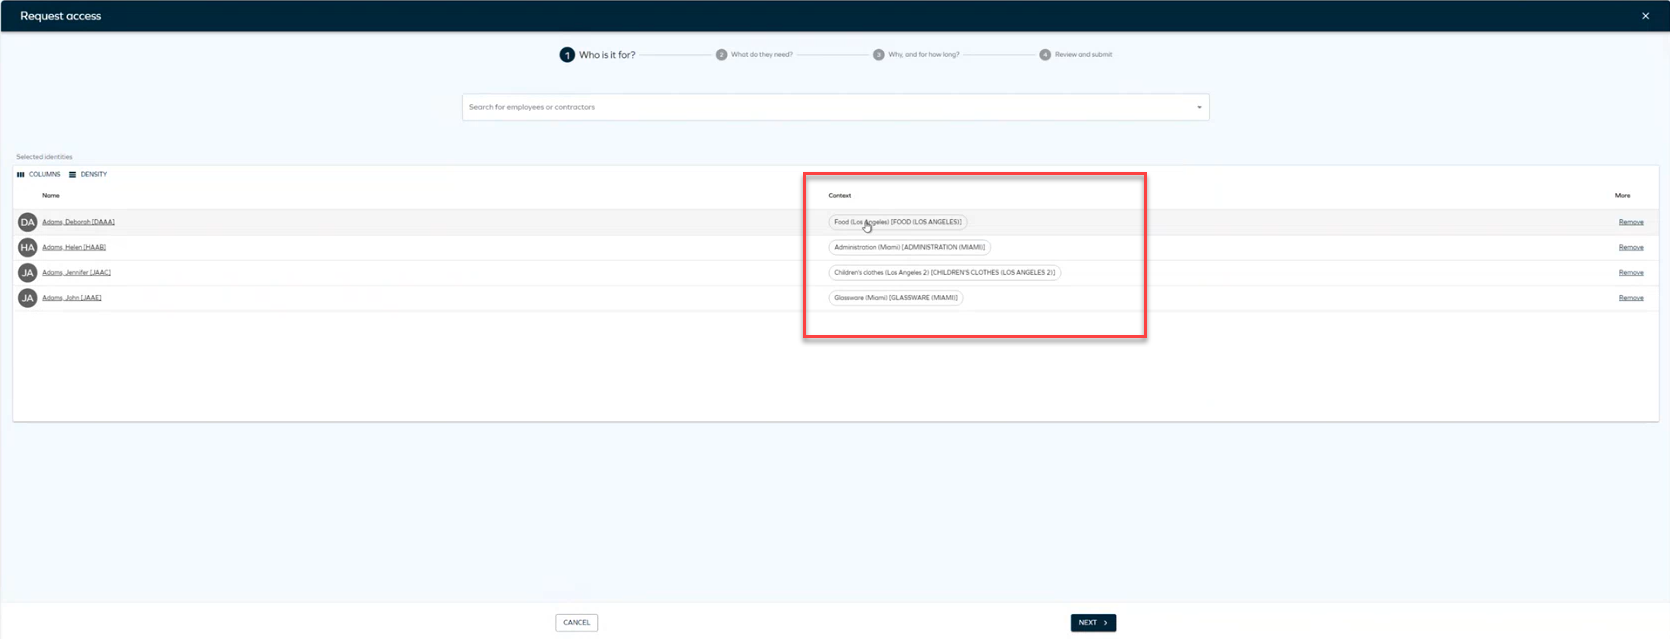
Select the identities for whom you want to request access. Click Add to add as many identities as needed. If you select identities with different context, you will see a diffferent column with the context of each identity.
 note
noteIn this step, you can use dynamic filters to make identity search easier:
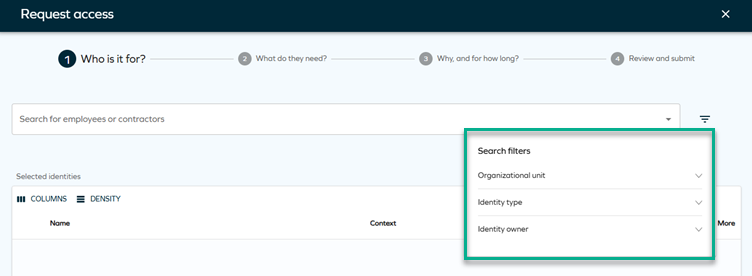
While filtering by organizational units is active by default, you can add other filters as comma-separated values through a customer setting with the key
AccessRequestIdentitiesPropertyFilters. An example of adding such filters is displayed here: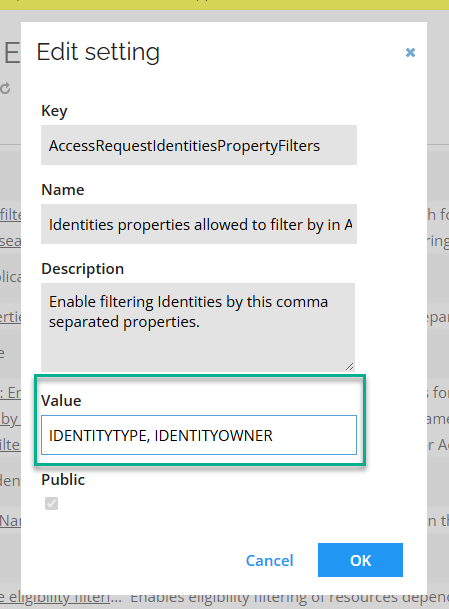
For more information, look up this setting in Customer settings.
-
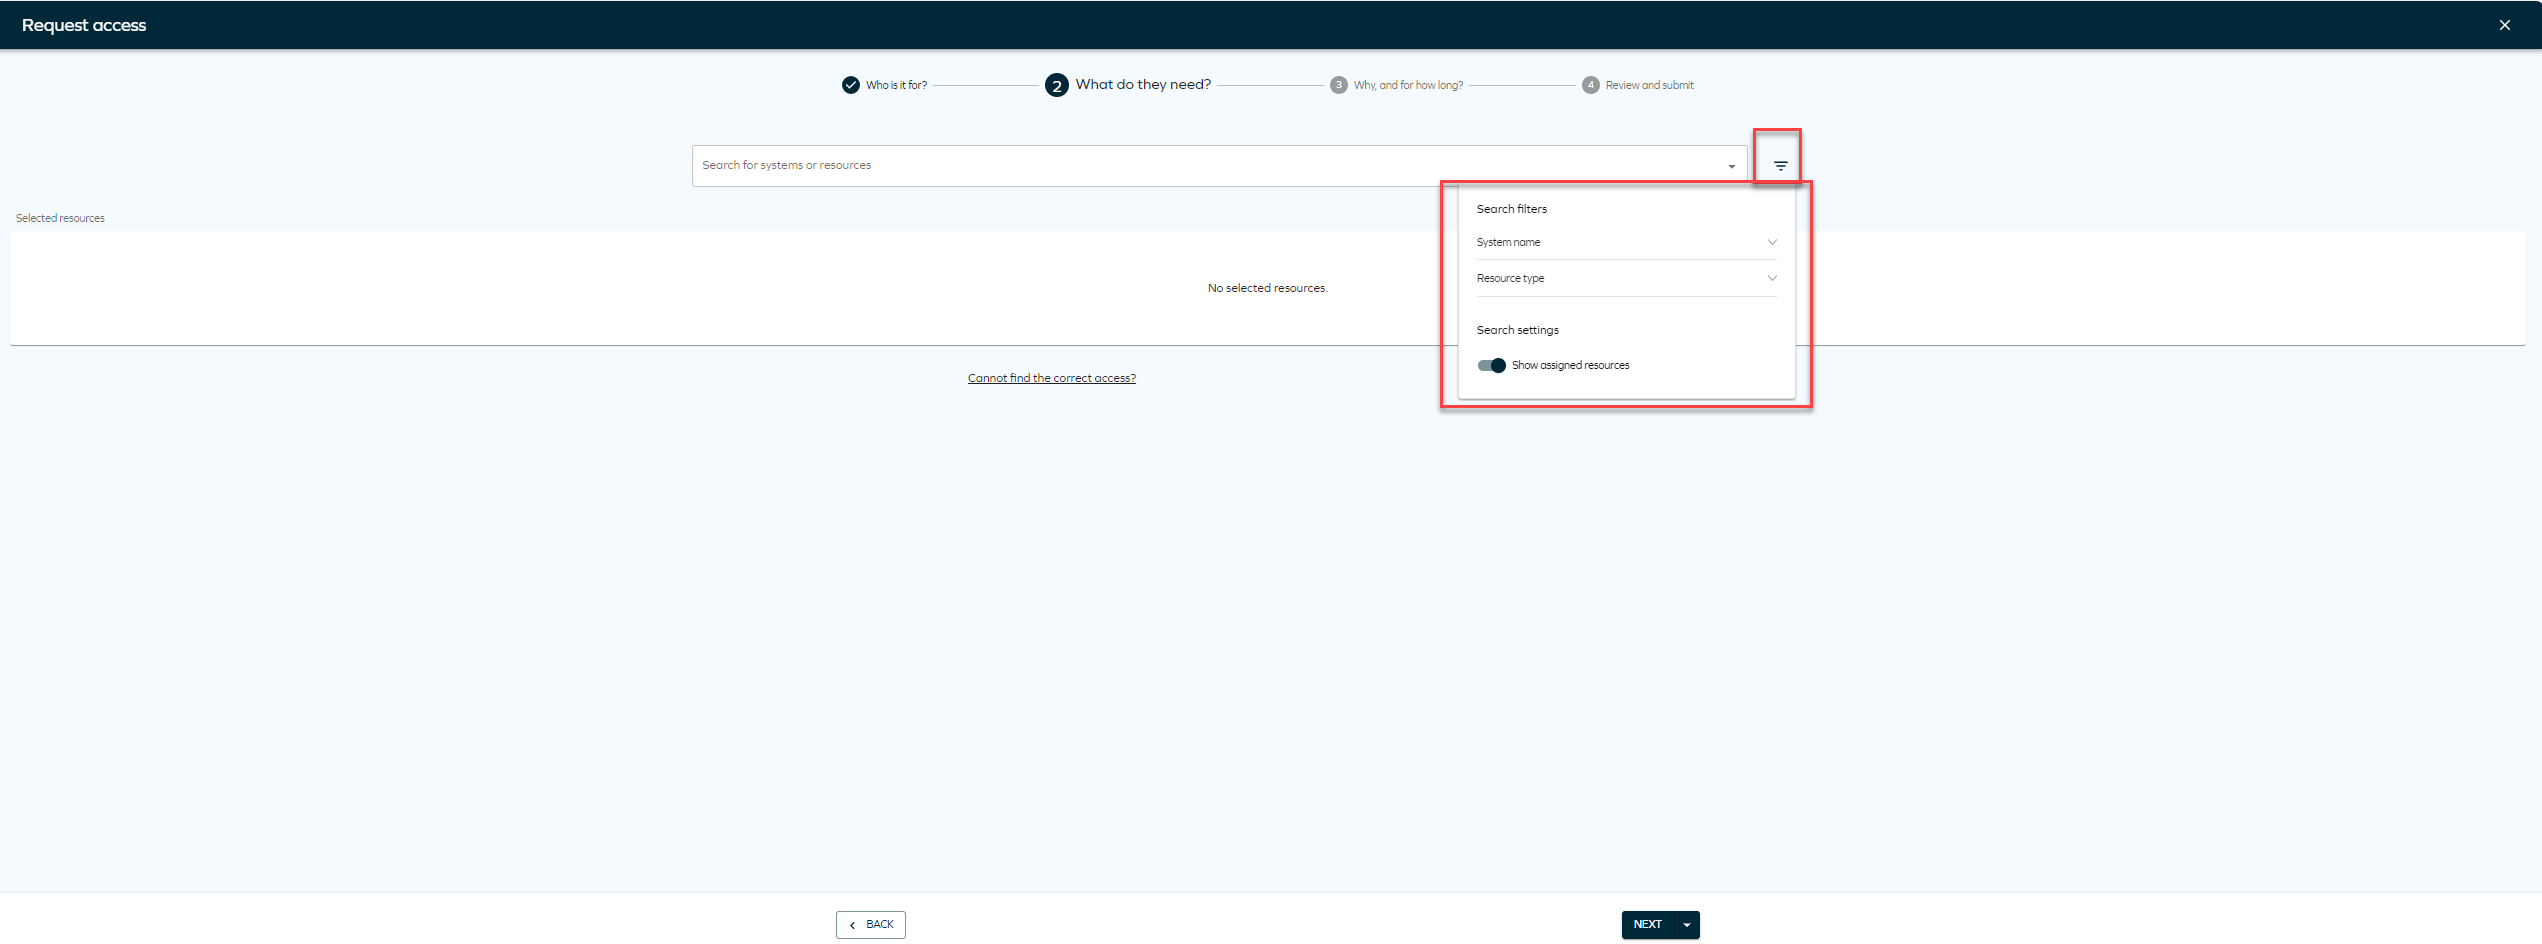
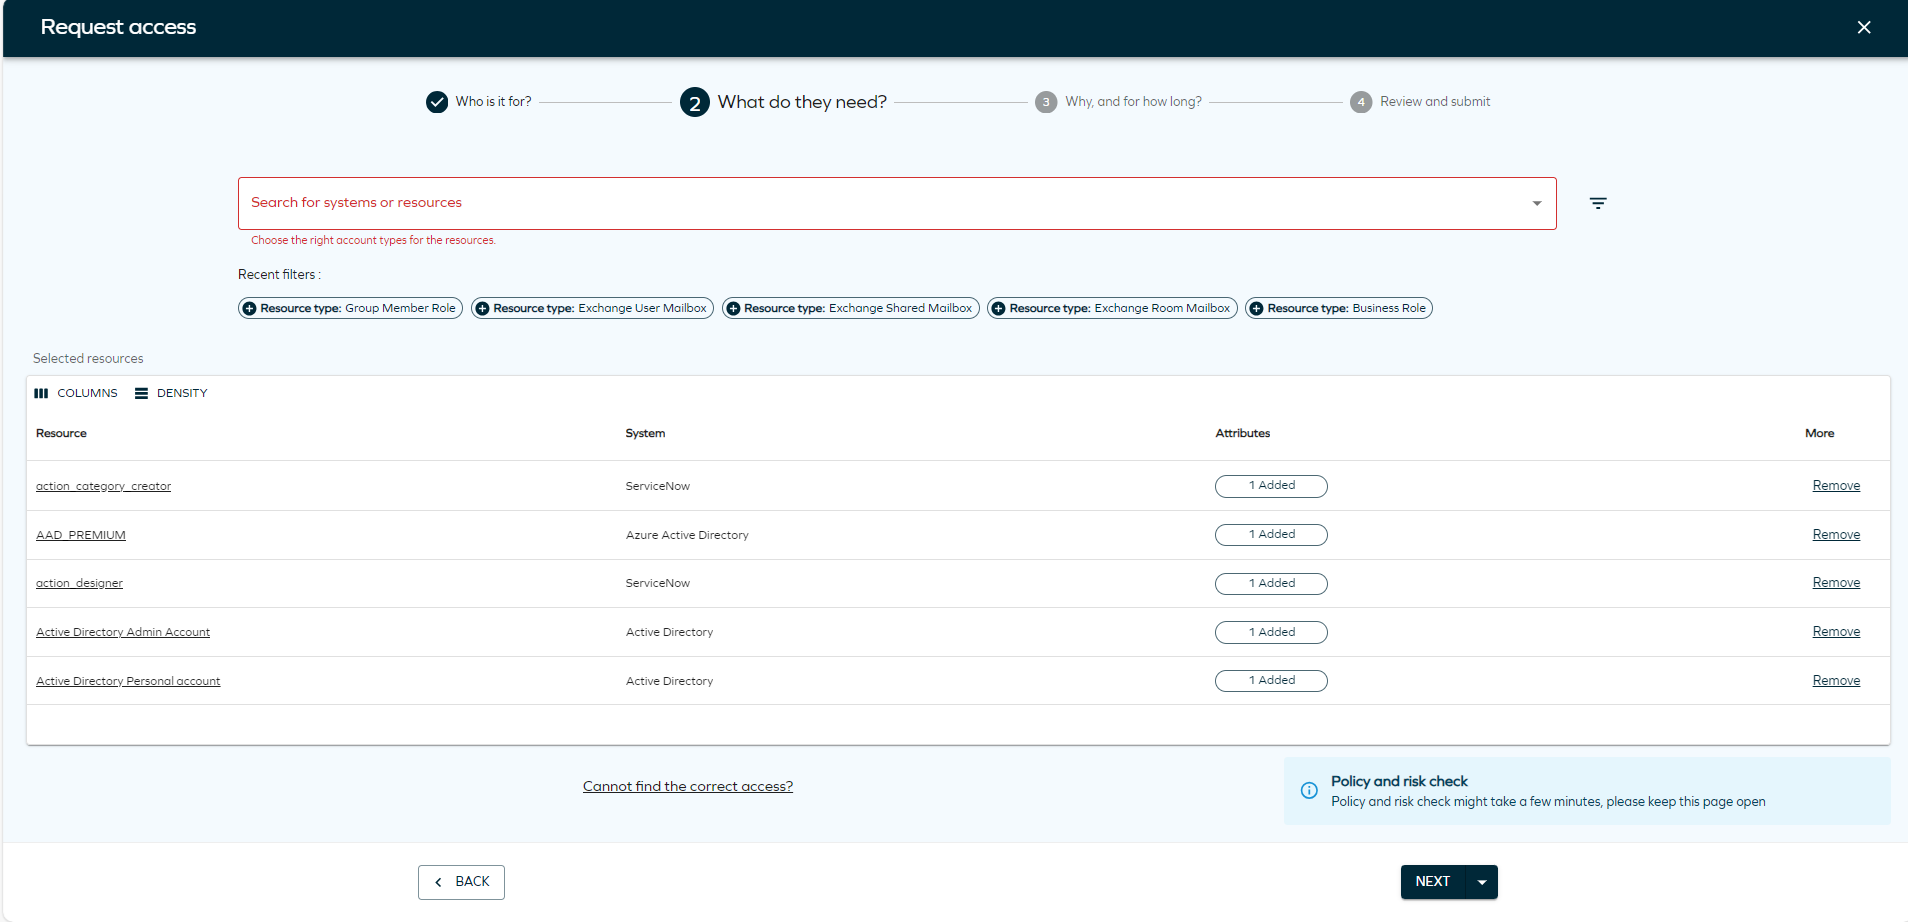
Search for the systems or resources to which you want to provide access. Click Add to include as many resources or systems as you want. You can also select Show assigned resources to display resources assigned to that identity, if applicable. To do that, you need to click the filter icon and select the toggle
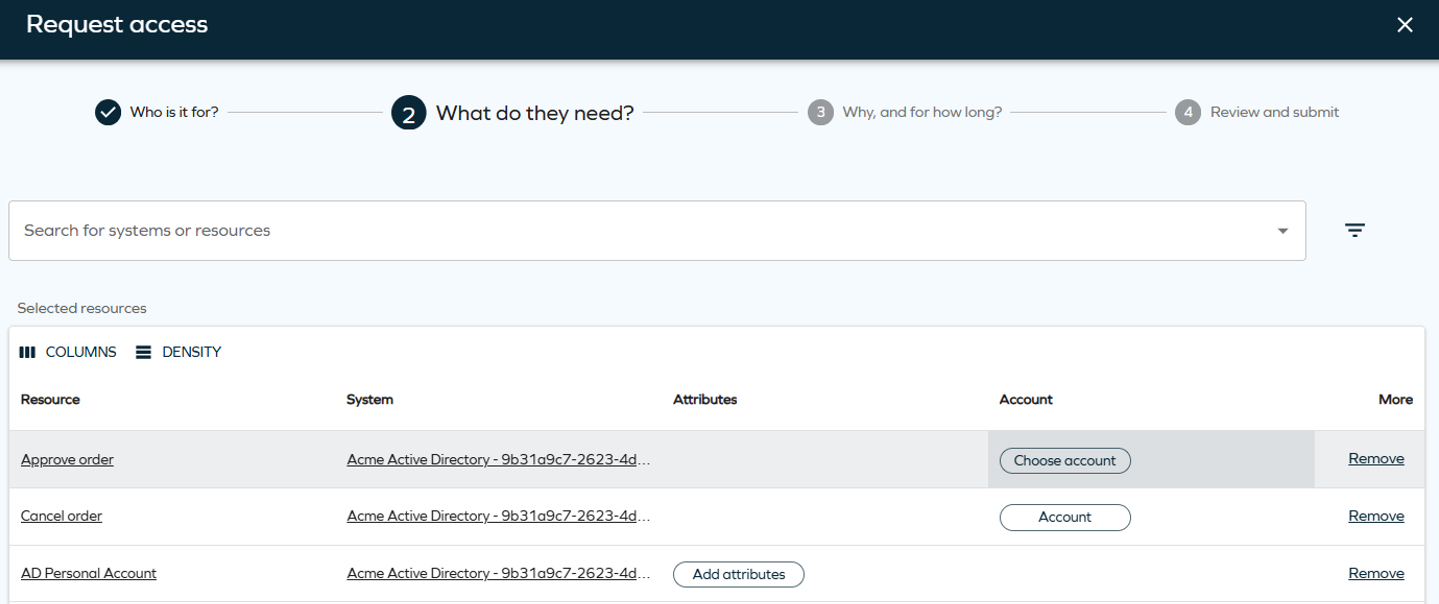
noteThere are separate columns for Attributes and Account, simplifying selection of the account used for the selected resource.
The account chip in the Account column is not visible for account resources. Attributes that are part of the account resource, for example account name, are visible on the attributes chip.In the account panel you can select the account type that a resource beneficiary should have.
Depending on the identity state, the options available in the drop-down list differ. The following scenarios are possible:
Scenario Drop-down list available options Identity does not have an existing account Account types supported by the selected resource. The default selection is based on the customer settings. Identity has an existing account Account type matches one of the existing accounts. If there is a matching account type defined in customer settings, it is prioritized and this account type is selected. Non-human identity Account type is not pre-selected and must always be configured manually. Account auto-creation is disabled and the identity does not have any of the account types supported by the selected resource One of the accounts supported by the selected resource must be requested. For non-human identities, an account must already exist or be requested prior to initiating a non-account resource request. Clicking on the filter icon will allow you to select filter by System name or Resource type. You will also find Recent filters that you have used in the panel.
 tip
tipIf you don't find the resource you are looking for, you can click on Cannot find the correct access? to type the access request manually.
 additional features
-
You can edit the resources and choose the desired account type for each resource.
-
The Access request process will also take into account Auto-account type configuration. A warning will indicate if a resource cannot be added to the request due to a lack of a valid matching account type.
-
You can view the account type for each beneficiary.
-
You can assign the appropriate account type if a beneficiary matches the resource account type.
-
Multibeneficiary account type assignments are also supported.
-
You can use filters to make resource search easier:
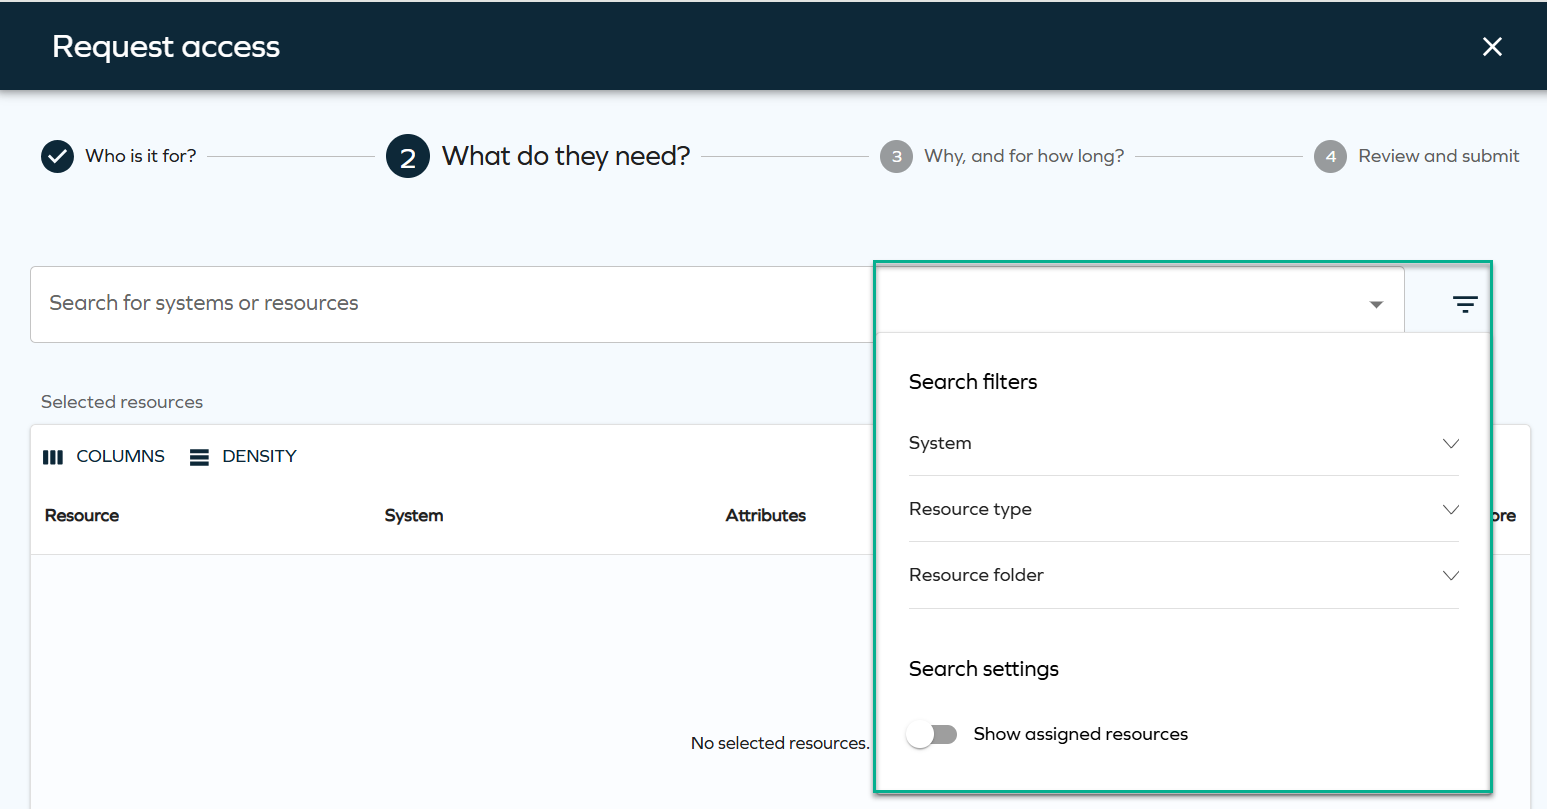
Filters can be configured through the
AccessRequestResourcesPropertyFilterscustomer setting and are displayed during the resource selection step. The behavior of these filters is consistent with how filters have worked previously. For more technical details, look up this setting in Customer settings.
-
-
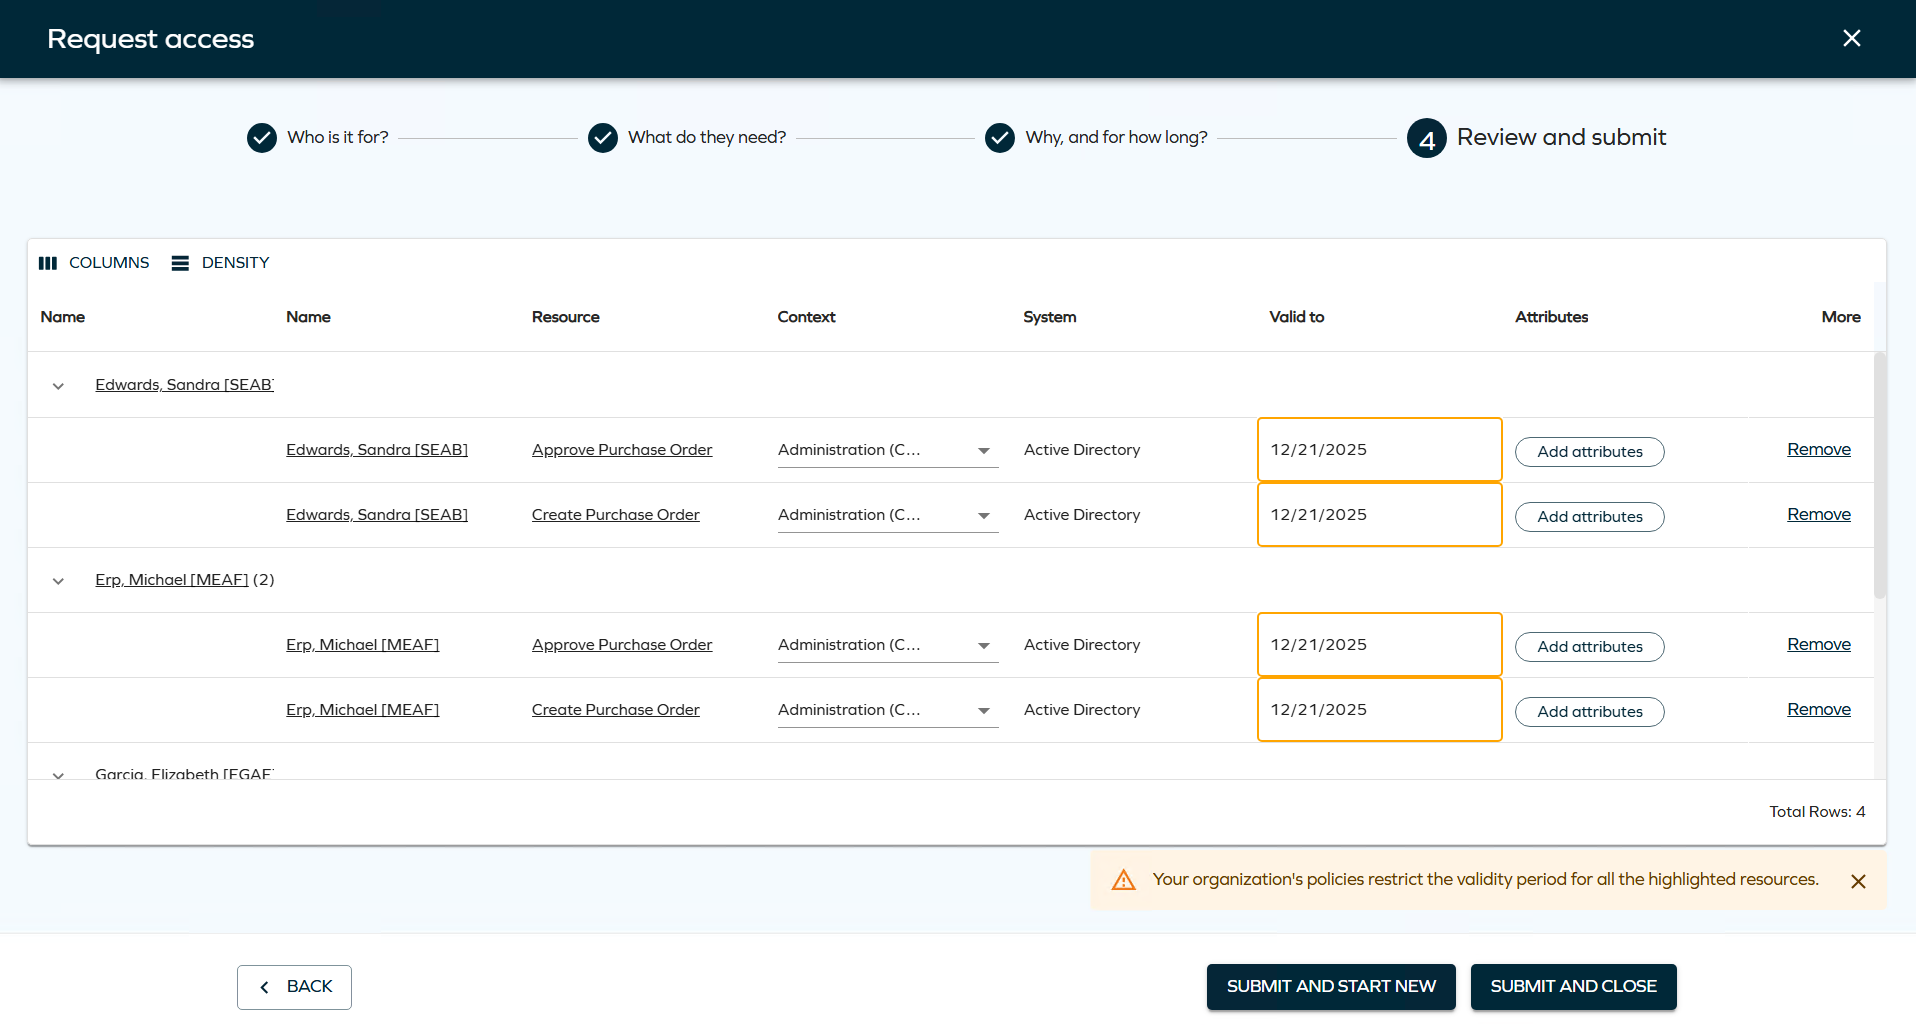
Select the Valid from and Valid to date.
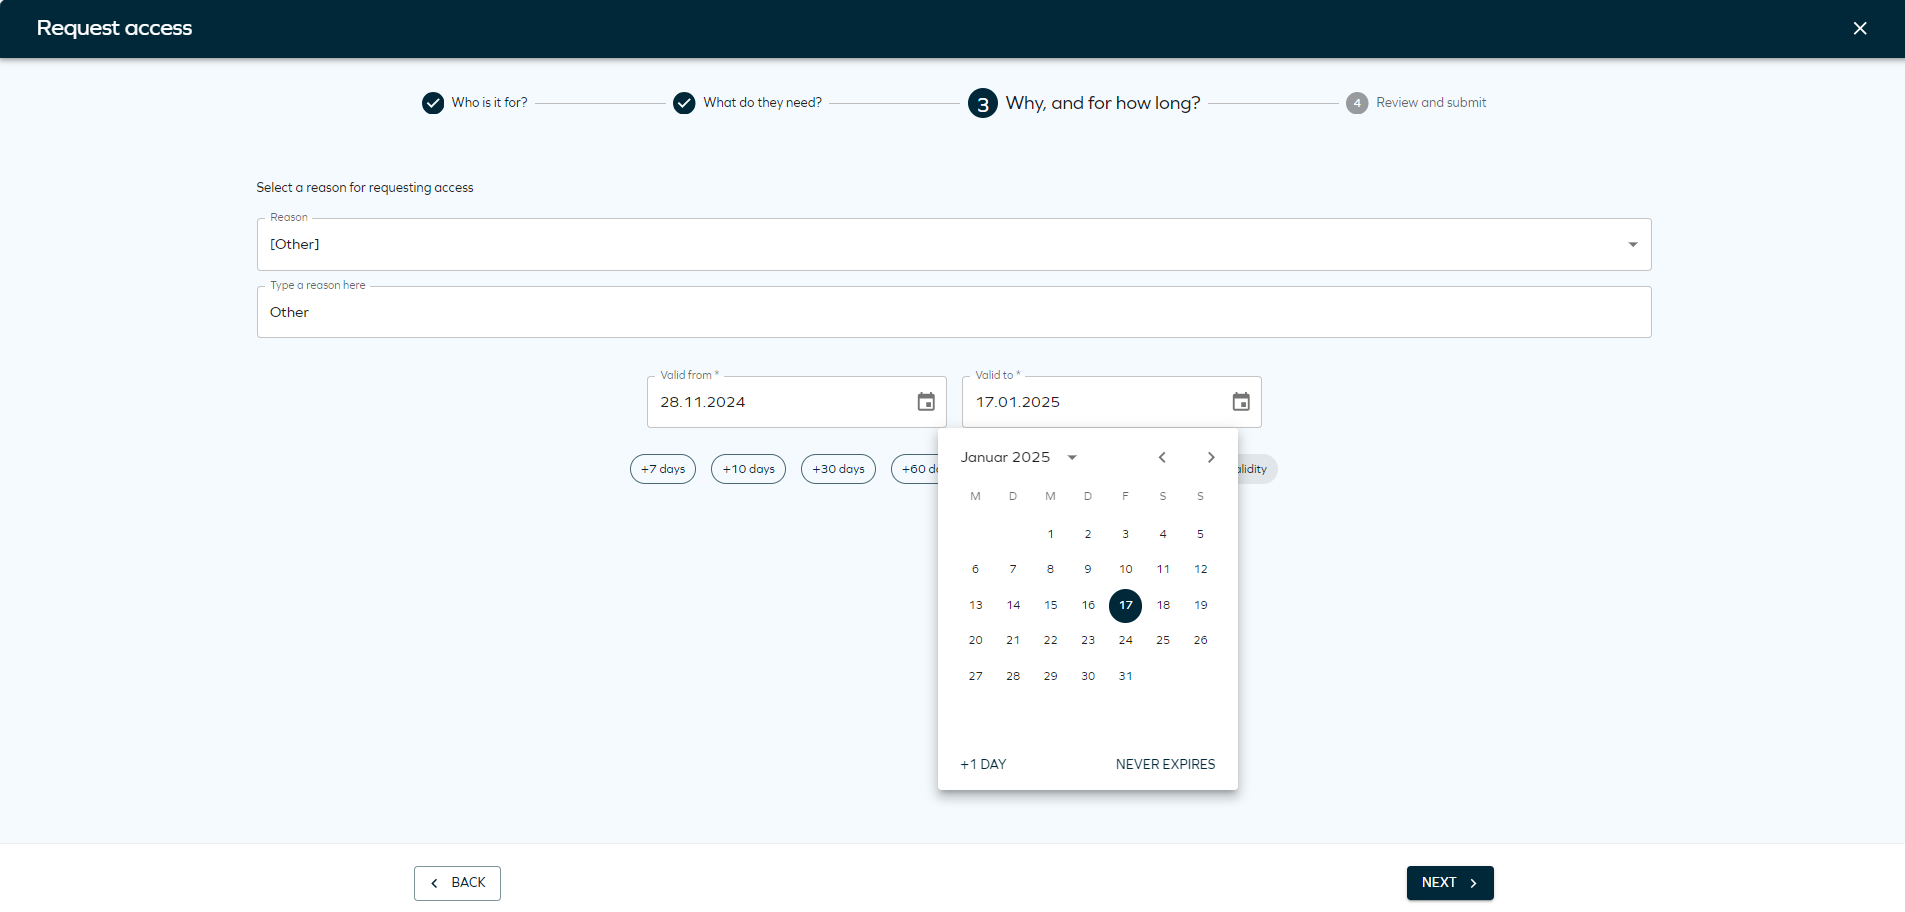 Maximum validity period
The Valid from and Valid to date are determined by a configurable Maximum validity period property, ensuring that access is granted only for the necessary duration.
This property can be configured for resources, resource folders, and systems. When defined with a value greater than zero, it limits the duration of resource assignments during Access Request, Approval, and Extend Access flows. The system automatically shortens the requested validity period if it exceeds the configured maximum, using the most specific value available (Resource > Resource Folder > System).
In the new UI, affected validity fields are visually highlighted, and users are shown a warning of a potential restriction if there are any resources or assignments in the basket for which a maximum validity period restriction applies.
-
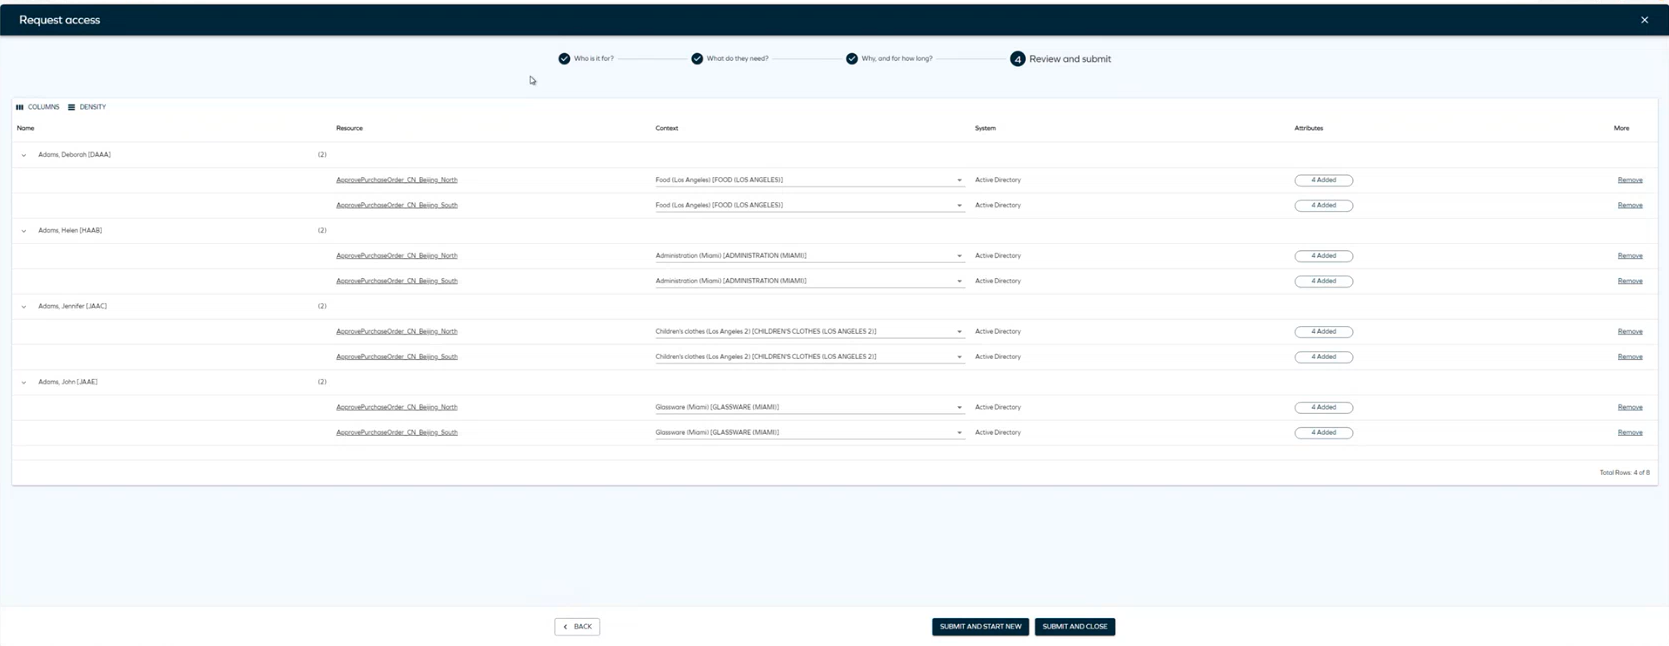
As the final step, review and edit identities and resources. In this step, you can review the access request and use the Remove button to remove an identity and add it again immediately. Click Next to complete the access request.
To view your active access requests or cancel a request, navigate to the Access tab in the navigation pane. For more details, see Access.

-
Identities can only be assigned a resource if both the identity and the resource share matching account types or if the account is being requested in the same request.
-
Access can be requested for multiple identities only if they share the same business context.
Creating an access request with preselected identities or resources
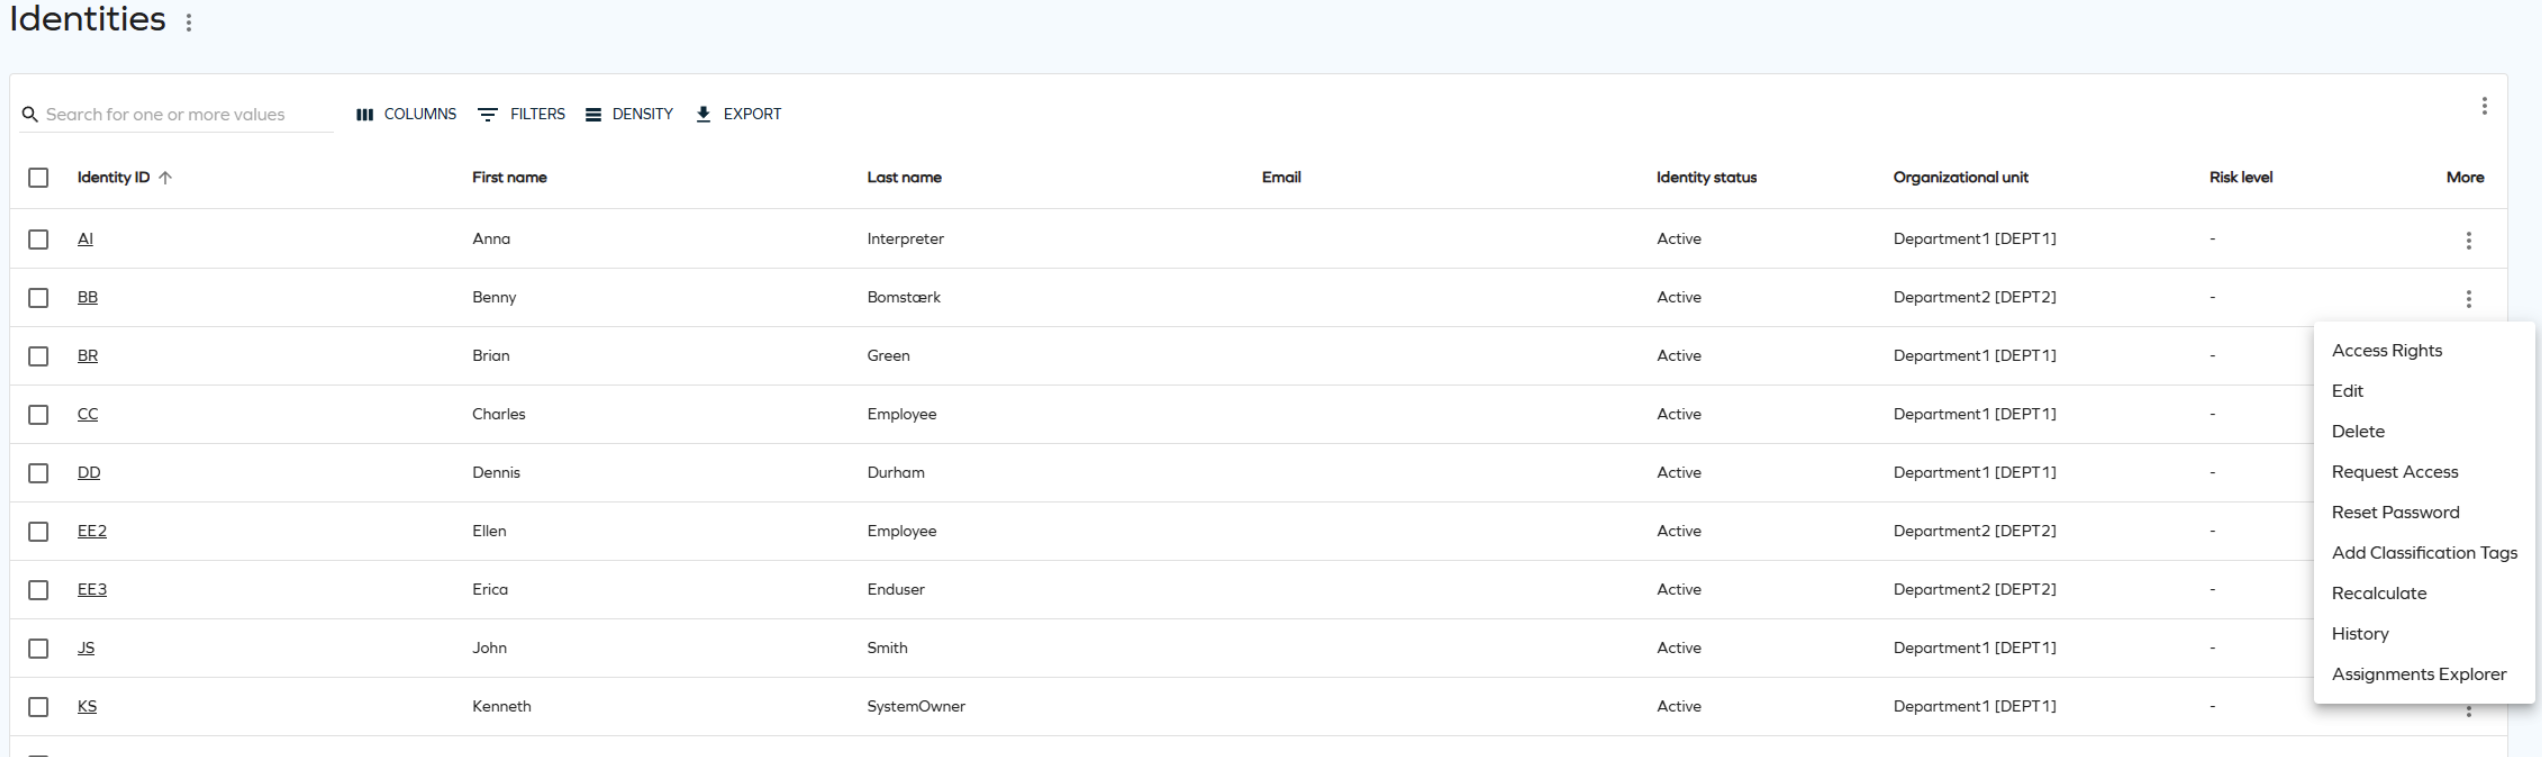
In the Identities view, you can select one or more identities and open an access request directly from this view. Select the identities from the list, click the ellipsis (three dots), and then select Request access.
Using deep links to create an access request with preselected identities/resources
In the step 2 of the access request process you can use the Get request link drop-down menu to reuse the access request setup – that is, copy the current request with identities or resources (the resources buttons are active if you have at least one resource selected):

Clicking the button opens a side panel with a deep link:
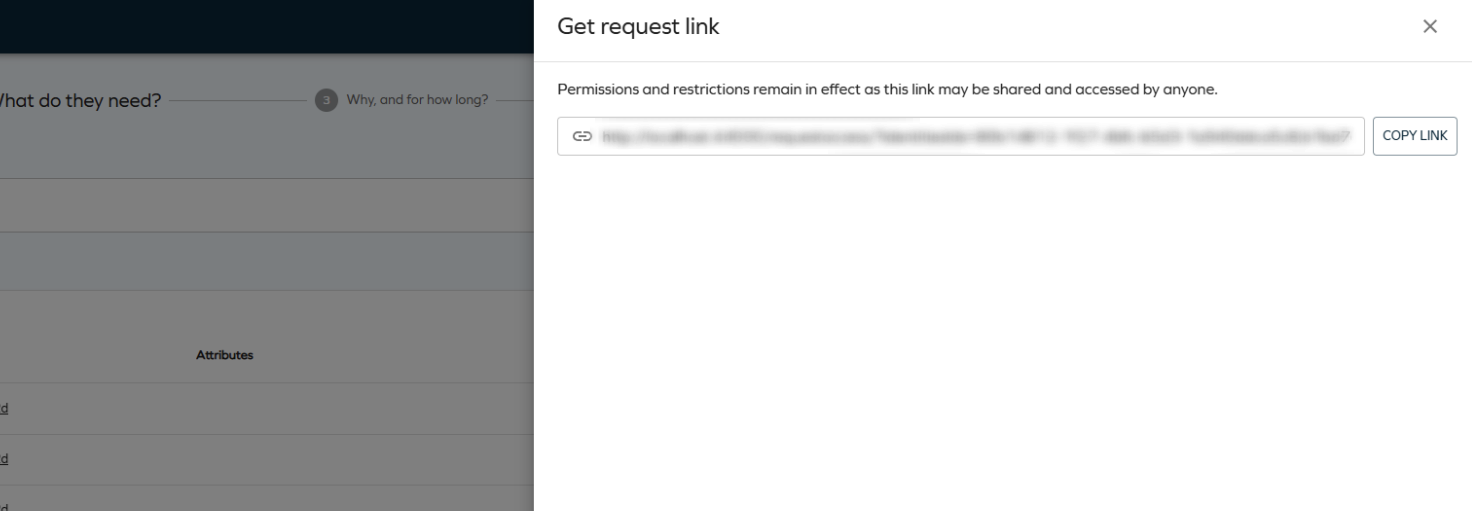
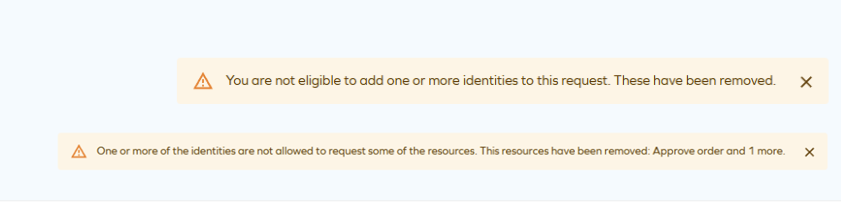
Deep links let you start the access request process with preselected identities and resources. They respect the security principles and the eligibility filter - if you cannot request for any of the selected identities (or cannot request for one of the prefilled resources), they are automatically removed and the user is notified:
Select resources
Assigned resources toggle
On the Access request page, you will find a setting menu to help you filter by System name and Resource type. To sort resources by popularity, you need to enable context on the Access request form, and make sure the customer setting Access request popularity enabled is set to True. You can access the settings menu by clicking the icon next to the Resources dropdown.
Add attributes
When you request access for a resource that requires attributes, a chip is displayed in the Attributes column. Click on Add attributes to assign the necessary attributes to the resource.

Search filtering
You can use the Enable Search Filtering that lets you choose how you want to view your list of resources in the Resource step when requesting access.
Eligibility Filtering added to search query
The Graph API has a new search filtering functionality for Access Request. This change introduces context-based visibility rules for resources, allowing you to pre-filter the resources that can be displayed in Access Request to resources that match the context of the selected identities.
- A resource tagged with Context B and Context C will be visible in search results only if selected beneficiaries are assigned to one or both of these contexts.
- If a beneficiary is added without Context B or context C, the resource will be excluded from the search results.
- Resources without any defined context will always appear in search results, ensuring comprehensive accessibility.
- A warning dialog will appear if you navigate back to step one after selecting resources and attempt to add a new identity. The warning dialog will inform you that the selected resources will be cleared if you proceed.
To access this feature, ensure that the Enable resource eligibility filtering customer setting is enabled. To do that, go to Set up > Administration > More > Customer settings. Look for the customer setting Enable resource eligibility filtering and set it to TRUE.

Approval process launched by timer service
With the LaunchApprovalProcessWithTimerService customer setting, the approval process can be launched by the timer service rather than through the Access request process.
The approval process can have four different statuses. Each status is a value of the Approval process launch status property:
- No approval required
- Approval process launch pending
- Approval process launched
- Approval process launch failed
The statuses depend on the stage of the launch:
-
Access request creation: When you create an access request, the status is set to Approval process launch pending.
infoThe timer service attempts to launch the approval process up to three times.
-
Failure handling:
- If the approval process fails to launch after, the status is set to Approval process launch failed.
- Details of the failure will be stored in the new Log property of the access request data object type.
- An event definition named Approval process launch failure is added. This event definition is configured to send two emails:
- To the requester, notifying them that the launch failed.
- To the Operations Administrators user group. This email contains a link to the failing access request data object and the error log, which will also be stored in the Log property of the access request.
note
The email templates and the event definition can be customized.
-
Retry mechanism:
- Members of the Operations Administrators or Service Desk Agents can reset the status to Approval process launch pending to allow the timer service to retry the launch if the issue causing the failure has been resolved.
- The Access Requests view includes the value of the Approval process launch status property. If you want to change the value:
- Select one or more access requests with a failed state, and click on the context menu in the toolbar to select Mass update.
- In the mass update dialog, select to update the Approval process launch status property and change the value to Approval process launch pending. This enables the timer service to try to launch the process again.
Policy and Risk
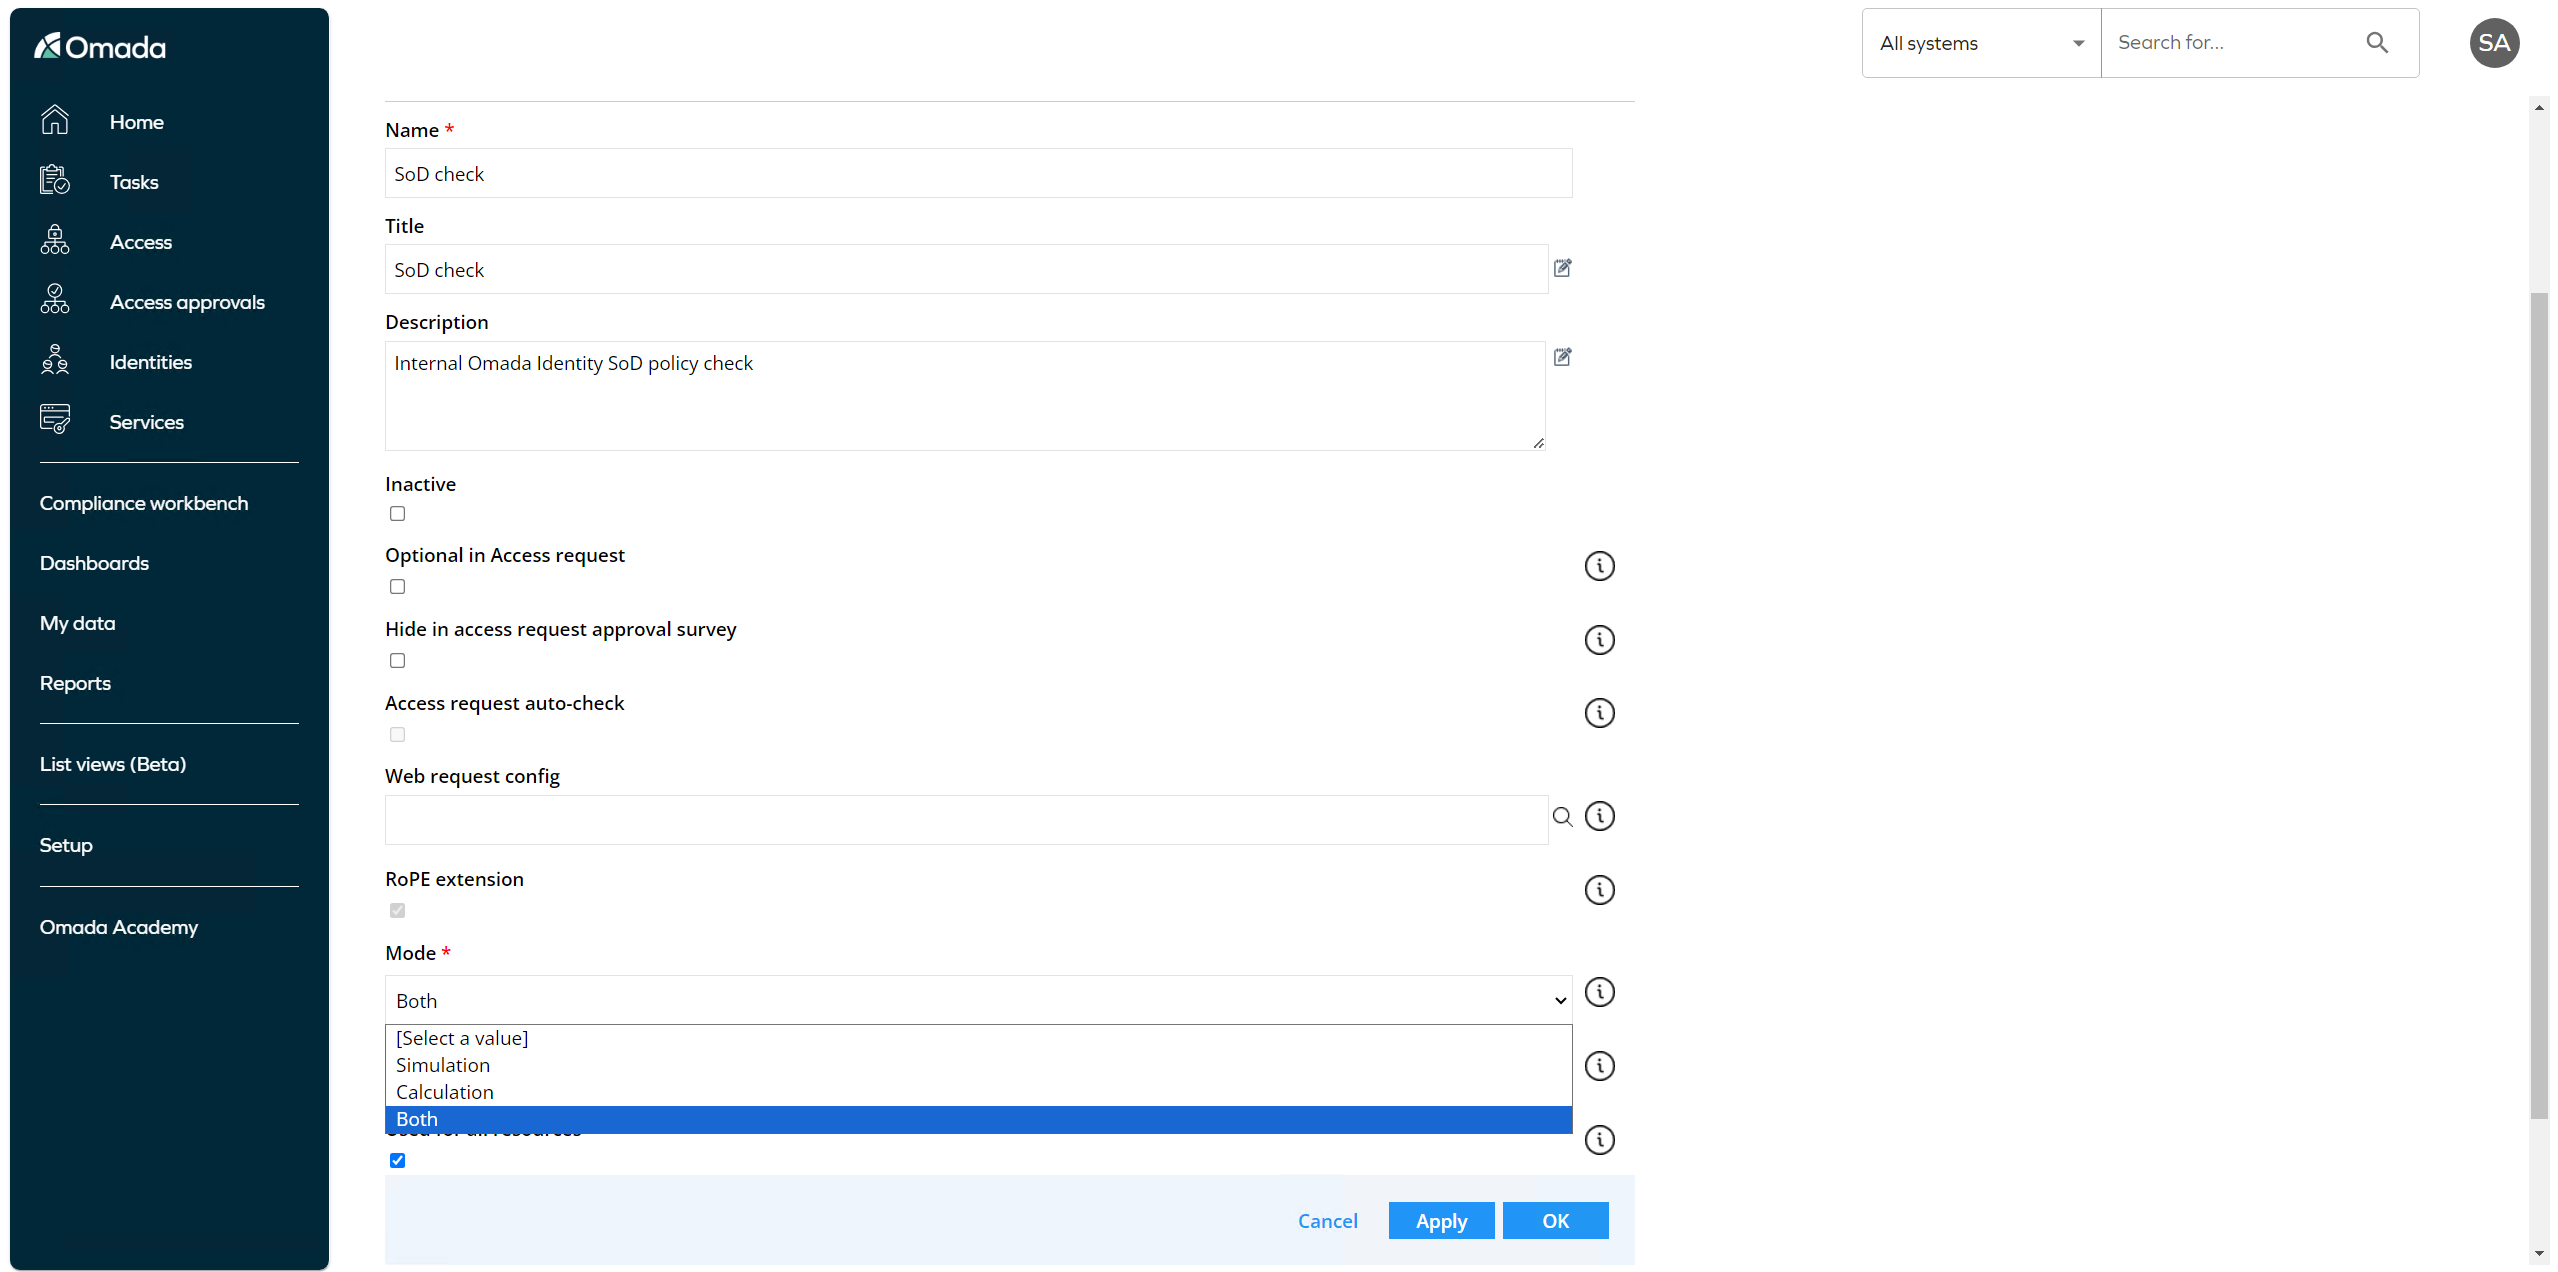
To enable Policy and Risk checks in Access request, go to Setup in the left side menu and look for Policy and Risk checks. To enable the Policy and Risk checks, make sure that:
- The Inactive field is unchecked.
- The policy check is set by default. If you want to make it optional, make sure you select Optional in Access Request field.
- The Mode field is set to Simulation or Both.
With the Policy and Risk checks configured, they will automatically run when clicking the Next button on step 2 in the Access request flow:
If the Policy and Risk check has been configured as Optional in Access Request, then when clicking on the arrow in the Next button, you can manually trigger the Policy and Risk check.

Policy and Risk check panels
The Policy and Risk check panels are displayed in step 4, but they can be performed in step 2 as well. The Peer Access Analysis and SoD/GRC are treated as two different columns in step 4, each opening a panel that shows the results of the relevant check. See below for the relevant details of the panels:
-
Each check (Peer Access Analysis, SoD, and GRC) can be enabled separately and can also be set to Optional/Mandatory.
-
If one or more enabled checks are set to Mandatory, then the checks will run in the background when you click Next in step 2. The results are shown in step 4.
-
If you make any changes to the context or remove/re-add any resource assignments in step 4, the Submit button is disabled until you choose to run the checks again by clicking the Run Risk Check button.
-
If every enabled check is set to Optional, the checks won’t run automatically in step 2, but you can choose to run them using the dropdown arrow next to the Next button in step 2.
-
Any changes made in step 4 don’t prevent you from submitting, but if you make a change, you can choose to re-run the checks using the Run Risk Check button.