Configure Microsoft Entra ID with Open ID Connect
This page contains third-party references. We strive for our content to always be up-to-date, however, the content referring to external vendors may change independently of Omada. If you spot any inconsistency, please report it to our Helpdesk.
To configure Microsoft Entra ID with Open ID Connect:
-
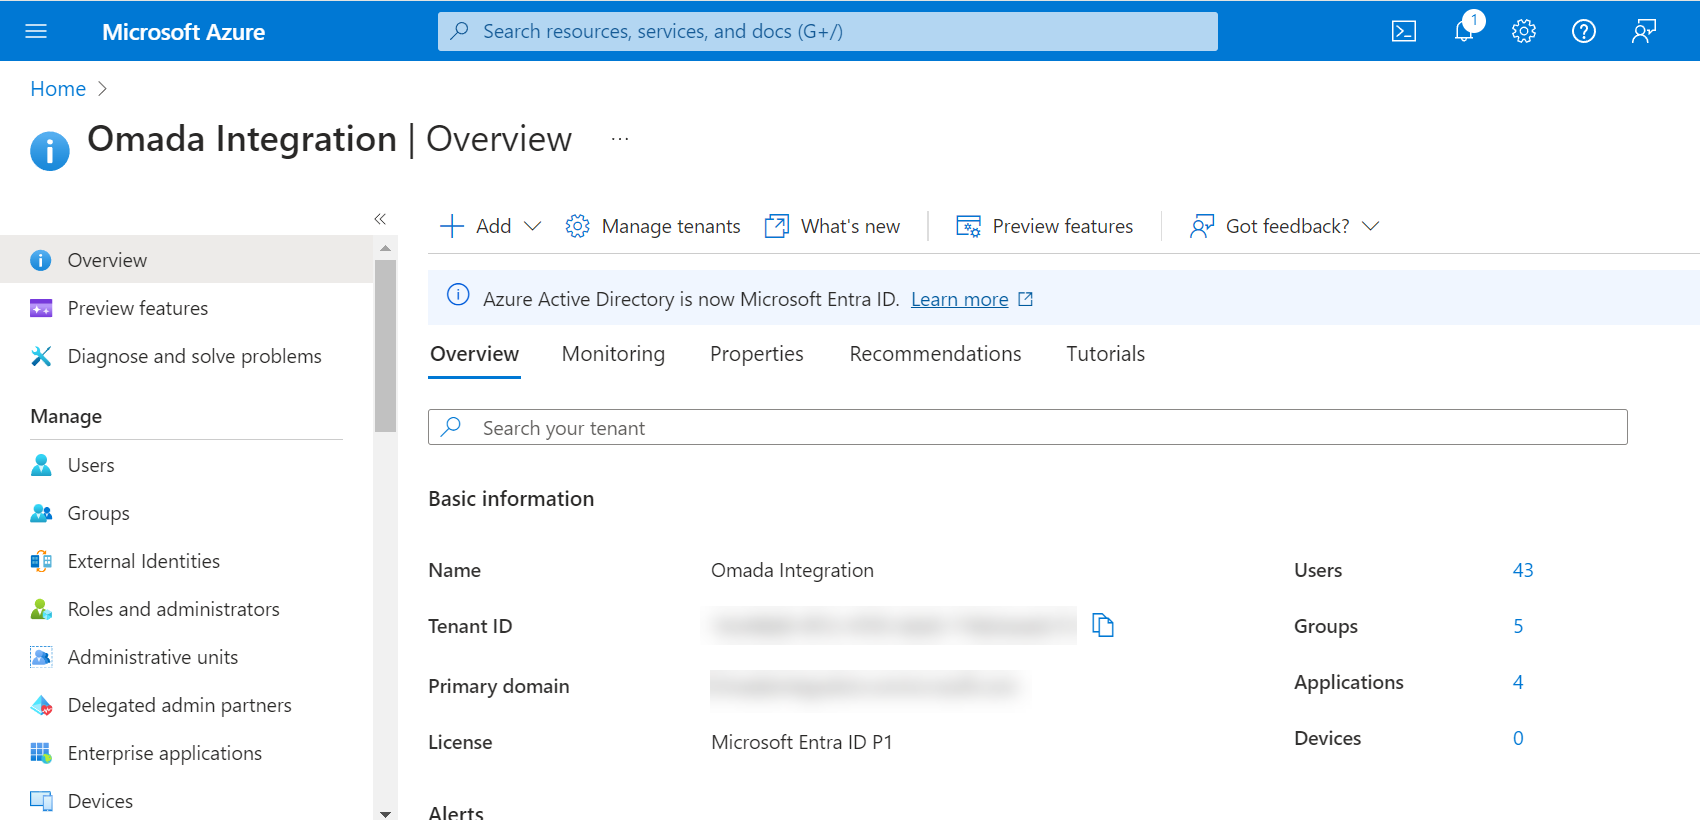
Open the Azure Portal and select Microsoft Entra ID.
-
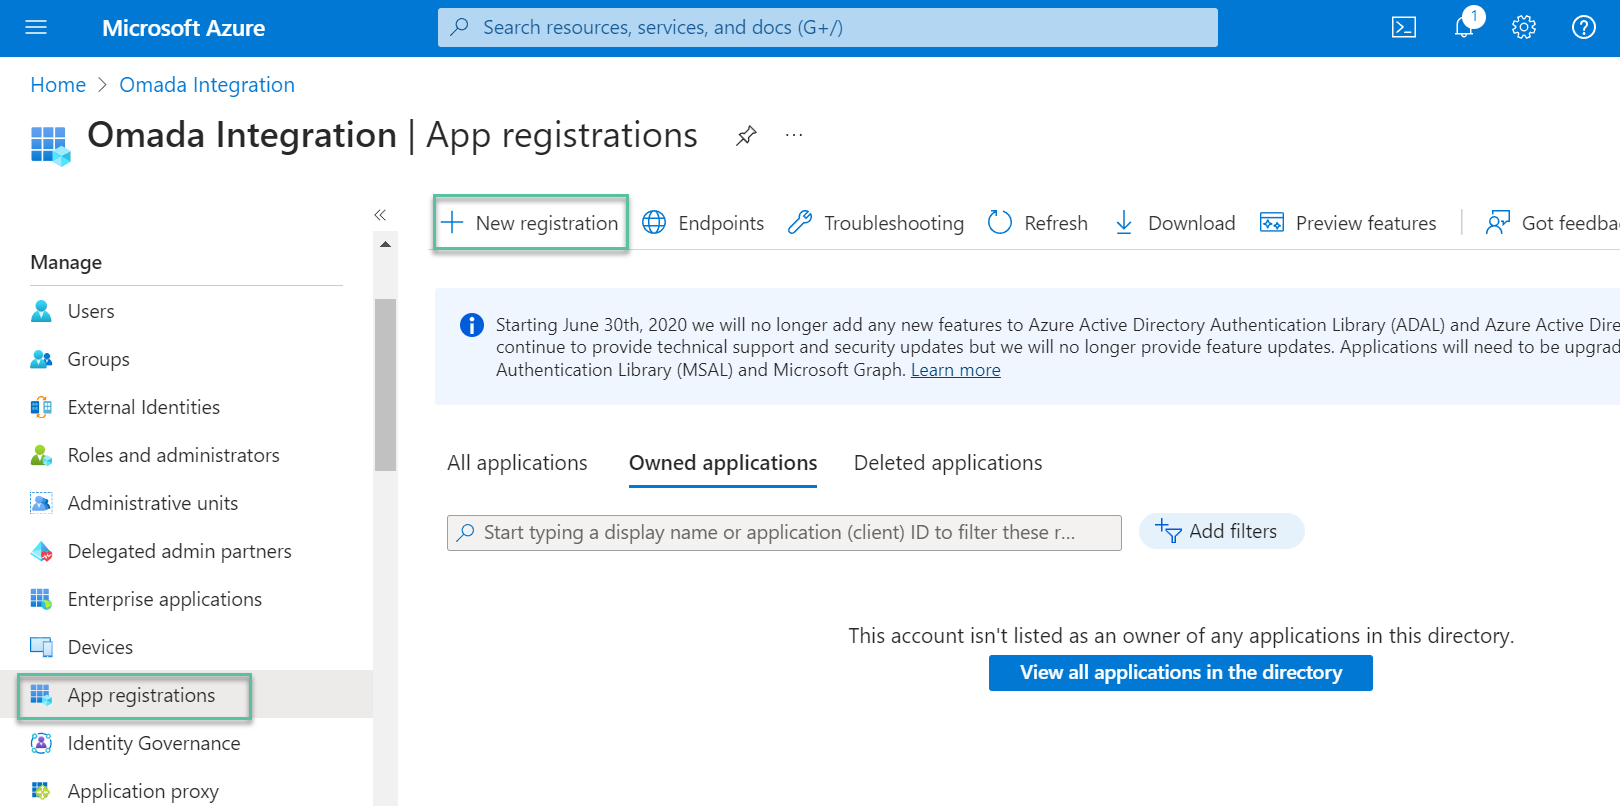
Select App registrations, then click + New registration.
-
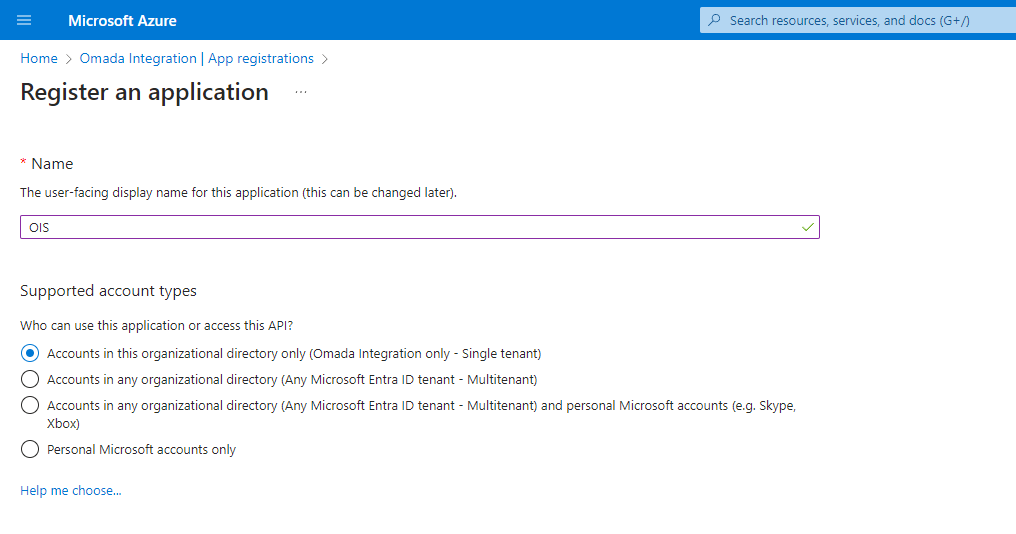
To register the application:
-
Type a name for the Omada Identity website.
-
Select Accounts in the organizational directory only in the Supported account types field.
-
Click Register.
-
-
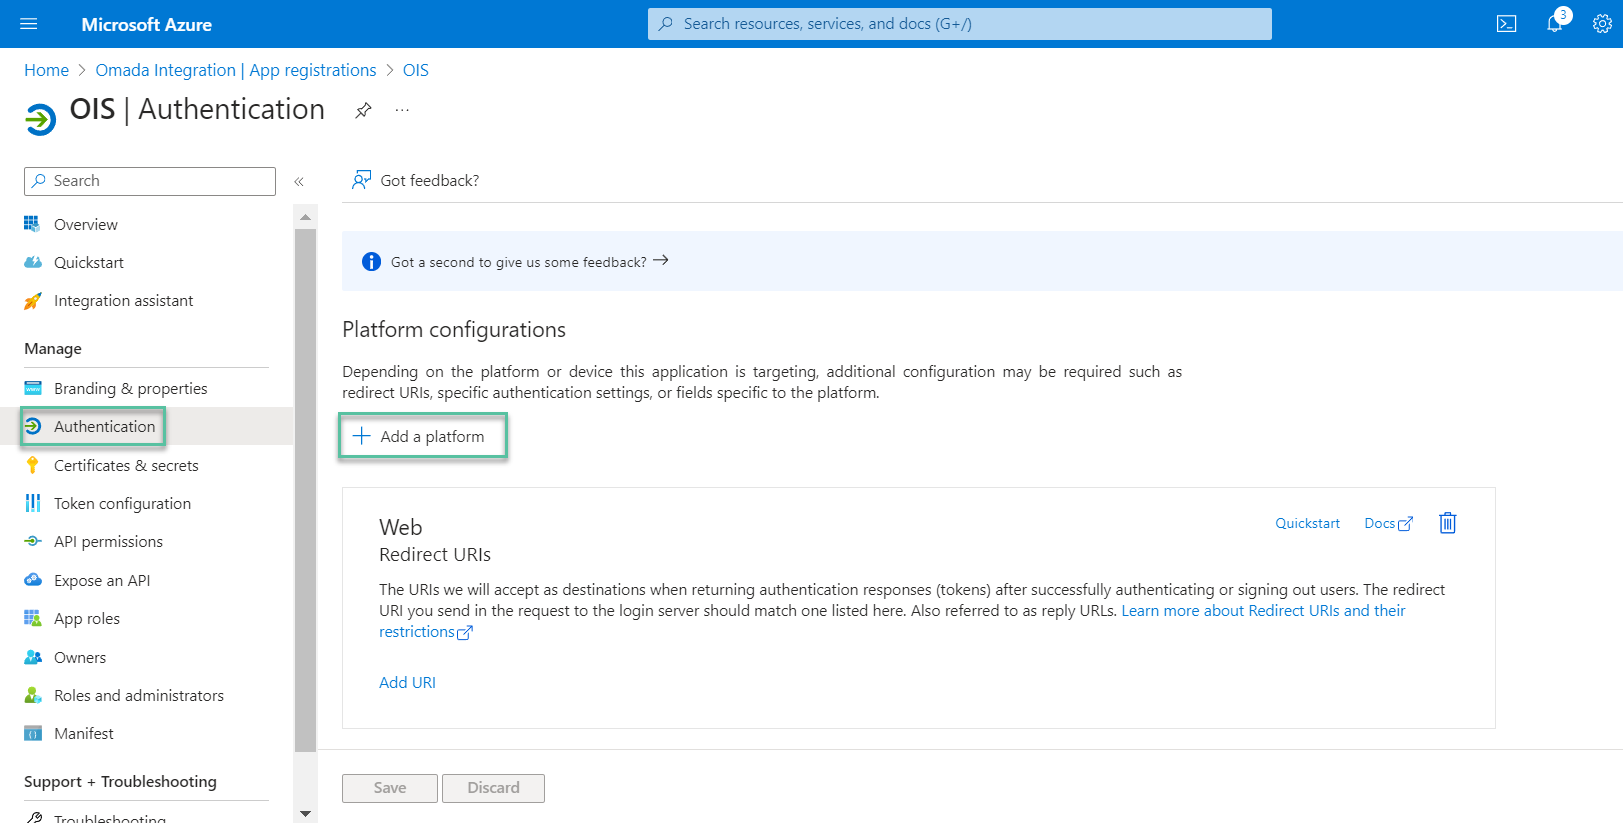
In the App's registration Authentication management, click the Add a Platform button.
-
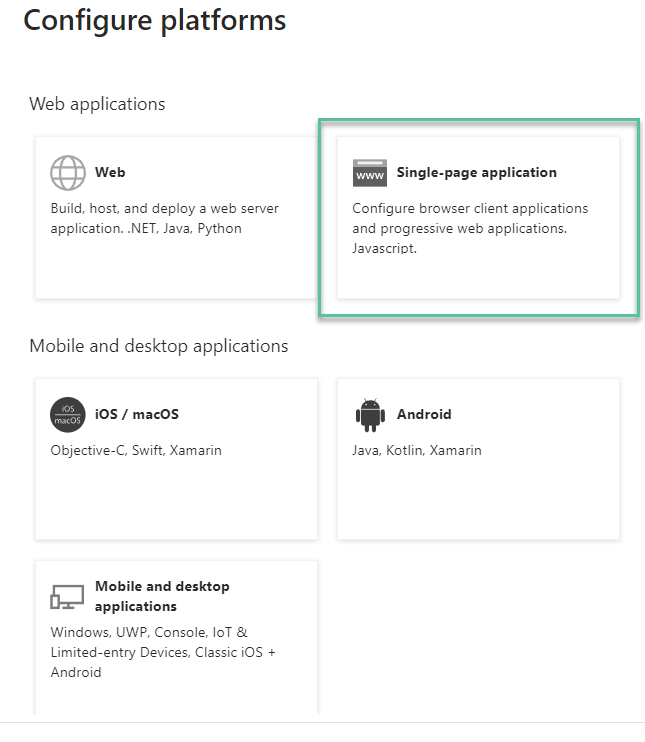
In the Configure platforms window, select Single-Page Application.
-
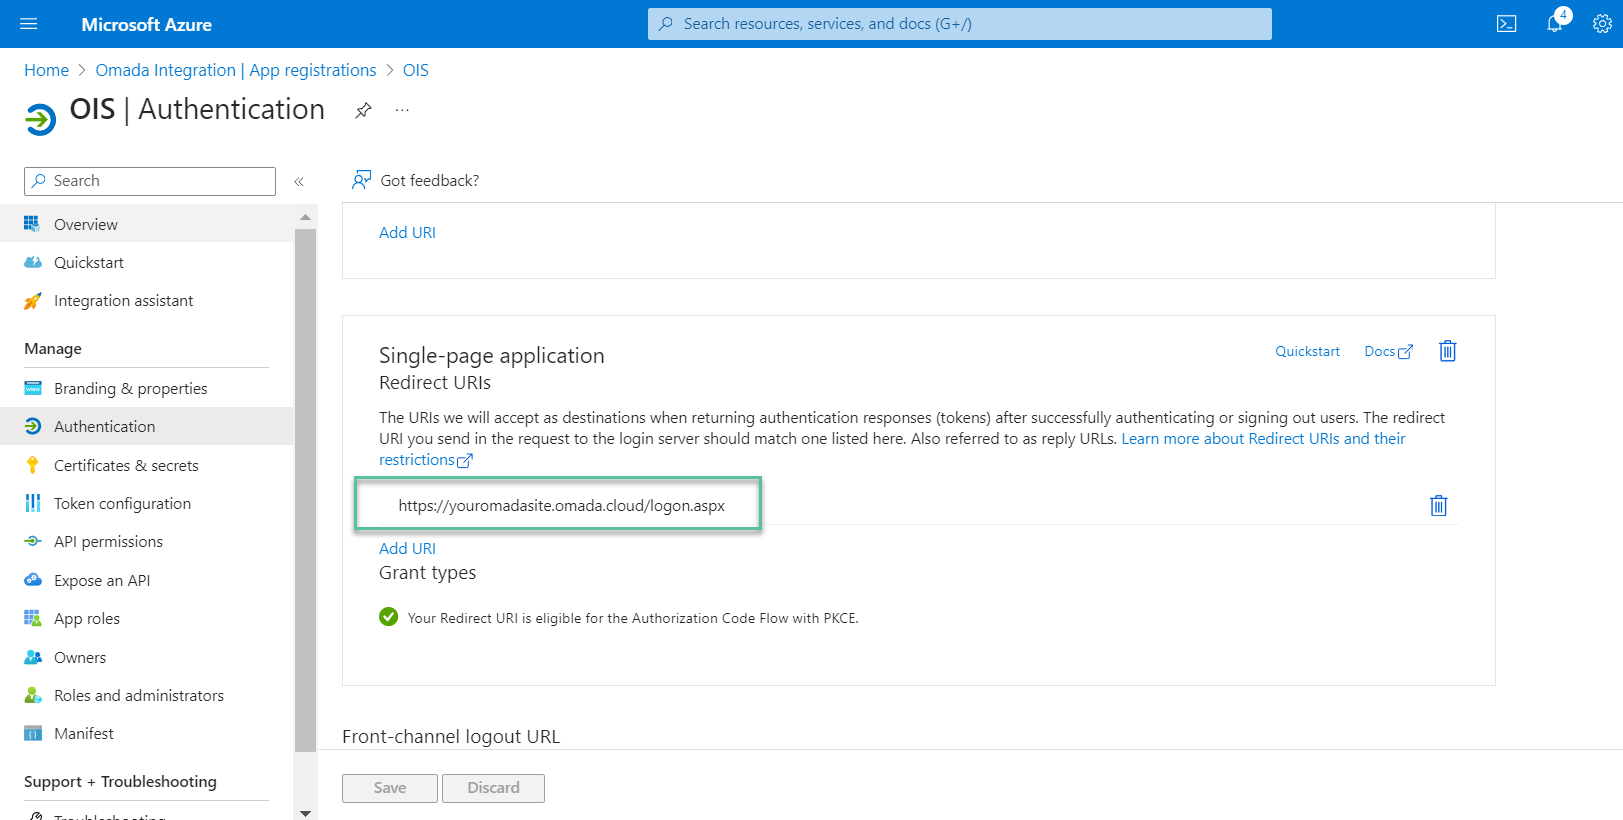
In the Redirect URI field, specify the URL to the logon.aspx page in the Omada Identity Portal, for example,
https://youromadasite.omada.cloud/logon.aspx. Click Configure.
-
The URI is listed in the Platform Configurations. The specified Redirect URI is eligible for the Authorization Code Flow with PKCE. For more information, refer to the OpenID documentation.
-
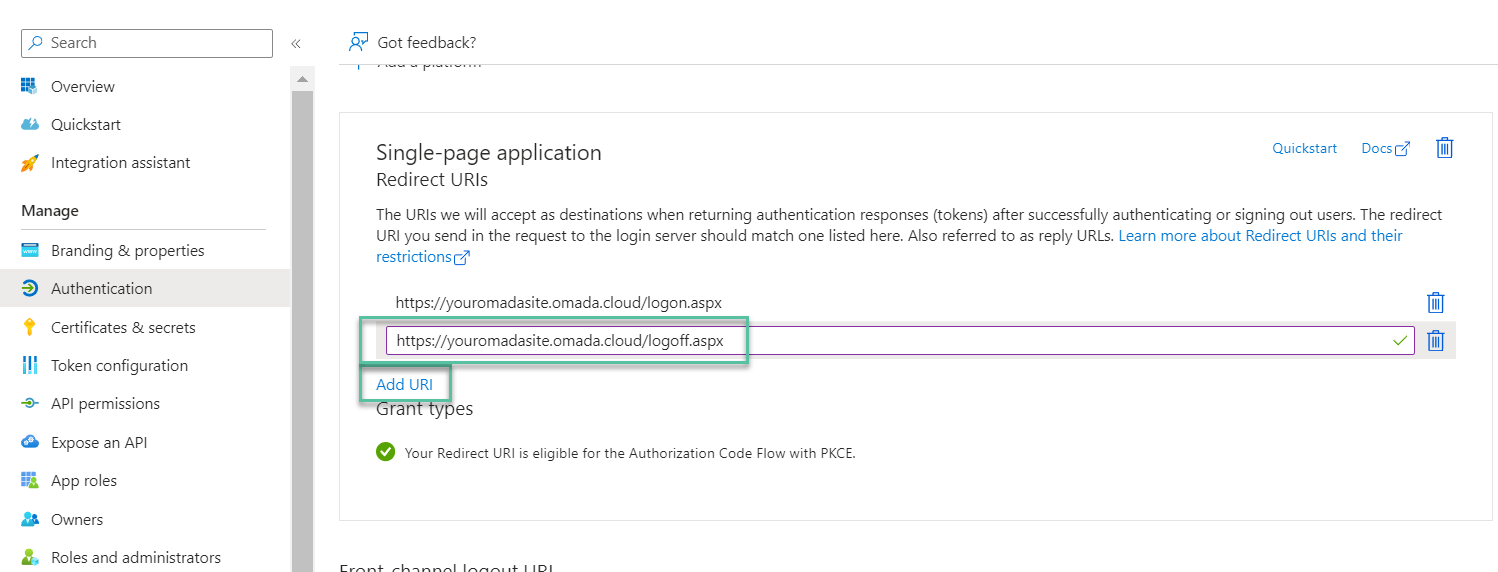
To redirect the users who log out to the correct logoff page, add also the URL to the logoff page. Click the Add URI button to add the URL and set the customer setting OpenIDLogoutRedirect to True.
 info
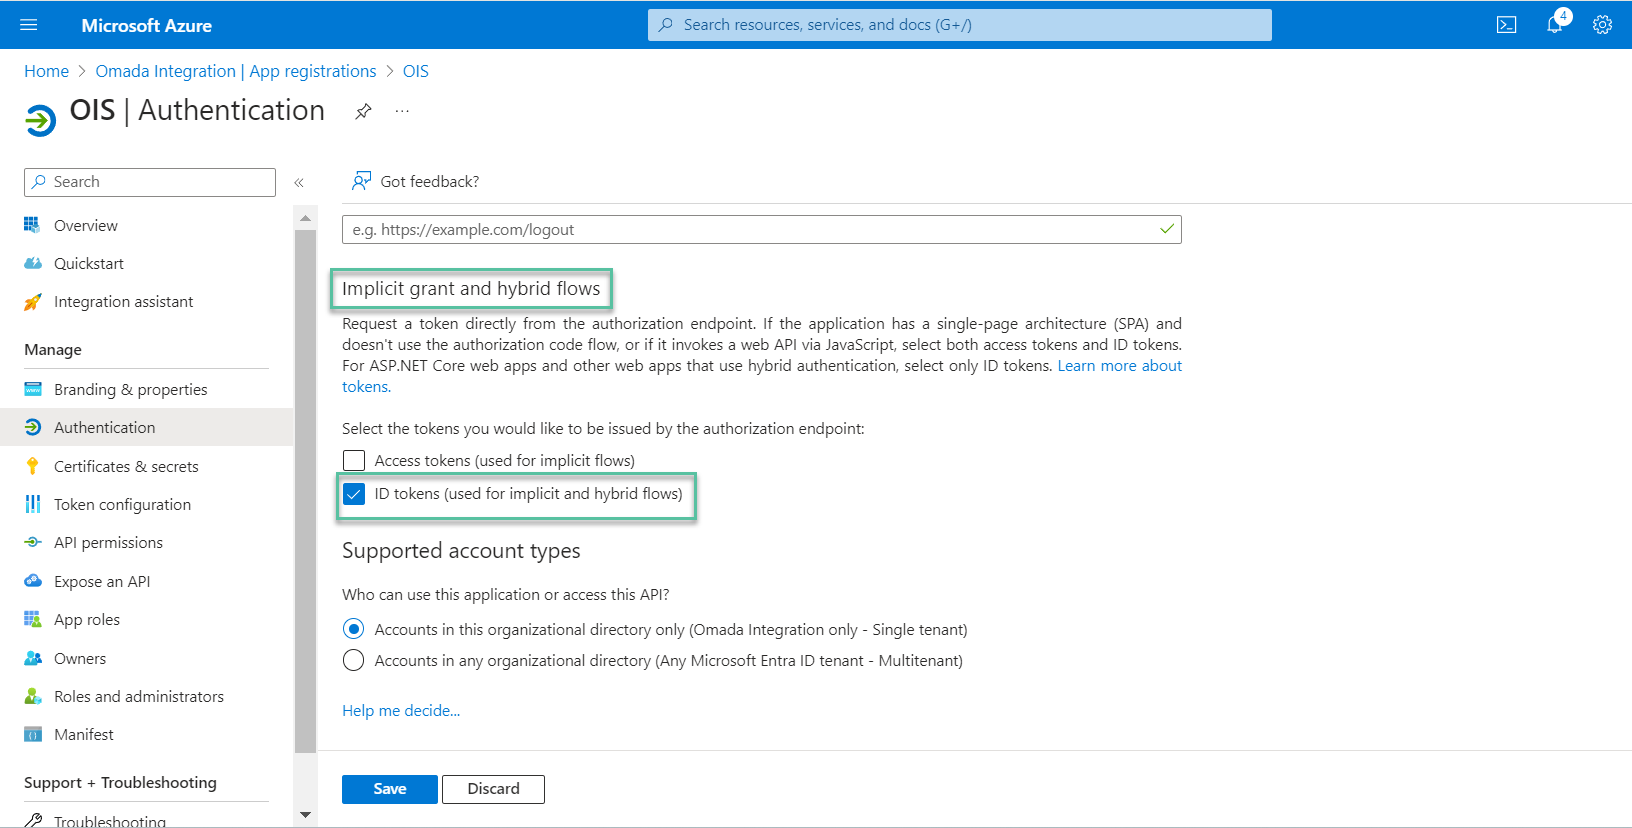
infoOmada recommends using the Authorization Code Flow for obtaining authorized access.
However, if you prefer to employ the Implicit Flow, in the Implicit grant and hybrid flows section, select the ID tokens option.
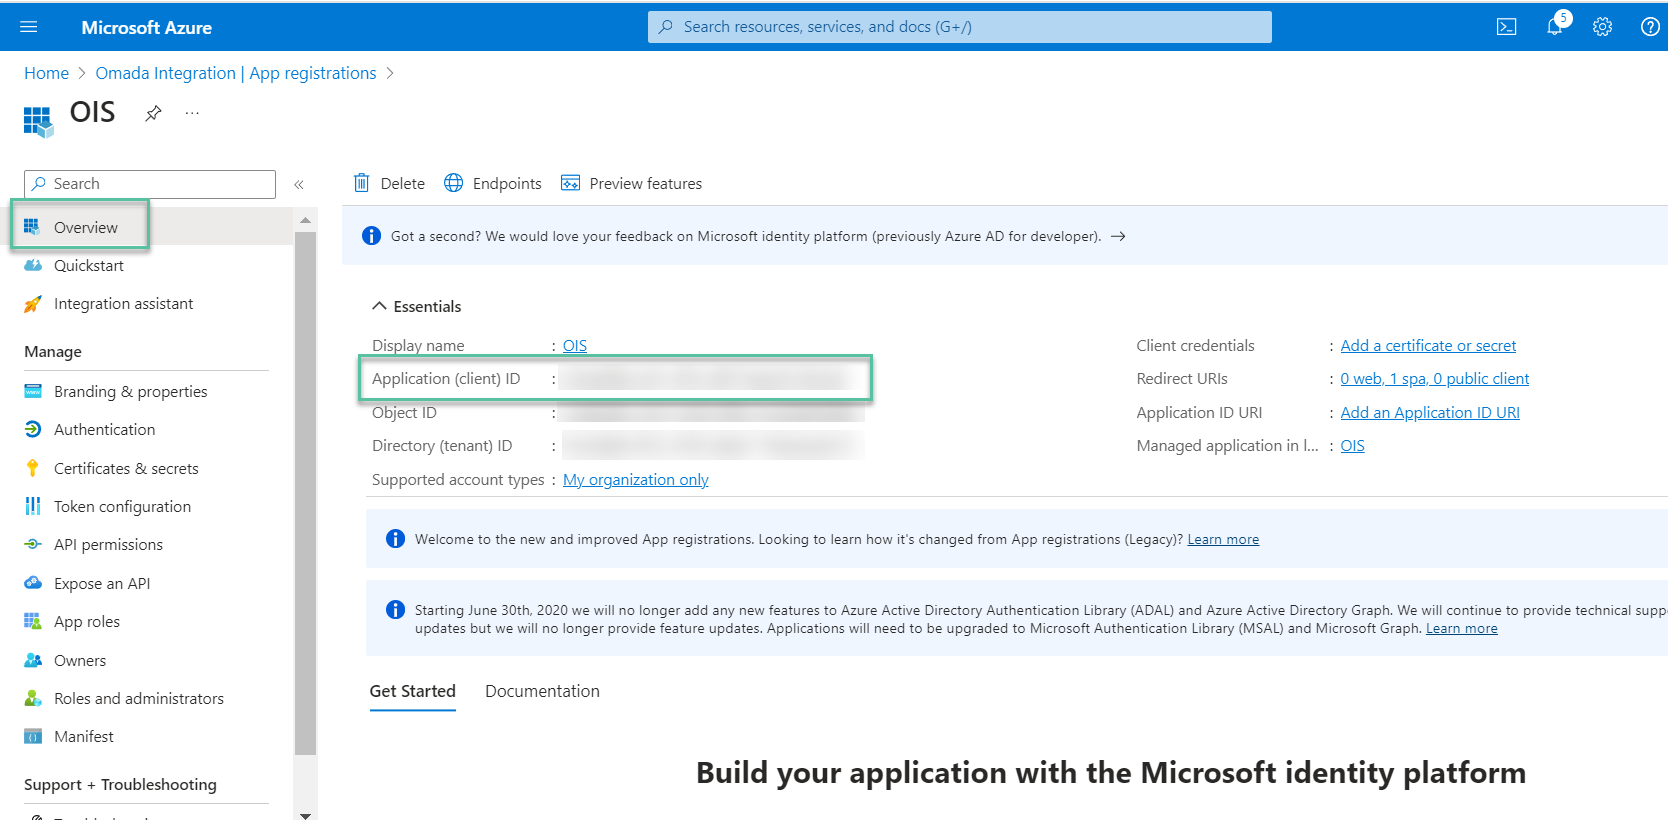
-
Open the application's Overview and copy the Application Client ID. Copy the value into the tblCustomerAuth.IdpAudience field in the Omada Identity database.
 info
infoThe ResponseType column in the tblCustomerAuth table determines which
response_typevalue is sent in the OpenID Connect authorization request.-
0indicates theid_tokentype, facilitating Implicit Flow. For more information, refer to the OpenID documentation. -
1indicates thecodetype, enabling the highly secure Authorization Code Flow. For more information, refer to the OpenID documentation.
The flow used is determined by the
response_typevalue contained in the OpenID Connect Authorization Request.When the code response type is used, then, the Proof Key for Code Exchange (PKCE) is enabled. If PKCE is not supported, the code flow is disabled.
-
-
Go to the list of registered applications and click Endpoints. Find the OpenID Connect Metadata document, and copy this value.
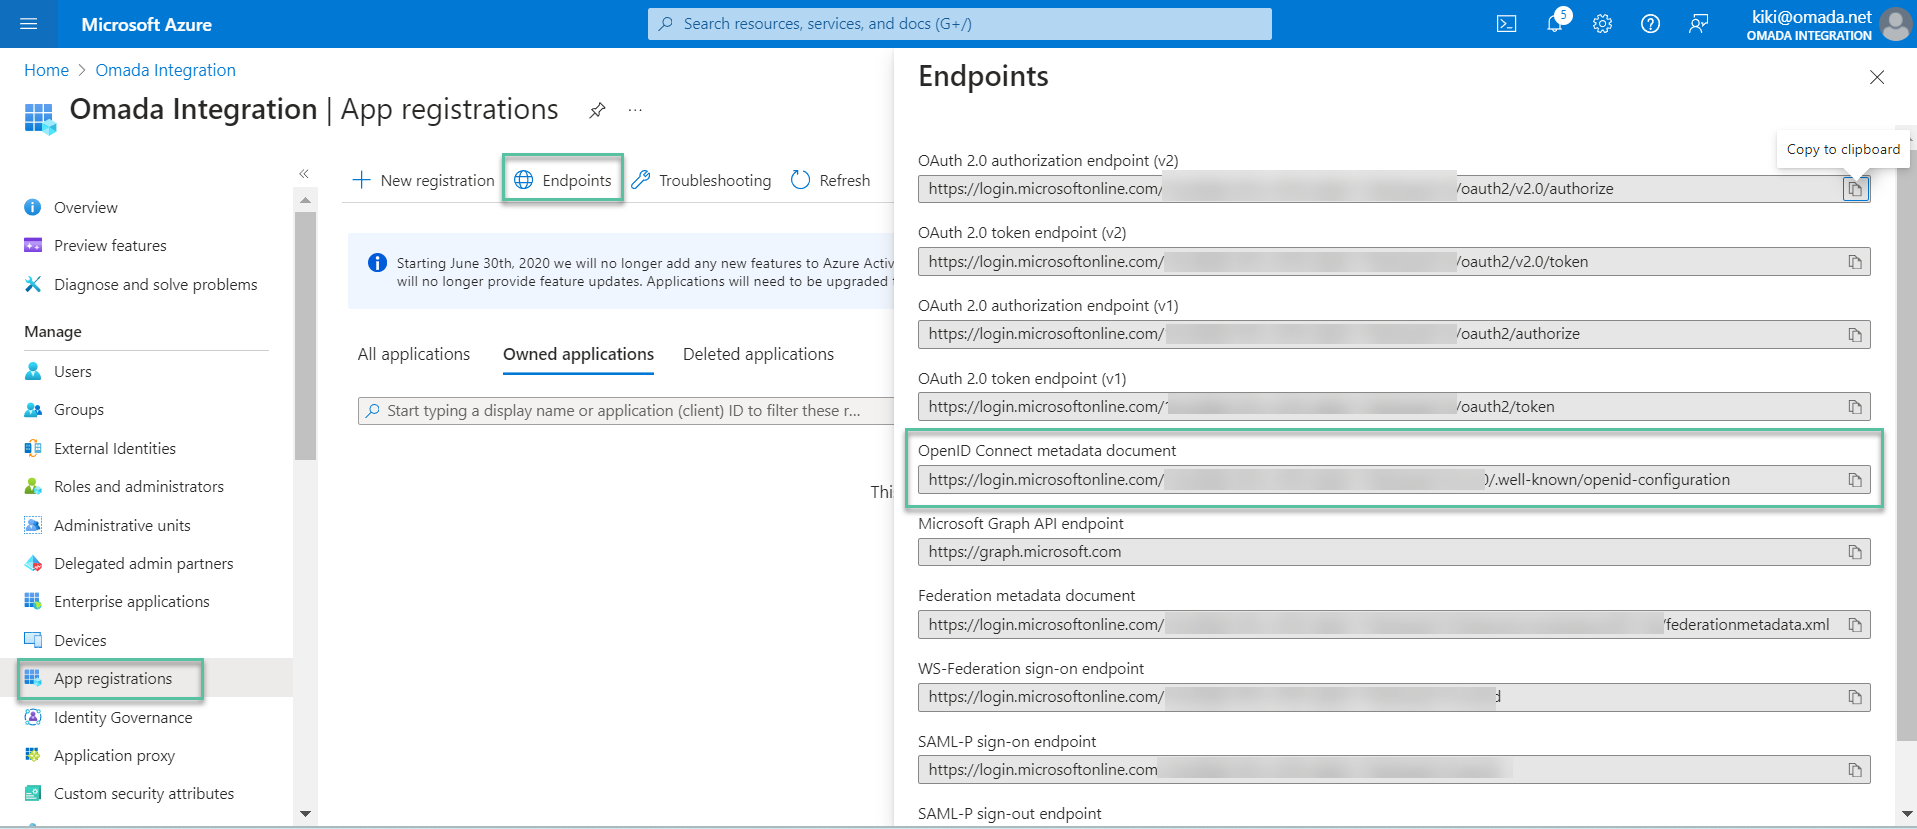
-
Paste the copied value into tblCustomerAuth.IdpEndPoint.

-
For the OAuth concept to work, edit the Manifest of the main Application registration. To do that, in the left pane, select the Manage drop-down item. Then, select Manifest > Microsoft Graph App Manifest (New).
Inside this tab, you can either edit the manifest in a web-based editor or download it, edit it locally, and then upload it again. Set the
requestedAccessTokenVersionto 2 and save the change: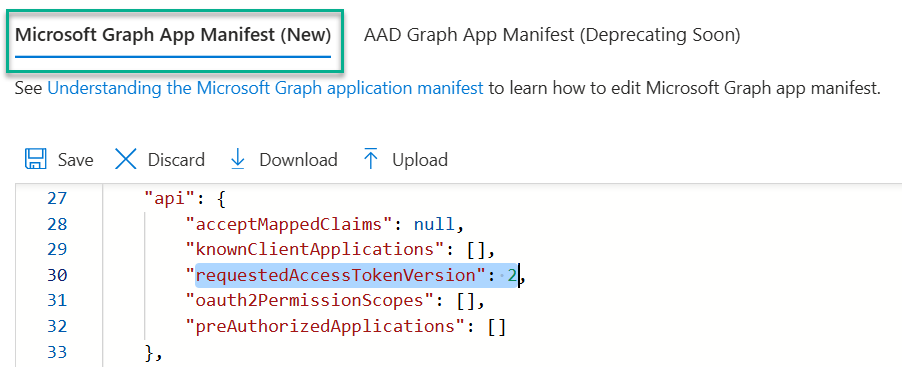 tip
tipTo learn more about configuring the manifest, visit Configure the Microsoft Graph app manifest.
Configure an application to expose a web API
By registering your web API and exposing it through scopes, you can provide permissions-based access to its resources to authorized users and client apps that access your API.
Prerequisites
- You already have a web API that you want to expose to other users/applications.
- You want to control who can access your API and what they can do with it, for example: which resources they can access and what operations they can perform.
- You want to use Microsoft Entra ID to authenticate users and client apps that access your API.
- You want to use Microsoft Entra ID to issue tokens that grant access to your API's resources.
- You want to use Microsoft Entra ID to manage the identity and access of users and client apps that access your API.
Register the web API
To provide scoped access to the resources in your web API, you first need to register the API with the Microsoft identity platform.
- Go to the Azure portal and sign in.
- In the portal's navigation panel, select Microsoft Entra ID.
- Register a new application:
- Select App registrations > New registration.
- Type the name of the web API you want to expose.
- Select the supported account types for the API according to your requirements.
- Single tenant – includes the accounts in your organizational directory only. Select it if you want to restrict access to the users in your organization.
- Any Azure AD directory – Multitenant – includes accounts in any organizational directory (that is, any Azure AD tenant).
- Any Azure AD directory – Multitenant and personal Microsoft accounts – includes accounts in any organizational directory (Azure AD tenant) and personal Microsoft accounts.
- Personal Microsoft accounts only – includes personal Microsoft accounts.
You can skip the following sections:
- Add a redirect URI – you do not need to configure a redirect URI for a web API since no user is logged in interactively;
- Configure platform settings;
- Add credentials – your API would need its own credentials only if it accessed a downstream API.
Add a scope (Configure permissions for your Web API)
The code in a client application request permission to perform operations defined by your web API by passing an access token along with its requests to the protected resource (the web API). Your web API then performs the requested operation only if the access token it receives contains the scopes required for the operation.
First, follow these steps to create an example scope named Employees.Read.All:
-
Sign in to the Azure portal.
-
If you have access to multiple tenants, use the Directory + subscription filter in the top menu to select the tenant containing your client app's registration.
-
Select Microsoft Entra ID > App registrations, and select your API's app registration.
-
Select Expose an API > Add a scope.
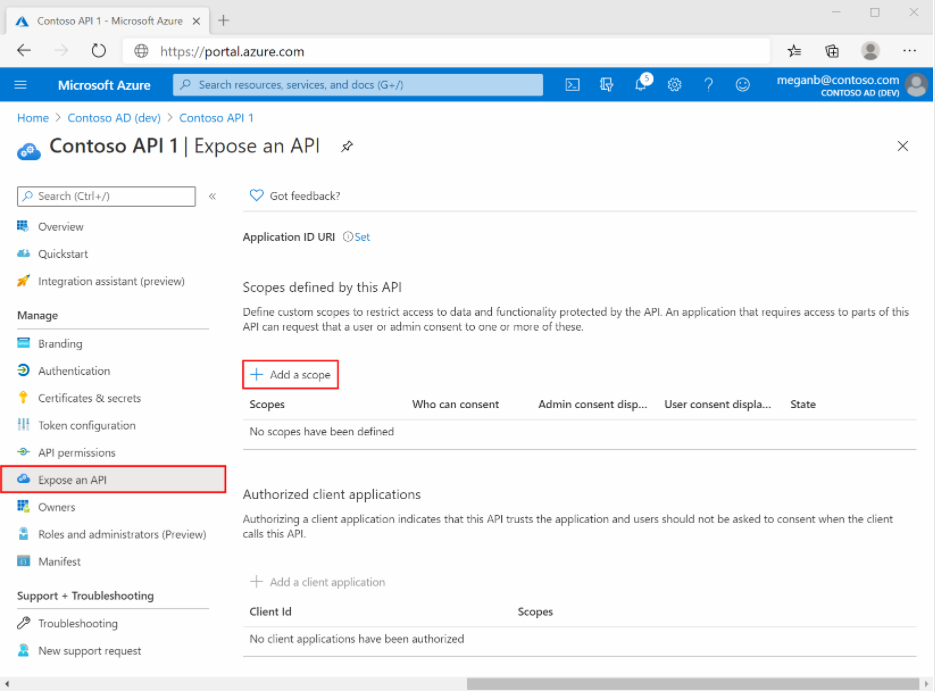
-
You are prompted to set an Application ID URI if you haven't configured one yet.
-
Next, specify the scope's attributes in the Add a scope pane. For this walk-through, you can use the example values or specify your own.
| Field | Description | Example |
|---|---|---|
| Scope name | The name of your scope. A common scope naming convention is resource.operation.constraint. | Employees.Read.All |
| Who can consent | Whether this scope can be consented to by users or if admin consent is required. Select Admins only for higher-privileged permissions. | Admins and users |
| Admin consent display name | A short description of the scope's purpose that only admins will see. | Read-only access to Employee records. |
| Admin consent description | A more detailed description of the permission granted by the scope that only admins will see. | Allow the application to have read-only access to your Employee records. |
| User consent display name | A short description of the scope's purpose. Shown to users only if you set Who can consent to Admins and users. | Read-only access to your Employee records. |
| User consent description | A more detailed description of the permission granted by the scope. Shown to users only if you set Who can consent to Admins and users. | Allow the application to have read-only access to your Employee data. |
-
Set the State to Enabled, and then select Add scope.
-
(Optional) To suppress prompting for consent by users of your app to the scopes you have defined, you can pre-authorize the client application to access your web API. Pre-authorize only those clients applications you trust since your users won't have the opportunity to decline consent.
- Under Authorized client applications, select Add a client application.
- Enter the Application (client) ID of the client application you want to pre-authorize.
- Under Authorized scopes, select the scopes for which you want to suppress consent prompting, then select Add application.
infoIf you followed this optional step, the client app is now pre-authorized client app (PCA), and users won't be prompted for their consent when signing in to it.
Add a scope requiring admins consent
Add another example scope named Employees.Write.All that only admins can consent to. Scopes that requires admin consent are typically used for providing access to higher-privileged operations, and often by client applications that runs as backend services or daemons that don't sign in a user interactively.
| Field | Example value |
|---|---|
| Scope name | Employess.Write.All |
| Who can consent | Admins only |
| Admin consent display name | Write access to Employee records. |
| Admin consent description | Allow the application to have write access to all Employee data. |
| User content display name | None (leave empty) |
| User content description | None (leave empty) |
Verify the exposed scoped
If you have successfully added both example scopes described in the previous sections, they will appear in the Expose an API pane of your web API's app registration.

As shown in the image, a scope's full string is the concatenation of your web API's Application ID URI and the scope's Scope name.
For example, if your web API's application ID URI https://contoso.com.api and the scope name is Employess.Read.All, the full scope is: https://contoso.com/api/Employees.Read.All.
In some cases, it may happen that the access token returned from Microsoft Entra ID contains a different issuer claim (sts.windows.net) than the one defined in the OpenID metadata document (login.microsoftonline.com). To mitigate this, you need to add the application scope. To do so:
- Click Application ID URI on the application screen.
- Add the scope using the format:
api://{application id}.
Now, when making a token request, you need to set this value in the scope parameter: api://{application id}/.default.
Assign users to an application
Prerequisites
To assign users to an app that you added to your Microsoft Entra ID tenant, you need:
-
An Azure account with an active subscription.
-
One of the following roles: Global Administration, Cloud Application Administrator, Application Administrator, or owner of the service principal.
-
Optional: Completion of View your apps.
-
Optional: Completion of Add an app.
-
Optional: Completion of Configure an app.
Use a non-production environment to test the steps in this section.
Assign users
Follow these steps to assign users to an application:
-
In the Azure portal, select Enterprise applications. Then find and select the application you want to configure.
-
In the left navigation menu, select Users and groups.
noteSome of the Microsoft 365 apps require the use of PowerShell.
-
Select the Add user/groups button.
-
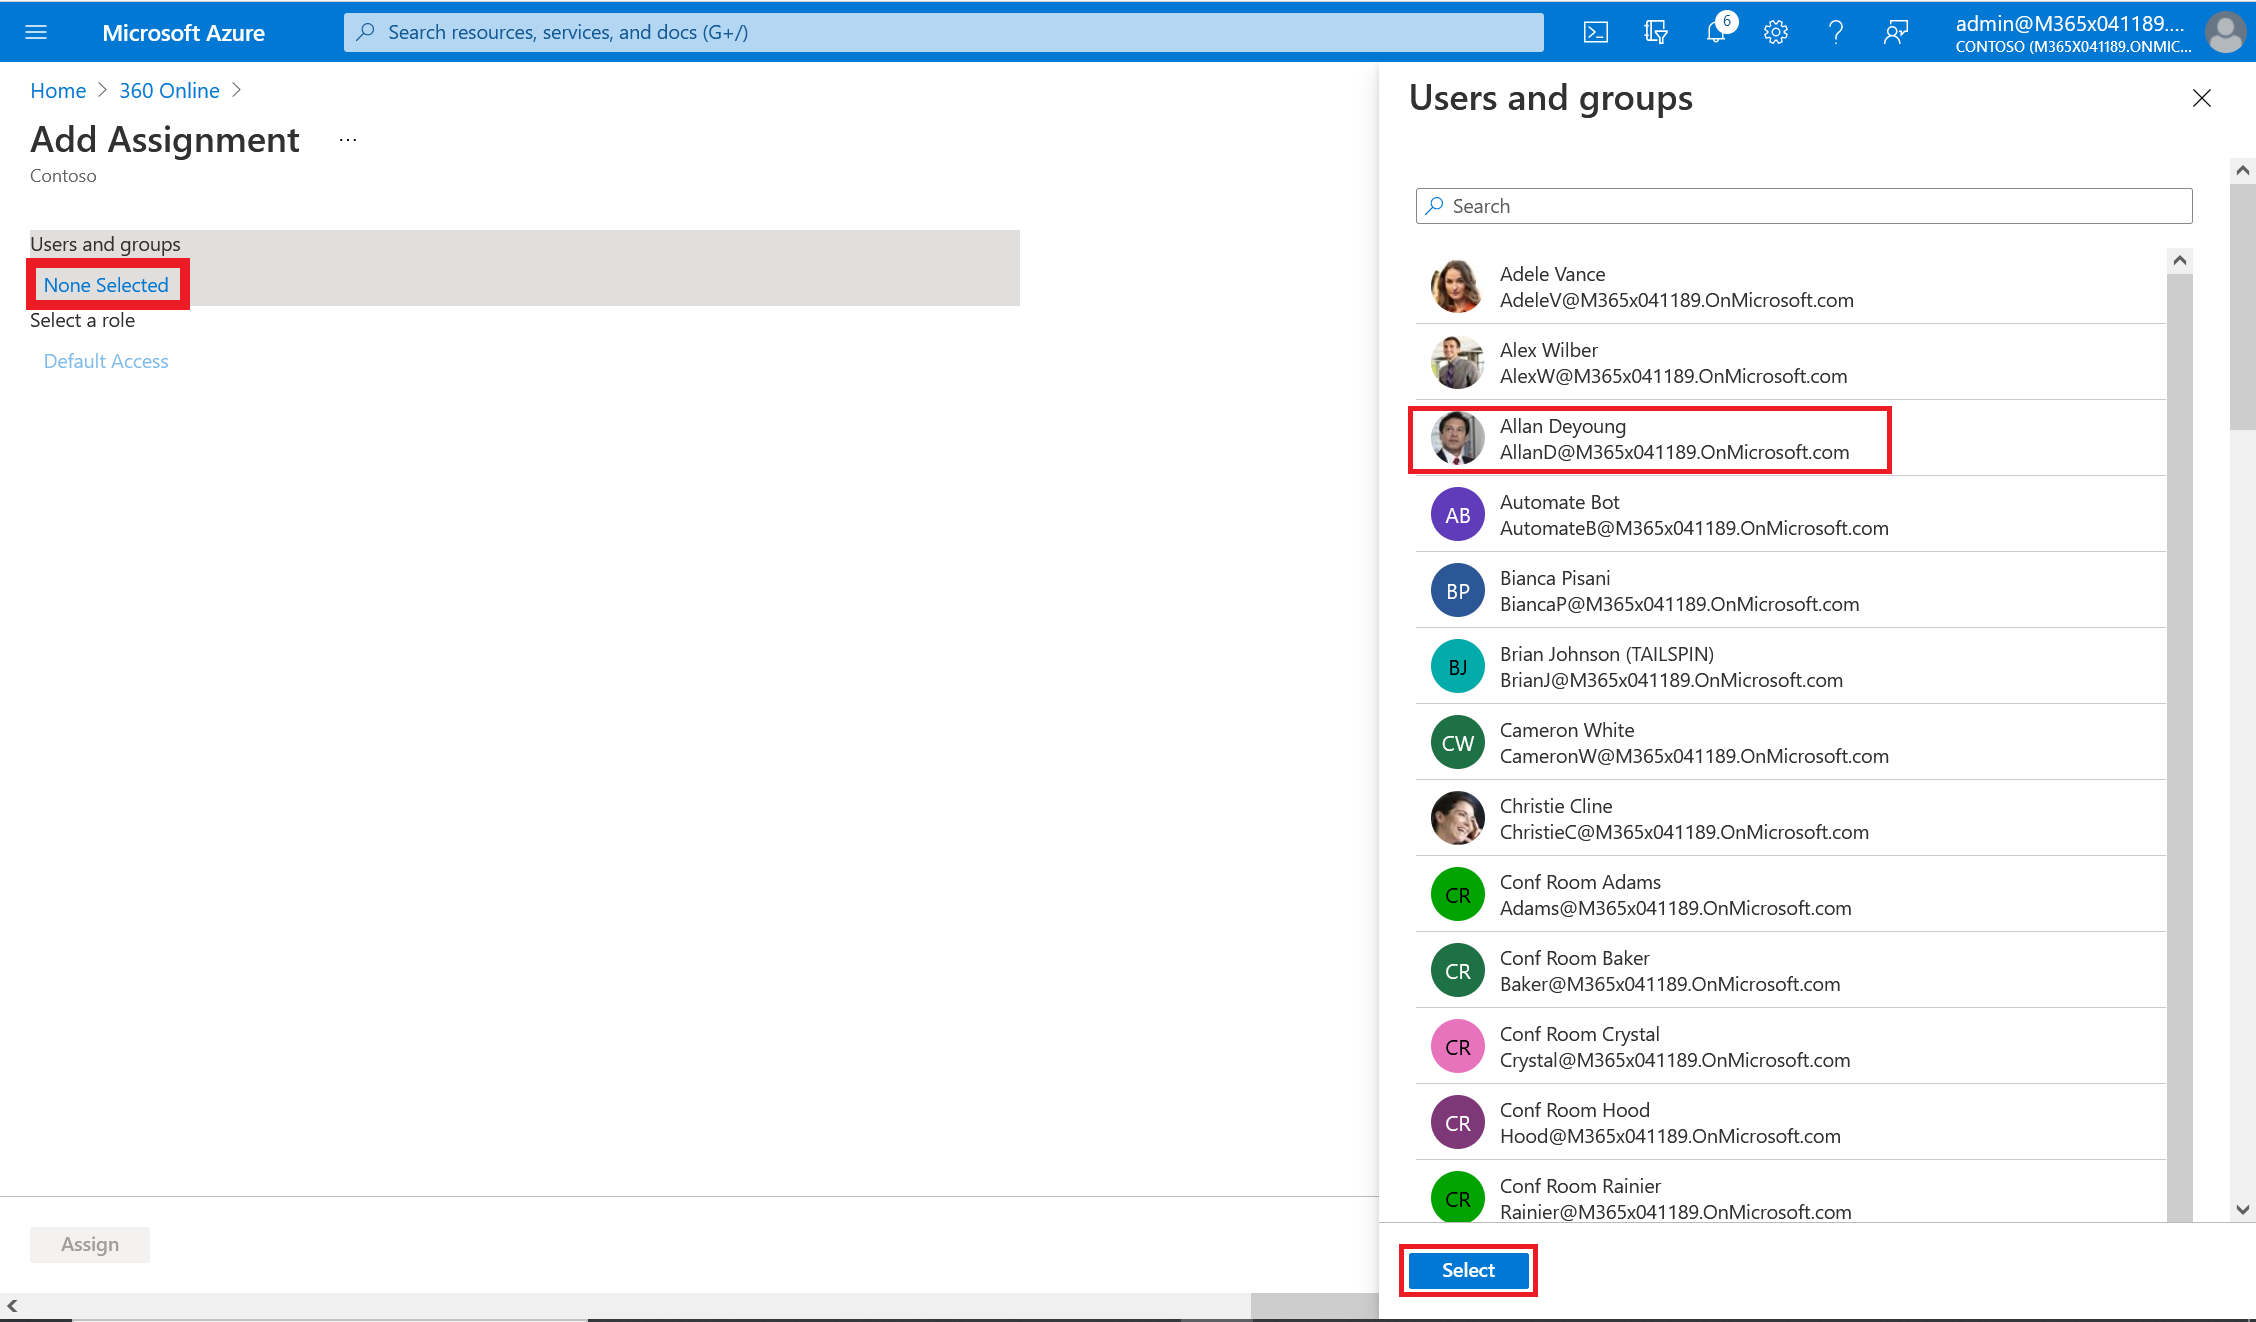
On the Add Assignment pane, select Users and groups.
-
Select the user or group you want to assign to the application. You can also start typing the name of the user or group in the search box. You can choose multiple users and groups, and your selections will appear under Selected items.
infoWhen a group is assigned to an application, only users in the group will have access. The assignment does not cascade to nested groups.
noteGroup-based assignment requires Microsoft Entra ID Premium P1 or P2 edition. Group-based assignment is supported for Security groups only. Nested group membership and Microsoft 365 groups are not currently supported. For more licensing requirements for the features discussed in this section, see the Microsoft Entra ID pricing page.
-
When finished, click Select.
-
On the Users and groups pane, select one or more users or groups from the list and then click the Select button at the bottom of the pane.
-
If the application supports it, you can assign a role to the user or group. On the Add Assignment pane, click Select Role. Then, choose a role to apply to the selected users or groups, then click OK at the bottom of the pane.
noteIf the application does not support role selection, the default access role is assigned. In this case, the application manages the level of access users have.
-
On the Add Assignment pane, click the Assign button.
noteYou can unassign users or groups using the same procedure. Select the user or group you want to unassign and then click Remove. Some of the Microsoft 365 and Office 365 apps require the use of PowerShell.